The droids are rebelling! To stop them, head to the fleet's Gav Daragon ship, where you will find the little droid L3-V5, who will send you to the planet Zadd to put down this rebellion and prevent all the droids in the galaxy from turning against their masters.

Presentation
You'll find plenty of droids in this Flashpoint. The followers of recovery will rub their hands. Six bosses await you:
Pathway
Bonus quests will enhance your journey, with a bonus boss for the stage one:
- Step 1 : Destroy the droids (/ 50)
- Step 2 : Destroy the droids (/ 50)
- Step 3 : Destroy the replication modules (/ 8)
- Step 4 : Destroy the Replicator Droid
- Independent bonus :
- Destroy transceivers (/ 5)
- Destroy thermal sensors (/ 8)
Detector

Point of view : 146 670
capacity :
- Ion Cell: Deals more damage to nearby targets
- Interruption; he has the annoying habit of interrupting from time to time
- Reconstruction: Detector repairs itself, regaining health
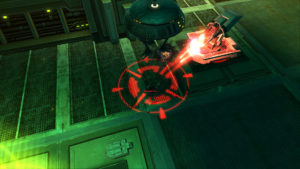
Not much to say, take out the two turrets that come out first, then focus on the boss.
Once defeated, move forward, and destroy the stock of missiles to explode the fence and be able to pass.

Mentor Assassins
After a discussion with a strange ally, three droids await you firmly.

Point of view : 45 each
capacity :
- Accurate Shot (Left Droid): A single spellcasting shot that deals damage
- Charged Burst (right droid: a single spellcasting shot that deals damage
- Cone Attack (Middle Droid): An attack in front of him, which deals damage to those in the cone
These three droids have two shields, which they take turns. One (blue) greatly reduces damage received, and the other (orange) reflects it back. No surprises therefore, you will have to attack each time the one who does not have a shield. The cycle to hit them is quite simple, because always the same:
- Center droid
- Left droid
- Right droid
- Center droid
- etc, etc

Interrogator

Point of view : 99 765
capacity :
- Attack of the clones: Regularly, Interrogator will randomly spawn clones of one of the players in the group, in one of the compartments to the left or to the right of the boss. These clones have some emblematic attacks of your class, and are to be eliminated as soon as possible. They are still quite strong. During this time, Interrogator is invulnerable for about fifteen seconds, but does not attack.


The strategy is therefore simple: eliminate the clones quickly, then inflict maximum damage on Interrogator when he is no longer under his shield.
Rampart

Point of view : 265 375
capacity :
- Rafale Rempart: A simple burst of fire in a row on the target
- Bulwark Shock: A stun, followed by a projection on the target
New original strategy for this boss. Indeed, you can see on each side of the consoles, which activate once the fight has started. From the start of the fight, you will have to click on them to destroy them, and thus explode the shield that protects Rempart. He will then be vulnerable. But that's not all, because regularly, astromechanical droids will come out of the elevators to the left and to the right, to repair the consoles. They will have to be prevented at all costs, otherwise Rempart will recover his shield, and the consoles will have to be destroyed again.

Small droids are vulnerable to stun and throw, so feel free to use them. The recommended technique? The Tank is placed with its back to the back door, so as not to be hampered by the projection. The two DPS are placed on either side of the boss, on a console, which they destroy as soon as possible. Their role will then be to prevent the little droids from repairing their console.

Assembler

Point of view : 62 390
capacity :
- Two turrets accompany it (22 hp), which it will be better to eliminate first
- Grappin
Two techniques are available to you. If you judge the group capable of holding out, you can do as normal, and you take care of the turrets, then the boss.
If you prefer to ensure the shot, you can bring the boss by hiding behind this crate, at the back (well hide behind, otherwise he will not come).

You will have plenty of time to eliminate it without being bothered by the turrets. And you will just have to take care of them afterwards.
Boss bonus: Droid Replicator
At this point in the instance, you should have completed the bonus quests. You can therefore face the bonus boss of the instance. A boss who is also quite original.

Point of view :
- First form: 75 832
- Second form: 22
- Third form: 3
capacity :
- He doesn't really have any abilities to speak of. Its originality comes from its way of multiplying when it has received a certain amount of damage. In its first form, it multiplies into three smaller droids, which in turn will morph into four even smaller droids.
The technique will therefore be to avoid being overwhelmed by the droids. So start with the big one, then once the three means arrive, eliminate only one. Wait for the little ones to arrive, and screw them up.


Chain on one of the two remaining mediums, and continue with the four small ones, and so on.
Mentor

Point of view : 42 029
capacity :
- Mentor's Claw: A claw that targets a random player, and who will follow him. If you are the target, run without stopping, if you stay more than a second in the red zone at your feet, you will be hot!
- Missiles: Green areas will also appear on the ground from time to time, after deactivating a core. Avoid these areas, it's better.
 Handles
 Missiles
This boss is broken down into several stages, the objective of which each will be to deactivate one of the cores (the kinds of towers that spin) to remove Mentor's protection and be able to eliminate him. At each completed phase, one of the nuclei will be vulnerable and it will be necessary to quickly go over it to deactivate it (two turrets appear, it is better to deactivate the ray first, then take care of the turrets).

Phase 1 : Two turrets will appear to the left and right of Mentor, each with 22 hp. You can position yourself this way to prevent the second from attacking you:

As soon as the two turrets are eliminated, a core will be vulnerable.
Phase 2 : A droid appears in the middle, which will have to be exploded.

Once removed, a kernel will be deactivatable.
Phase 3 : like phase 1
Phase 4 : like phase 2
After all four cores are deactivated, Mentor becomes vulnerable and you can hit him. Be careful though, because it remains quite formidable, especially because of its claw which is always there to annoy the world, and its laser beam which can hurt a lot. The Healer may need to be vigilant. Do not hesitate to launch defensive powers on this phase.