Different from the first floor, the second does not include any trash monster. The big difference is that you will have to kill some balls (similar to those on the first floor) to get to the boss of the instance: ADS.
Note that a minimum ilvl73 is required to enter this second floor.

Destroying the spheres will have two consequences on the final boss. It will take away a skill but it will will add either a power bonus or a resistance on some type of damage. It exists 6 balls that can be killed. Let's see the sectors in more detail.

- Sector 1 :
- Skill gained: increased physical damage
- Ability lost: none
- Sector 2 :
- Skill gained: resistance to cutting edge increased
- Lost Skill: Chain Lightning
Aptitude lightning chain is not one of the worst aptitudes that ADS could benefit from. This will take away from the boss a source of regular damage on the group which relieve the group's healers.
- Sector 3:
- Skill Gained: Magic Damage Resistance
- Lost Ability: Star Fire
Aptitude star fire is one of the skills really annoying in this kind of fight. Like the Titan landslide but multiplied by 6, this one will inflict on you in addition to the damage undergone, if you are touched, a periodic spell of fire type removing you points of life regularly. Given the area covered by this ability and the resulting damage, if you are hit, it is one of the skills to remove.
- Sector 4:
- Skill Gained: Knock Resistance
- Ability lost: attack at 270 °
As the name suggests, it is a 270 ° attack. For distance, this attack has very little interest. However, for melee characters, it's the other way around. This attack is divided into 3 stripes of circles. Each circle strip you will push back in the next band. If you are in the 1st band next to the ball, you will be thrown into the next band and so on. Result, great damage or even death if you are hit. To avoid this, there are two solutions: get out of the 3 bands as quickly as possible by running far or stay within the 90 ° free range. In conclusion, it is one of the authorized to remove for ADS.
- Sector 5:
- Skill Gained: Blunt Damage Resistance
- Lost Ability: Purple Zone
Classic mechanics, the ball will appear purple areas at regular intervals. They don't do a lot of damage on their own but land the player hit with a slow-down which can be fatal on another more problematic attack.
- Sector 6:
- Skill gained: haste
- Lost ability: rot
Theoretically, this ball is not to do in the classic strategy because in a classic composition with 2 healers, the haste bonus inflicts too much damage on the group of players.
Aptitude Rot is THE mechanics of the boss. She makes a curse appear  that one must pass on to one's teammates before the countdown. Yes the arrives at 0, we can say that you are rotten but above all that you die instantly.
The thing to know about this one is that taking rot from another player, this one gets a "penalty"  who theprevents to have this rot before 40 seconds. It will therefore be necessary to organize and give an order of passage / placement to the group so that everything goes well.
Now that the spell theory is over, let's get down to business! Regarding the path taken for the explanation of the strategy, I will use the most common path namely:
Sector 1> Sector 2> Sector 3> ADS
spheres
Resembling the sphere on the 1st floor, the spheres, just like the final boss, have quite similar mechanics. Here is a reminder:
- Repellent cannons : zone attack around the sphere. In terms of damage, this mechanic doesn't do a lot of damage. You should still try to avoid it, especially since it is not very complicated because the area created is quite small. The tank with the sphere can stay in it to avoid losing aggro.
- High tension : area attack targeting the whole group and inflicting the hex Paralysis. Fortunately, this spell can and must be interrupted. Normally, the majority of groups use a Bard and a Paladin for this mechanic. In pick-up groups, since vocal is not often required, you can use a macro like:
/ macroicon "Traumatic Arrow"
/ ac "Traumatic Arrow"
/ p Silence target
- The spheres also have the particularity of placing a spell
 increasing damage to the target. From a certain number, it becomes unmanageable to hold for the healers. This is why tanks must exchange the sphere every 3/4 power charges on them. For greater ease, tanks must be equipped with the Taunt spell to facilitate this task.
There are then special attacks depending on the sphere you will encounter. Here in this guide we are going to have the following spheres:
Surveillance sphere
No special technique on this sphere. It is also the moment when the group will be able to take these marks for the High Tension and on the tank exchange.
Protection sphere
Little difference to the first sphere, apart from some more damage to ranged characters
Incineration sphere
As said before, you will have to pay attention to the star fire spell. This inflicts heavy damage on 5 lines starting from the sphere. Must be avoided.
After these 3 spheres, direction ADS!
ADS
The big difference between spheres and ADS: the size! But as the saying goes, it's not the size that matters. Regarding ADS, he will keep the basic skills of the previous spheres and he will add one more which is a straight line zone attack like the one present in the 1st floor. Of course, it should be avoided on pain of almost certain death.
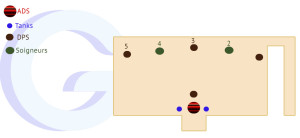
As explained above, it will be necessary to use a specific placement during the fight to easily skip the skill. decay of the boss while avoiding stepping on each other. There are a multitude of placements but, for my part, I recommend an placement like this:
La second phase reaches 75% of life. This is when the Spell Rot comes into play. It will therefore be necessary to ensure the rotation between the players in an optimal way. Most of the players give rot when it remains 5 seconds on this one. It exists two strategies concerning rot:
- Everybody give rot to the next player
- The pivot player between the two healers must fetch the rot from the healer in 2 and give it to the healer in 4.
It will be necessary that the nobody in 5 be careful à do not give rot to players who are at body to body. Normally, players in 2/3/4 position should not be able to pick up rot as they will have the 40 second hex that prevents them from picking up it while it is active.
Arrive third phase at 50% with the absorption of a new sphere and therefore the appearance of purple areas. This new mechanic is not that much of a problem. The only problem arises if you are affected by the purple area and that, at the same time, you have rot : you will put more time to give it to a team-mates. Be careful under your feet and, if necessary, take into account that it will take a few more seconds if you are hit.
Finally, the last phase and the absorption of the last sphere of power, ADS will gain the skill 270 ° attack. As said previously, you will have to try to stay either within 90 ° of free space, or to run quite far. I advise tanks to stay against a wall so that they are thrown against and not across the room. Think of use your offensive cooldowns as well as the transcendence to finish the boss as quickly as possible.
Loots Bahamut 1st floor
Tank Equipment:
- Allagan Plate Belt
- Heavy Allagan Legs
- Allagan Protector's Earrings
- Allagan Ring of Protector
Healer Equipment:
- Allagan Tiara of Healing
- Allagan Boots of Healing
- Allagan Choker of Healing
Melee Equipment:
Dragon Knight
- Allagan Gauntlets of Slaying
Monk:
- Allagan Gauntlets of the Aggressor
Common accessories:
- Allagan's Earrings of Aggressor
- Allaganza Choker of Felling
Bard Equipment:
- Allagan Visor of Aiming
- Allagan's Earrings of Aiming
Mage / Summoner Equipment:
- Tongue of Enchanter of Allagogue
- Allanteis Enchanter's Gloves
- Allagan Boots of Casting
- Allagois Charming Bracelets