The fight takes place in several phases and once all understood it is really not that complicated (especially with the echo).
Phase 1
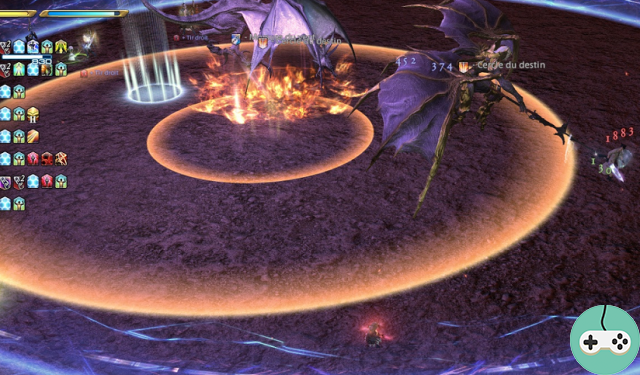
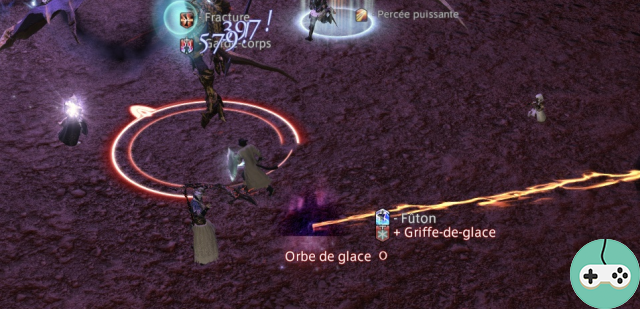
The tank will place the boss back to the raid (to the North), the melee will separate if possible (one to the right and one to the left) and stay within maximum range (outside the boss's circle) to avoid taking the area. around the tank that I explain later. As for the rest of the distant (healers and mages or bards), they will be placed in a circle around the room within maximum range of the boss.
Boss techniques during phase 1
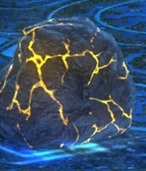
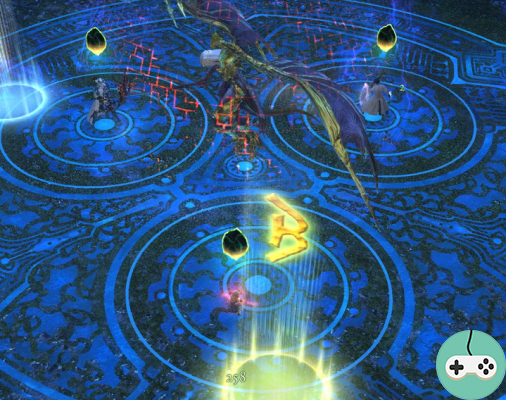
Meteorites
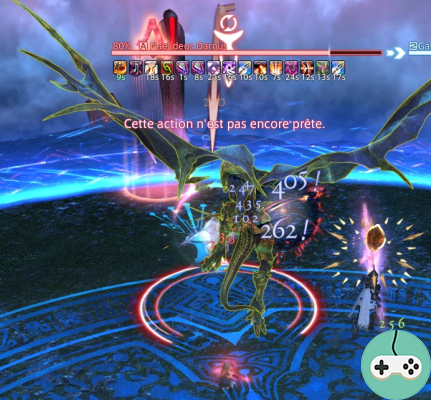
A symbol will appear above a player other than the tank, this one will have to be placed against the circle of the edge of the room but without touching it (if you touch the circle you will die). Once the symbol disappears move away quickly so as not to take the meteorite in the face. In addition, be sure to space them apart because if two meteorites are too close they explode and it is a defeat for your group (the meteorites can be red or yellow but that does not change anything).
The red mark
The boss will place a red mark above a member of the group who will have to stand in the middle of the room and the others will have to regroup on him to absorb the damage. Note that if you are far from the middle at the beginning it is because during this mark the boss will jump on a member of the group to make an area that pushes you back and hurts a lot. So you should not place this area in the middle (if that happens adapt but regroup well). Watch out for melee at the end of this mark the boss lands on the tank and it hurts so wait before rushing in melee.
The dynamo:
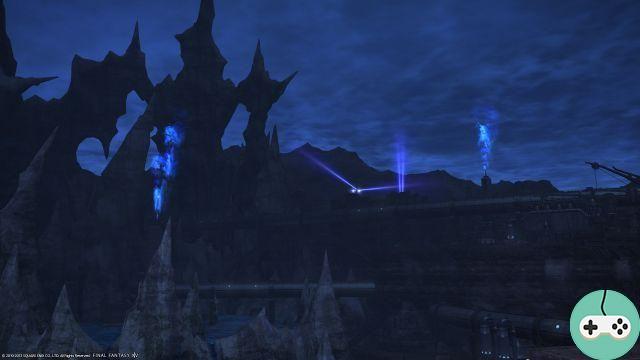
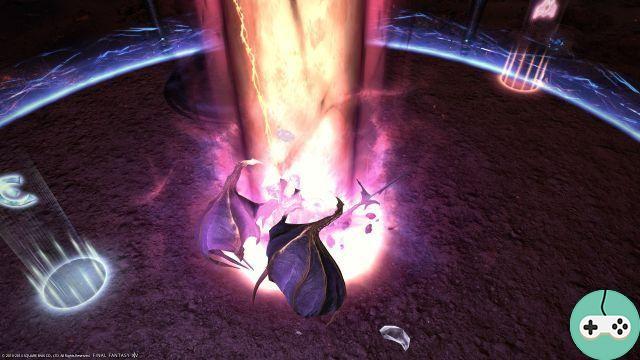
The boss will launch an attack which affects a large area around him, the damage done is given back to him in the form of life points. To avoid this area you must either be in close combat or at maximum distance. Be careful not to take it under the risk of dying and in addition to heal the boss (we see the dynamo and the white pikes on the screenshot below).
The dives:
The boss will fly away and put white marks above some players. After a while he dives on those and does area damage around those players, get away from each other (setting a placement early can help). Be careful, the boss can perform this dive twice (explanations later).
Dot on the tank:
This Dot will explode at the end of its duration and cause a damage zone around the tank, so be careful not to stay close to it. This is why melee remains outside the boss's circle or at maximum range. Also during the passage in phase 2 the tank must be careful not to kill a member of the group during its movements if the Dot is not finished. This dowry comes with the attack of the boss "Bird of prey".
For the healers:
The tank is going to be very expensive when the boss makes Bird of the Raptor so if possible put him a breastplate or a scholar's shield.
For those who like to anticipate and know the "pattern" or order of the boss's spells, it is:
Meteorite <Red Mark <Beak of the Raptor <Meteorite <Dynamo <Pique (only one) <Beak of the Raptor <Meteorite <Pique (here it will make a double on some players so be careful) and so on ... (Knowing that depending on your damage this may change a bit).
That's it for phase 1, so not that complicated, right?
Phase 2
The boss flies away, three people in your party (the tank can be targeted) will have green marks above their character, you will have to stand in the middle of the circles on the ground (the three drawn on the ground). And, as with the meteorites in phase 1, once the green symbol is gone, you have to step aside.
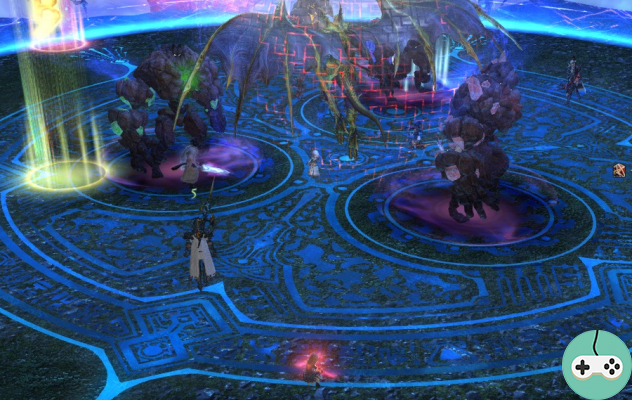
These meteorites will reveal 3 golems, one red, one blue and one green. They should not come close to each other. Green will be tanked by your MT1. Blue by your healer or your MT2 (often there is only one tank). And the red by a bard if possible or a ninja finally someone who takes it and who can silence.
Each golem has special abilities:
- the green does a damage cone in front of him so no one should be in front except the tank.
- the Red Throws an area away that does damage and places a bleeding debuff as well as a 280 degree area around it that expands (if the healer can knock the golem back during this spell it will be interrupted).
- the most important remains blue which will do Earthquake which causes paralysis on everyone but can be silenced so don't let this golem do it!
Knowing that in the end, all meteorites must be eaten by golems and that each golem must not eat more than 3, it's up to you to manage (to eat them they must come close).
In order : each person having to take a golem, mounts his aggressiveness on it and moves away from the others. The green golem must have fallen very quickly because after a certain time the golems exchange their color, if the green is dead the blue will turn red and the red will turn blue (this usually happens not far from the death of the green and c This is why the bard takes the red when he must silence the blue, the red will turn blue and there is no silence to do before so it's perfect).
Once the green is dead, drop the red that goes or has just turned blue (don't forget to silence it if it makes Seismic Tremor). Finally, switch to red to finish this pack of golems.
Attention do not release the pressure it is not finished, once the dead golems of the meteorites will appear (marks above the members of the group etc…) as with the P1 but in the chain.
To be able to place them at the edge and space them more easily, form groups: the healers in the south the tank and the CàC in the northwest and the distances in the northeast (well, make groups of maximum 3, arrange it). It's complicated on the card but not that much once understood. If you are 3, stand one to the left one to the right and one in the middle while visualizing that the one in the middle will go directly against the edge, the one on the left a little to the left so as not to stick the meteorites and so on. Be careful, the boss being nasty, he can very well target only your group or almost and in this case he will have to adapt.
Once the meteorites are placed, once again, three green marks will appear and the 3 group members will have to place themselves as at the start of P2 and move away. Three new golems (green, blue and red) will appear and this time again you will have to do the same thing as with the first ones, be careful there will probably be more meteorites to eat so watch your DPS.
Here is the mastered P2, a count begins and you will have to place yourself. If you have placed a sign to the east stand on it and the tank must shift so as not to be in the middle of the group. (It's time for the scholar's bubble and the extra-medica).

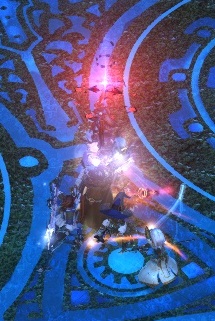
Phase 3
The group will take damage and the boss will fall on the tank. Once the boss has fallen (no one melee on the tank at the risk of taking the fall damage), you can go to the tank, the boss will no longer cleave. Warning, a pillar will fall in the middle of the room and push you back, you must not be in the middle of the room so as not to catch the pillar or be too close to the edge of the room at the risk of being thrown into it and dying. Nothing forces you to stay on the mark (A, B or C) only, be sure to strike a balance, not in the center and not too far from the center of the room.
The pillar will create golden cones, you must not stay in it.
During this phase, you have to do a maximum of damage to the boss to try to avoid a maximum of cycle (he must go under 46%).
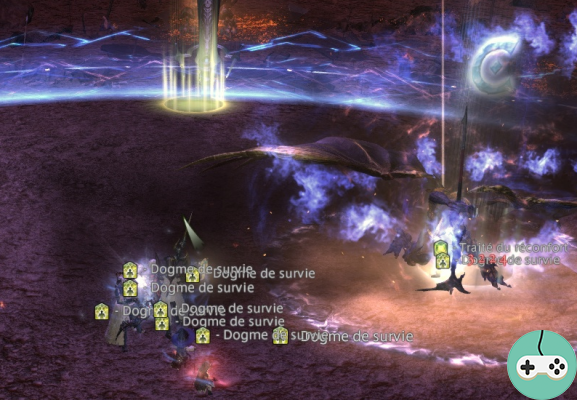
The boss will spawn A dragon which does damage in front of it so the tank must quickly take it and no one must be in front. It must be dropped before the end of its incantation otherwise the players with the golden chains die. When he dies he makes a fairly large area so move away.
This area will show three small white circles on the ground, at the same time the boss will pose a rose debuff on a player who will have to go and remove it by passing in one of these circles, no one else should step on it. After a while another member receives this pink debuff again and has to go and remove it again with one of the circles.
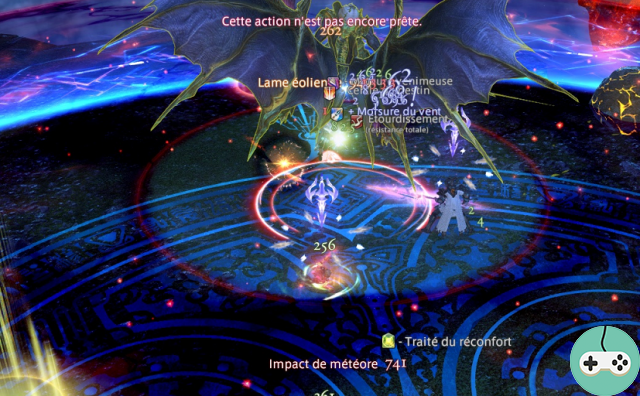
(In the following screenshot you can see the boss throwing a gravitosphere, the golden cones, the pillar, and the white circles that remove the debuff).
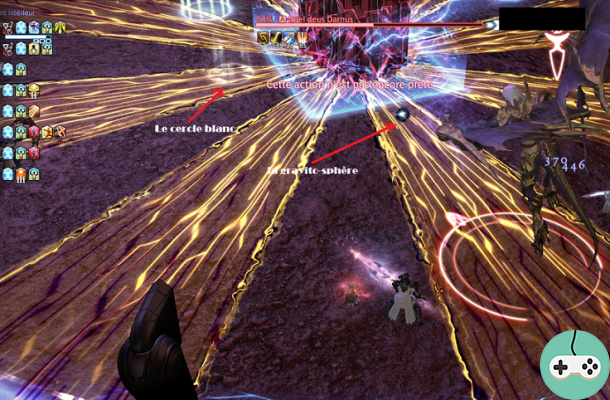
Just behind that the boss drops a pillar again, be careful, the cones are much more distributed this time. And at the same time as these cones the boss throws at random two black gravitospheres on players, this will place a black area on the ground that you must absolutely avoid. Once these gravitospheres are placed use melee transcendence to quickly pass the boss under 46% if you get there it's phase 3 if not a new pop dragon and another pillar and cones much more difficult to avoid.
The 4 phase
Watch out for the transition, the boss will try to kill your tank with a series of deadly blows, hang on to the healers.
This phase remains the most complex to take in hand, but once again nothing very complicated.
The tank will place the boss in the middle of the room and his group will regroup on him (once well in hand, melee can still make their positional, just be careful when fires or lightning and go to regroup for the fire "in", I will explain later).
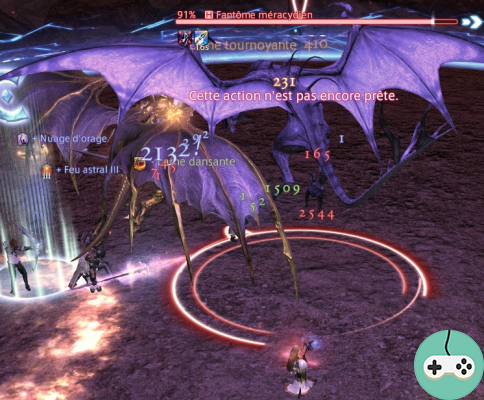
Three dragons will appear, and basically each player will take turns an ice spell which poses a debuff (if you do not pay too much attention it does not matter for this one, if the rest is well done the ice debuff is managed automatically).
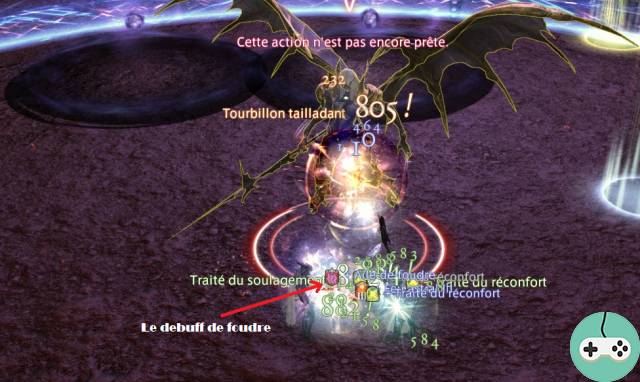
A bond of fire which looks like that of the T8 for example will appear and the targeted one will take a fireball making an area on impact, and finally a lightning debuff (which you must see well to avoid any problems) which explodes and causes paralysis on the limbs affected by that area (except the bearer of the debuff). In the following screenshot we can see the gravitospheres and what the lightning debuff looks like that you need to watch closely.
The fiery link looks like this:
Knowing that no one should be hit by lightning and that the fire removes the ice, and that if you accumulate two debuff of the same type (2 fire or 2 ice) you are dead, there is a very precise cycle that I explain to you at the end.
The first fire must be far from the group since everyone does not have ice yet and the next must be in the middle of the group to remove ice (be careful however who took the first fire if the debuff is not gone he will have to stay away so as not to take the fire debuff twice).
The boss always does the red mark of the P1, the one where you must all be grouped together. As well as the area that pushes back when he jumps on someone.
In addition, it also sends 3 gravitospheres as in P3, and continues to do pique (white) that must be managed as in P1, namely to be separated from each other.
But above all he does two big dives (the green marks as on the T5) but which work unlike the T5, the impact is not where the mark appeared but where it disappears.
Well I admit that it's a lot but by going step by step it comes back promised!
Already to manage green brands, one of your players will have to take care of marking the "dives" as they say. It is often a bard but a mage or summoner will do.
For convenience, the person in charge of it will have to keep the brand tool on the ground open.
Dives marking
Look north, turn your camera clockwise. As soon as you see a dragon, look for the second one and put the A mark between the first two dragons, continue and as soon as you get to the third dragon put the B mark just to the right of it. When placed, the marks are almost opposite each other, not quite symmetrical but almost.
Once the marks are placed, the one with the first green dive goes to mark A and the second to mark B, for even more ease when dives, you can get closer to mark A (remember to look where they are before) and if it's not you, you can go to mark B to be sure you don't take the damage zone. The same with mark B if it is not you, you can go back to A, given that the damage zone of mark A has passed.
Cycle and placement to observe.
Now that you are familiar with the spells, it's time to get down to some practice.
Beginning of P4, the tank is placed in the middle and all the others regroup on it. The first fire arrives and the targeted member goes behind the boss while crossing it (be careful behind but within range of white shots, in fact not too far!). The fire explodes and the boss jumps on someone, regardless of the target you will have to react quickly because the boss will make a dynamo and therefore this time everyone in melee but if you are already grouped it is easy. Knowing that during this dynamo someone will have the lightning debuff and will have to go behind the boss (the one who had the fire will be returned with the group).
Right after that there is a fire which this time will have to affect the whole group, and just after another lightning debuff. The simplest is that the one who has the lightning goes behind and that after the fire says "in" everyone moves away (go towards the edge of the room) during this passage there is another lightning and a fire "Out". The red mark will appear but don't worry, count two black gravitospheres and regroup in the middle (the third will be launched on the path and not in the middle if everyone respects the count). Once in the middle with the tank you will all absorb the red mark and take an "in" fire.
It is the turn of the green dives, do as explained above, be careful during these green dives there are also white ones as in P1 so move aside too.
Once the green dives have passed, the boss falls back on the tank so no one gets close to him until the boss has returned.
If all goes well everyone is alive and there you have a phase of calm, take the opportunity to send the damage and reassemble everyone.
After the calm comes the storm, the boss will still try to kill your tank so a cooldown and hard healing are welcome. And hop we start again from the beginning with the first light “out” and so on. Be careful at the end of this second cycle there are still green dives and this time the placement of the marks will have changed so the bard will have to do it again and the rest will have to look at the placement again. Small detail at the end of this second cycle there will also be another dynamo just after the green dives so stay together in the middle.
With the echo two cycles are enough, just know that three cycles are possible but not four so you have to send to the DPS anyway. Thank you echo!
Here's the T9 in your pocket, for those who play League of Legends: You just killed Galio's wife!