There you have for by pass Titan Brutal. The labyrinth of Bahamut is ready to open its doors to you, but be on your guard for numerous traps waiting for you.
The 1st floor of the labyrinth is broken down into 3 main stages:
- Un mini-boss
- Garbage monsters (known as trash mobs)
- The boss of the 1st floor: Caduceus
Regarding the team first of all, it will be preferable to have 2 damage classes of the distance type including a Bard. You will need a minimum of ilvl70 equipment to enter this first floor, the ClairObscur plus the relic set is really nice to succeed without too much difficulty.
Mini-Boss
First difficulty of the instance, this mini-boss also called The ball or bouboule for close friends. Beware of this one because many groups die believing that it is just a vulgar little monster of nothing at all.
The tank will have to take the ball and place it In front of the wall to its starting location. As of the engagement, the ball will launch a High tension that you will have to interrupt (see explanations below). Whoever has to interrupt it must therefore be within reach.
This will launch a zone attack around her than the tank will be able to dodge to relieve the healers.
The straight line zone attack directed towards the group will, on the other hand to be dodged by everyone under penalty of a heavy penalty (i.e. death) if the affected person (s) do not have good equipment.
After each straight line area attack also called Laser, the ball will cast the spell. High tension which should be automatically broken. This is where the Bard and the Paladin come into play because a rotation of their interrupt spells must be done to prevent the ball spell from being cast. Failure to interrupt this leads to damage to the whole group as well as the spell Paralysis which cannot be removed by the healers. If you are not on Teamspeak or any other voice service, I advise you touse macros to indicate that you have interrupted the spell and that it is up to the other to do the next.
Then, two strategies are possible:
- After first High-Voltage, second tank will have to place at the start of the corridor to take the little ball that will appear. We must keep the two spaced balls so that the large ball does not absorb the small one. The damage classes must be destroy quickly and go back to the big ball afterwards. The White Mage at this time is focusing on healing the second tank.
If the damage is low enough or there were deaths during the fight, there will surely be a new appearance of the small ball. Same strategy, kill her and return to the big ball afterwards. - After first High-Voltage, second tank will have to place at the start of the corridor to take the little ball that will appear. We must keep the two spaced balls so that the large ball does not absorb the small one. The damage classes remain on the boss, while the secondary tank takes care of distracting the little one. A second will appear that the off tank also takes on him. The White Mage is dedicated to healing the offtank. The DPS must come to the end of the boss quickly. This technique is used for players with better equipment.
(Video will be added soon)
After having exterminated the balls as well as the trash monsters littering the instance, you will find yourself in front of the first real boss of the Labyrinth: Caduceus.
Caduceus
Before exposing the different phases of the boss, let's go back to his main mechanics.
In the first place, Caduceus will earn power bonus at regular intervals. From one certain number bonus, it will become Impossible for your healers to hold the tank. To remove Caduceus' bonuses, you will have to make him "eat" a blob.
The second thing to know is that the boss throws a cone shaped zone attack behind him. You can trigger the same behind him if a person is behind his back, of course he should be avoided. Theadvantage to trigger this zone attack behind is relieve care on the tank because Caduceus will not hit it during its area attack.
As said before, for remove a bonus power to the boss, he will have to eat a blob. As you will have noticed, the room is divided into several slabss. A regular interval, some go light up. If you stay on it, a blob will appear next to you. It will take the then go below 50% for it to be eaten by Caduceus. If this is not the case, the boss will be healed up to 10%. Be careful, if you move away too quickly of the blob, this one will explode which will have two major consequences: 1 bonus not taken away from the boss and certainly a few deaths.
You must approach with your blob on a side of Caduceus and especially not in front or behind. Your healer should also be sure to remove the condition from you. Gravity if you have it and throw in a little Recup or Treatise of Comfort.
Sometimes Caduceus is a bit finicky and doesn't eat the blob right away. Jump from one side to the other so that it ends up eating it.
Note that only the one that shows the blob has the threat on it. No one will be able to take it away from him. If a healer inadvertently spawns one, he will have to be killed. Your healer cannot afford a short walk.
Phase 1: A Caduceus
Concerning placement of the tank, it is better that he takes the boss right at the entrance to the arena. This placement will allow the tank to easily change platform if the one it is on lights up. Regarding the rest of the group, he will have to position himself intelligently in the room. Some tips:
- Un DPS distance on starting platform in height in case it lights up
- The healers do not have to not be on the same line platform because if it lights up, there will be no more healing on the tank. This short lapse of time can be fatal.
- Only the DPS distance show the blobs. One blob at a time. If something happens, such as the explosion of the blob, you will need to spawn two next time.
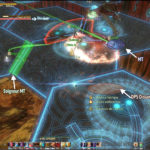 Main Tank, MT Healer and Distance 1 placement
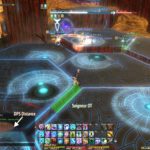 2nd Healer and 2nd Distance placement.
Le but of phase 1 is to do fall Caduceus around 60-65% without this one has no power bonus on it when the boss splits.
Phase 2: Two caduceus are better than one
As if that weren't complicated enough, here you have two Caduceus on your back. Don't panic, by dividing, they also cut their life points by two. First of all, it will be necessary that each boss be placed from each side of the room. The secondary tank will have to provoke the new Caduceus and bring it to the other side of the room. However, some precautions must be taken after this division of Caduceus:
- No one must not be on the road between the secondary tank and the second Caduceus. Indeed, it has the same attributes as the first, namely that it performs an area attack in front of it. It may be that during his journey he makes one. In this case, if you are in front, I do not give much of your skin (a few gil no more at the auction house).
- The healers at least that of the secondary tank do not have to heal for about 4/5 seconds. This time is necessary for the second tank to have time to build up its animosity.
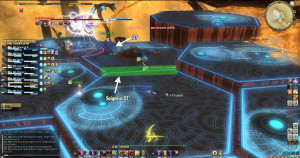
Placement Off Tank and Dedicated Healer.
Regarding the course of the second phase, there are two techniques:
- Two damage classes per Caduceus
- All damage classes on the first caduceus and a boss change around 10%
I advise you the second technique for more comfort. Given that the idea is to destroy quickly the bosses, you must avoid showing the blobs to "scratch" a little DPS. Be careful, however, more the fight will be late, the more the healers will have bad to treat their tank. However, if you see that the DPS is too fair, you should make 2 blobs appear each time to make them eat at each Caduceus.
Loots Bahamut 1st floor
Tank Equipment:
- Allagan Round Shield
- Allagan Heavy Armor
- Allagan heavy thighs
- Allagan Protector's Choker
Healer Equipment:
- Allagan Gloves of Healing
- Allagan's Earrings of Healing
Melee Equipment:
Dragon Knight
- Allagan tomestler's tassette
- Allagan Breastplate of Slaying
- Allagan Trousers of Slaughter
Monk:
- Allagan Trousers of Assault
Common accessories:
- Allaganza Earrings of Felling
- Allagan Ring of Aggressor
- Allagan Bracelets of Aggressor
Bard Equipment:
- Allaganza Gauntlets
- Allagan tomestones of tracker bracelets
Mage / Summoner Equipment:
- Allagens Charming Tiara
- Allagan Ring of Casting