


Capacities match
I am Nikko, Jedi Sentinel, member of the Arrakeen guild established on Battle Meditation. I would like to provide you with a guide to the Jedi Sentinel Concentration specialization for a PvE and PvP vocation.
Summary :
- Introduction
- Talent tree
- Powers
- Resource management
- Effect activations (Procs)
- Priorities and cycles
- Equipment
- Optimization
- Conclusion
Introduction

Le Jedi Sentinel is a melee damage class. He brilliantly wields two lightsabers. If you like being in contact with your targets and feeling your sabers slash through the air, this class is for you.
A Sentinel brings a lot to the members of his raid especially with the overpowered Inspiration which increases group healing and damage by 15% for 15 seconds. We have 3 forms of combat: Juyo form in Surveillance, Ataru form in Combat and Shii-cho form in Concentration.
Why the Concentration specialization?
Very good guides have been written on the Combat specializations by Sparkk and Warez and Surveillance by Isidon. I invite you to consult them.
It should be noted from the outset that the Concentration specialization is particularly effective on numerous enemies. However, its single target capacity remains less powerful but still allows it to be maintained at around 3250 dps with 180 optimized equipment.
Non-exhaustive list of bosses for which the Concentration specialization is effective:
- Draxus
- Zero Corruptor
- Dash'Roode
- Titan 6
- Slayer (if you're on the adds)
- Olok the shadow (effective on groups of droids)
- Beast
- Calphayus
Viable in PvP?
Since Update 2.7, the Concentration spec has become less powerful in PvP as secondary targets now take four times less damage than the primary target when we activate our Force Sweep.
The main disadvantage of a Sentinel in a PvP environment is that our health only decreases irreparably since we have no healing spells unlike our Guardian friends with their Focused Defense.
Talent tree

2 / 8 / 36
The colon in "Defensive Forms" allows us to generate centering when we take damage (especially in the form of damage over time and damage zones).
Powers
- Defensive powers
- Damage powers
- Utilities
- Group powers
 Reprimand (delay: 1 min): This power reduces all damage taken by 25% and deals regular damage charges to attackers. This ability has a theoretical duration of 10 seconds, but the effect time can increase and last up to 30 seconds when attacked.
 Saber return (delay: 3 min): Increases defense by 50% and reduces Force and Tech damage by 25% for 12 seconds.
 The Force keeps us (delay: 2 min): Reduced damage taken by 99% for 4 seconds, then lost 50% of current health. Highly recommended in PvP if your life is hanging by a thread, this power will give you precious seconds to defeat your opponent or admit defeat.
 Force Camouflage (delay: 45 sec): Allows you to enter stealth mode for 4 seconds while reducing all damage taken by 50%, also reduces its animosity in case of aggro recovery.
The damage of a Sentinel is of two types: on the one hand, there are melee attacks in white and, on the other hand, Force attacks in yellow.
Damage over time
 Cauterization (delay: 15 sec): Deals 8 stacks of burn damage over 6 seconds, with the 1st and 3rd being considered melee attacks and the other 6 being considered Force damage.
 Force exhaustion (delay: 18 sec): Inflicts 4 stacks of Force damage over 3 seconds (the first being instant).
Powers with channeling

Frappe expert (delay: 30 sec): Inflicts 6 melee hits on the target over 3 seconds, with the last hit occurring after 2,8 seconds.
Force attacks

Force Sweep (theoretical delay: 12 sec): Inflicts a significant amount of damage up to 5 non-player enemies located within 5 meters of the primary target.

Storm of Blades (delay: 12 sec): Blasts a blast of energy at the target.
Melee attacks

Hit : Inflicts very light damage to the target.

Relentless strike (delay: 15 sec): Deal 3 weak hits to target enemy.

Twin saber throwing (delay: 18 sec): Our second exits an area after Force Sweep, which sends our two sabers into a cone 30 yards in front of us and slows all targets hit by 50% for 6 seconds.

Slot : Inflicts two hits on the target, the first corresponding to the secondary weapon. Additionally, each Slash adds a charge of force damage called Flagellation. Gain a 7,5% critical chance bonus from points taken from "Lunge".

elimination (delay: 6 sec): Deals a significant amount of damage to the target (usable only when the target's health is below 30%). Gain a 7,5% critical chance bonus from points taken from "Lunge".

Disabling throw : Deals an average amount of damage and reduces the healing received by the target by 20% for 15 seconds. This spell is simply essential in PvP to weaken the opposing healer. Small problem: this spell is the most expensive in concentration.

Force Jump (delay: 15 sec): allows you to go melee with a target located between 10 and 30 meters away from you. This spell cannot be used against Snipers and Snipers while in cover.

Relentless jump (theoretical delay: 12 sec): allows you to get closer to an enemy target while inflicting two white blows (range: 10 meters). Can be used while immobilized if you are in range.
 Dread (delay: 1 min): Stuns all targets around us for 6 seconds. Note that damage interrupts the effect and that droids are not affected by this power.

Pacification (delay: 1 min): Reduces target melee and ranged accuracy by 90% for 6 seconds. This spell cannot be used on op bosses but works on most adds that come with them.

Force Stasis (delay: 1 min): This spell immobilizes the target and interrupts its power for 3 seconds. It deals 4 stacks of Force damage (one per second, the first being instant).

Force kick (delay: 8 sec): Interrupts the target and prevents them from using this power for 4 seconds.
 Valorous call (delay: 3 min): Immediately grants 30 Centering units. This spell's cooldown is reduced by 30 seconds with "Valor" and by 15 seconds with the PvE two-piece set bonus. It therefore reaches 2 min 15.
 Zen : confers 12 points of concentration in 3 seconds and 3 units of singularity (see next paragraph).
 Transcendence (duration: 10 sec): Increases melee and ranged defense by 10% and the speed of all nearby players by 50%. In the Concentration specialization, this power can be activated quite often.
 Inspiration (duration: 15 sec, delay: 5 min): Increases damage and healing by 15% for all players within 40 yards of us. When a Sentinel activates this power, all members of the raid gain the negative effect of Depression which prevents further activation of Inspiration and disappears after 5 minutes.
Resource management
In Sentinel, we have two resources to consider. The first is the Concentration and the second on Centering.
Manage your Concentration
We have a maximum of 12 Focus points and our spells consume these units.
Note that every 7 seconds or so, we automatically lose a point of Concentration (even in combat).
You will find that Zen is essential as it will give you back 12 points of Concentration.
Objective: to be Zen
Thanks to the points taken in "Bravery", each time we activate one of the 8 powers of the previous list which does not have a zero cost in Concentration, we gain 4 units of Centering. When we reach 30 we can activate the group powers: Zen, Transcendence and Inspiration.
The Valorous Call power will be used in opening to prevent us from making blank shots at the start.
Note that you do not generate Centering for 3 seconds after activating Zen even when you use powers that draw from Concentration. Note also that the Force Sweep still generates Centering despite the fact that it costs nothing in Focus thanks to Singularities.
Very interesting also: if you use Force Sweep on 4 enemies for example and you have not activated your Zen 3 seconds before, you gain 16 centering units at once.
Effect activations (Procs)

Elan : Each use of the Force Jump or Relentless jump allows us to negate the Concentration shot of the next Blade storm (which is theoretically 4 points).

Stunning blow : Each time we activate the Force Jump or Relentless jump, we gain the Knockdown effect, thanks to which our next Force Sweep automatically results in criticism. This effect lasts for 20 seconds.

Singularity : In Concentration specialization, the Zen andForce exhaustion grant 3 units of Singularity. These increase the damage of the Force Sweep launched within the next 15 seconds. In addition, it does not cost any Focus points. Attention, you must wait 2 seconds after theForce exhaustion to benefit from Singularities unlike Zen, which immediately gives the three charges.

Zephyrean slit : The following powers decrease the cooldown of the Force Sweep and Relentless jump : Slot, Hit, Storm of Blades, elimination.

High power : This effect increases all damage done by 9% for 6 seconds after Force Sweep. During the High Power effect, the following powers will be used: Frappe expert, Storm of Blades, Relentless jump et Twin saber throwing.
Priorities and cycles
The form we will adopt in Concentration specialization is the Shii-cho form.
The aim of this specialization is to use the Force sweep when available to gain High Power, which increases all damage by 9% for 6 seconds. As we saw previously, we have two ways to benefit from Singularities. We will therefore be careful not to use Force exhaustion et Zen consecutively.
We will follow the following diagram: Zen - Force Sweep - Force exhaustion - Force Sweep.
Before activating each Force Sweep, we will make sure to have the Knockdown buff to be sure to crit. Thus, we will use the Relentless jump always between two Force scans.
La Cauterization should preferably be used before Force Sweep for the burning effects to gain the 9% damage bonus.
La Slot and the Storm of Blades will be activated to reduce the reuse times of the Force Sweep and Relentless jump.
- Openness and priority
- Target less than 30%
Valorous Appeal
Force Jump
Cauterization
Zen
Force Sweep
Force exhaustion
Frappe expert
Storm of Blades
Relentless jump
Slot
Force Sweep
Twin saber throwing
Cauterization
Slot
Relentless strike
Slot
Relentless jump
Zen
Force Sweep
In the rest of the fight, each time you have your 30 Centering units, you activate the Zen or Transcendence. Indeed, if you have just used your Force exhaustion and that you have 30 Centering units, the activation of the Zen will have little use and we will prefer to use Transcendence.
Use your Relentless strike as soon as it is available but only when you have less than 6 points of Concentration. If your cycle is well controlled, you will never start a Hit.
When the boss's health drops below 30%, we will use theelimination as soon as it is available, preferably after a Force Sweep to benefit from the damage boost.
The following combinations will be adopted:
- Force Sweep → Elimination → Expert Strike → Blade Storm
- Force Sweep → Elimination → Twin Saber Throw → Blade Storm
When to activate inspiration?
THEInspiration is the best group power in the game with the Jamming field/Ballistic shield Snipers / Snipers that reduces damage taken by 20% for 20 seconds. In the Hard and Nightmare mode strategies, it is of considerable importance. Because for 15 seconds, all members of your raid benefit from a 15% damage and healing bonus. However, to maximize its effect, it will need to be activated wisely.
- Short fights
- Long fights
- Special cases
For fights lasting between 2:30 and 5:15 (for example, Nefra on the Fortress of Dread), you will only have time to cast one Inspiration. The ideal time will be when you meet the following four conditions:
- Have 30 centering units
- THEValorous call must be available (so after 2 min 15 of combat minimum).
- La Frappe expert will also need to be available to maximize damage.
- The boss's health must be below 30% in order to use theelimination.
We will then follow the following cycle:
Zen - Valuable Call - Inspiration - Doping - Cauterization - Strength Scanning - Elimination - Expert Strike - Blade Storm - Hard Jump - Hard Strike - Elimination
For fights lasting more than 5 min 15, you can launch theInspiration.
The first will be used in the first 30 seconds of combat. Two situations then arise:
1st case : Before starting the fight, you already have 30 Centering units either thanks to a group of additions which preceded the boss or thanks to a zone of damage like the Sandstorm which reigns on the place of combat of Dash ' Roode which will increase your Centering gradually.
In this case, you will perform the following cycle:
Zen - Valuable Call - Strength Jump - Inspiration - Cautery - Strength Sweep - Strength Exhaustion - Expert Strike - Hard Jump - Blade Storm - ...
2nd case : You do not have your 30 centering units.
Jumping - Strong Strike - Strength Exhaustion - Valuable Call - Inspiration - Cauterization - Strength Scanning - Expert Strike - Blade Storm - Fierce Jump - Zen - ...
On some bosses, there will always be sensitive phases. In these cases, we will prefer to activate theInspiration in the following moments:
- Bestia, in the Dread Palace: when the boss drops below 15% and the monsters are pouring into the tanks.
- Calphayus, in the Dread Palace: very last phase, when someone in your raid places the shield near the throne, you will have two windows of a few seconds to burst the boss.
- The Dread Council: in the second phase, when you have to burst Styrak and Brontes.
- Draxus, in the Dread Fortress: in the 5th phase, (when the boss is present at the same time as three Ramparts, 2 Corruptors and 4 Commissionaires).
- Brontes in the Dread Fortress: on the transition with the spinning laser that should not catch up with the droids.
Equipment
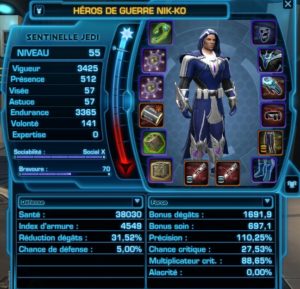
Statistics
In your character sheet, take a close look at the Strength and Close Combat tabs. Indeed, the Force tab logically concerns all your Force attacks while the Close Combat tab applies to your melee attacks.
Let us already mention the difference in critical strike chance between the two types of attack. This is due to the points taken from the Insight talent which increases the critical chance on Force attacks by 6%.
The statistics and caps that I will give in the following will only concern the Strength tab.
- Power and Vigor
- Precision
- Influx
For all damage classes in the game, the higher your Damage Bonus, the more base damage each of your attacks increases. 1 point of Stamina increases this damage bonus by 0,20 while a point of Power or Power Strength increases this bonus by 0,23. So your three most important statistics are: Vigor Engime and the Power force.
Note that Force Power only concerns your primary and secondary weapons (+1151 in 78, + 1006 in 72, + 936 in 69).
On your equipment, you can place 14 upgrades. The most optimized upgrades are the Advanced Power 28 upgrades which provide 32 stamina.
You have probably already seen "missed" written on the target. This happens quite often if you don't have enough Precision. Basically, your primary lightsaber has 90% Accuracy and your secondary lightsaber has 57% on melee attacks. For Force attacks, add 10% to the previous percentages.
The most important thing is not to get any misses on the damage of your main saber. Therefore, Melee Accuracy should be 100% and Force Accuracy 110%, or even slightly higher. The two points of the Firmness talent grant you 2% accuracy as well as the inheritance bonus which gives you 1% accuracy. So you must earn 7% through the Precision index.
Once you reach your Precision cap, you will need to increase your critical multiplier (Surge).
Specifically, the two points taken from Concentrated Resonance increase the critical multiplier by 15% for all your melee attacks and your force attacks. As a base, you will therefore have 76% critical damage bonus (with the inheritance bonus). The objective is to have a critical multiplier always greater than 85% and as close as possible to 90%.
Relics
- Concentrated Retribution Dread Forge Relic (740 proc Stamina)
- Dreadforge Relic of Unexpected Onslaught (740 proc power)
Relic 78 can be picked up from the 2nd boss of the Dread Palace in hard mode. It is also craftable by pyrotechnicians.
Note that the PvP relics of index 158 and 162 are still very interesting if you do not have the opportunity to go to the Dread Palace.
Seven bonuses
The Jedi Sentinel set bonus is essential.
The 2-piece bonus increases the damage of the Frappe expert and reduces the cooldown of theValorous call.
The 4-piece bonus increases all damage done by 4% for 15 seconds after activating the Zen. An additional icon called "Master of Weapons" appears on our bar.
My advice
Concretely in optimized equipment 180, here is my equipment in detail:
- 2 implants in Power, Precision
- 1 Power headset, Influx
- 3 Initiative sophistications (Power, Precision)
- 3 Adept sophistications (Power, Surge)
- 1 Battle sophistication (Critical, Surge)
- 9 Skill modules (Stamina, Power)
- 2 Power crystals
- 13 Power (Stamina, Stamina) upgrades and 1 Surge upgrade
With the 186 equipment, we will increase the Influx as a priority.
Customization
In the Excel file that you can download at the following link, you will have the possibility to see directly how your statistics are modified according to your equipment, class buffs, choices in the talent tree ... Thus, you will be able to find the customization that suits you.
Optimization
This part concerns the different means to increase your statistics (datacrons, stims, dopants, inheritance bonus). I'll let you watch the analogous part in my article on the Jedi Scholar's Telekinesis specialization. Note that it is essential to research in addition to Stamina datacrons, Will datacrons since your Strength damage bonus also depends on your Willpower index.
Conclusion
So this concludes my guide to the Jedi Sentinel Concentration Specialization. Hope it helps you and that you enjoy playing SWTOR. I would also like to thank Isidon and Oddwyn for their wise advice. Have a good game everyone!


