
I introduce myself Stick, Jedi sentry level 50 specialized in surveillance. I officiate on the Hssis server as a lieutenant for the Defenders of Freedom guild on the republic side of course. I also take care of the management of our guild forum. The guide I offer is on the sentry Jedi knight specializing in surveillance for the PVE (lvl 50).
Thanks
I want to thank Khatarstrophe who made a very good guide on the Jedi Sentry (too bad his guide stopped). He inspired me for the guide that I am offering you.
I also want to thank Gintoto a Jedi sentries from my guild with whom I discuss the cycle and the stuff that helped me a lot in making this guide. I will not forget all the other members of my guild, especially Jin'Doh Erudit DPS says the fat one, Durzo Guardians and Iroda Shadow our two TANKs who love to test Denova HM, Norus a Heal who loves beer, Trigorse our DPS commando who hurts (very badly…), Urull another sentry Jedi, and my little Xenali (no I have not forgotten you) with your smuggler god of the Heal and captain of the guild.
Oops… I almost forgot the rest of the officers (NOT GOOD). Epik-fail our second captain (this is his first MMO but he delivers). The officers, Morycette (concrete heal or phony heal, we don't really know…) and Lilliah (heal life to death… especially death). Finally, thank you to our great Commander Martigan Franc-Tireur for welcoming me into this superb guild.

This guide will be divided into five main parts, I will start with a small introduction to describe the sentry specialized in surveillance and to make a small summary on his skills. The second part, on generalities, explains the template, the skills and gives you the statistics of your class. The third part describes the combat tactics to adopt to have a good DPS. Finally, we will see how to optimize all this.
The guide will be updated after 1.3
Introduction
The sentry specialized in surveillance (Watcheman in English) is a cac DPS (damage per second to melee to body). This means that you take more damage and need to reduce the distance to enemies in order to attack them. You will be powerful against a single enemy (Champion or elite), on the other hand for enemy packs (> 4) you will have to give your all. During a raid or a ZL, you will act as cac DPS and place yourself behind your enemies.
During combat you must generate Concentration points and then use them to launch your attacks. You will also generate focus points to be able to use one of your three abilities Zen, Inspiration and Transcendence. The Surveillance spec has gameplay based on the application of two DoTs (damage over time) of Cautery and Saber Overload. You will apply these DoTs on the target. The duration of these DoTs is 6 seconds, with the objective of keeping them almost during the entire fight. This will therefore require a perfect management of your Concentration and your CDs on the spells that apply DoTs.
Cauterization has a simple operation: once launched, it does damage. Saber Overload gives you a buff with three charges: on each melee hit, this buff loses a charge and the target regains a DoT with a charge. After three hits, you no longer have the buff and the target has a debuff with three charges. Of course, each charge increases the damage the target takes.
Finally, the Jedi can have many different forms. It will be necessary to choose the Mastery of Juyo. This form increases your chances of dealing critical hits with your burning effects which greatly increases your DPS. One last very important point will be very useful to you to break the spells of your enemies with your two possibilities of interruption: Force jump and Kick.
Your main statistics are:
- Vigor: increases melee and force damage and critical strike chance
- Power : increases melee and force damage
- Will: increases force damage and force critical chance
- Precision: increases the chances of hitting
- Review index: increases the chance of a critical hit
- Influx index: increases damage dealt by critical hits
All the points of the introduction will be detailed in the following parts.
Generalities
Description of the main skills used by the Jedi sentry specializing in surveillance.
template
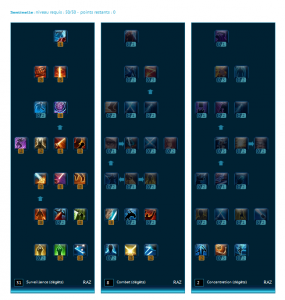
Surveillance (damage): 31 points
Tier 1:
Concentrated Lunge (Passive) - Rank 3/3
Slash, Flurry of Blades, and Merciless Slash have a 100% chance to restore 1 Focus. Warning ! This doesn't mean their cost is lowered by 1. You will still need 3 to cast the Slot, but your Focus will only drop by 2 points.
Bravery (Passive) - Rank 2/2
Increases Focus generated by 2 units when you activate powers that tap into Focus. Also reduces the cooldown of Valorous Call by 30 seconds. It is therefore a very useful talent for generating Centering points.
Tier 2:
Merciless Zeal (Passive) - Rank 2/2
Burning critical hits restore 2% of your maximum health. This is a fairly nice and very useful life boost.
Juyo Mastery (Passive) - Rank 3/3
Your burning effects have a 3% increased critical strike chance per Juyo Form. So since we have to maintain 5 loads of Juyo this gives 15% more critics on our DoTs!
Tier 3:
Troubled Speed (Passive) - Rank 2/2
Reduces the cooldown of Force Leap by 3 seconds. This spell is one of our main assets for movement, but also a good way to get Focus.
Saber Overload (Focus: 3 - Instant - Cooldown: 12s) - Rank 1/1
Charges your sabers with deadly energy for 15 seconds. Your next 3 successful melee attacks will burn the target, inflicting 235 elemental damage over 6 seconds. Cumulative 3 times. This effect is only available every 1.5 seconds. Here is finally our second DoT.
Searing Saber (Passive) - Rank 2/2
Increases the critical damage of your burning effects by 30%. It is therefore a bonus to the Influx since it does not trigger diminishing returns.
Tier 4:
Close Combat (Passive) - Rank 2/2
Reduces the minimum range of the Force jump by 10 yards. Another improvement to Force Leap.
Barrage (Passive) - Rank 1/1
Increases direct damage from cauterization by 30%. Attention! This is only direct damage, not the DoT itself.
Vigie (Passive) - Rank 2/2
Reduces the cooldown of Pacify by 15 seconds and Force Kick by 2 seconds. Talent oriented PvP, but it's the most useful we can find to keep going up the tree. Additionally, the Force kick allows you to quickly break a spell while casting. This is very useful on certain elites or on operations bosses.
Concentrated Jump (Passive) - Rank 2/2
Strength leaping has a 100% chance to grant an additional point of Focus. Another improvement to Strength Leap.
Tier 5:
Mental Incandescence (Passive) - Rank 3/3
Lunge has a 33% chance to negate the cooldown of Cautery, while Merciless Lunge has a 66% chance to do the same. This effect is only available every 6 seconds. Big up-time of the Cauterization.
Plasma Blades (Passive) - Rank 3/3
Increases the damage done by your burning effects by 15%. Even more damage to our DoTs.
Searing Concentration (Passive) - Rank 2/2
Your burning effects have a 30% chance to grant 1 point of Focus on dealing damage. This effect is only available every 1.5 seconds. A good Concentration generator.
Merciless Lunge (Focus: 5 - Instant - Cooldown: 12s - Range: 4m) - Rank 1/1
Hit the target with both weapons. Deals 920-1200 weapon damage. Each use of this power grants Mercilessness for 15 seconds, decreasing the cooldown of your next Merciless Lunge by 1.5 seconds. Cumulative 3 times. Requires 2 lightsabers.
An extremely powerful hit with a very high damage slice and with a very short range. But a big cost in Concentration: 5 points.
Combat (damage): 8 points
Tier 1:
Defensive Forms (Passive) - Rank 2/2
Generates 2 Centering units on attack. This effect is only available every 1.5 seconds. Also improves the effects of your Lightsaber Forms when they are active. Another Centering generator and a small damage reduction.
Dual Wielding Master (Passive) - Rank 3/3
Increases damage from saber attacks from your second hand by 36%.
Tier 2:
Firmness (Passive) - Rank 3/3
Increases melee and Strength accuracy by 3%.
Concentration (damage): 2 points
Tier 1:
Expert Focus (Passive) - Rank 2/2
Reduces the cooldown of Expert Strike by 3 seconds and increases the damage it deals by 8%.
List of Skills
Now that you know the Template in detail, you will need to familiarize yourself with the different skills.
- Postures
- Utilities and controls
- Buffs
- Defensive abilities
- Offensive abilities
- Forme Juyo: Damage increases by 2% with each sword attack. This effect can trigger once every 1.5 sec and can stack up to 5 times. The effects only last 6 seconds, but the duration resets to zero each time you deal damage with the saber.
- Forme Shii-Cho: Increases damage dealt by 3% and reduces damage taken by 3%.
- Ataru form: Increases accuracy by 3%. Successful melee attacks have a chance to trigger a second strike that deals energy damage. This effect can occur once every 3 seconds.
- Introspection: Regenerates player health while channeling
- Force Kick: Kicks the target and interrupts the current casting preventing the use of this power for 4 seconds. Costs 1 focus point. (CD: 8 seconds)
- Valorous call: Instantly generate 30 centering charges. (CD: 3 minutes)
- Resolution: Releases you from any incapacitating effect. (CD: 2 minutes)
- Force Camouflage: Reduces threat of and increases movement speed by 30% for 4 seconds. Dealing damage interrupts this effect. (CD: 45 seconds)
- Pacification: Calms the target and reduces their melee and ranged accuracy by 90% for 6 seconds. Costs 1 focus point. (CD: 6 seconds)
- Force Stasis: Overpower the target and stun them for the duration of the channel, dealing kinetic damage. Generates 1 Focus point per second. Lasts 3 seconds. (CD: 1 minute)
- Dread: Confusion strikes all nearby enemies preventing them from acting for 6 seconds. Damage interrupts the effect. Doesn't work on droids. Costs 1 focus point. (CD: 1 minute)
- Disabling droids: Disables a droid for 1 minute quickly healing it. Damage interrupts this effect. Works on one droid at a time. (Range 30m)
- Power of Force: Group buff. Increases damage and healing by 5%. Lasts 60 minutes.
- Zen: Convert 30 Centering points to enter Zen state. This effect varies depending on the combat stance:
- Frome Shii-cho: The slit cannot in focus and hits a nearby enemy in addition.
- Juyo Form: Increases the critical strike chance of your scorching attacks by 100% and deals scalding damage to heal your party for 1% of maximum health with each click.
- Ataru Form: Decrease the focus cost of Slash and Flurry of Blades and reduce their GCD by 0,5 seconds.
- Transcendence: Converts 30 Focus points to buff the party increasing movement speed by 50% and melee and ranged defense by 10%. Lasts 10 seconds.
- Inspiration: Converts 30 Focus points to buff the party increasing all damage for 15 seconds. (CD: 5 minutes)
- Call to the Force: Ends the cooldown of Return of Saber and heals for 40% over one minute. (CD: 20 minutes)
- Saber return: Increase Defense by 50% and reduce Force and Tech damage by 25%. (Lasts 12 seconds / CD: 3 minutes).
- Force camouflage: An aggro reset that will benefit from different effects depending on the spec, namely damage reduction in Watchmen or anti CC in Combat
- The Force keeps us: Spends 50% of current health to grant 99% damage reduction for 5 seconds. damage reduction
- Reprimand: Reduces damage taken by 20% and deals damage to attackers. This effect is only available every 1,5 seconds. Lasts 6 seconds. Duration restored in the event of an attack, but cannot exceed 30 seconds. (CD: 1 minute)
- Resolution: Breaks all effects hindering the Knight's movement
DoT
- Cauterization: Strikes the target for immediate damage plus a DoT of elemental damage for 6 seconds. Costs 2 focus points. (CD: 15 seconds)
- Saber Overload: Charges your sabers with deadly energy for 15 seconds. The next 3 successful melee attacks will burn the target for elemental damage. Cumulative 3 times. This effect is not available every 1,5 seconds. Costs 3 focus points. (CD: 12 seconds)
CAC
- Hit: Attack series generates 2 focus points.
- Slot: Attack with both sabers
- Relentless Strike: Hit the target multiple times with both sabers. Deal damage and generates 6 focus points. (CD: 12 seconds)
- Expert strike: Series of powerful blows. Lasts 3 seconds. (CD: 30 seconds)
- Pommel strike: Deals heavy damage depending on whether the target is weak or strong. Only works on incapacitated opponents. (CD: 45 seconds)
- Timely Strike: Punch the target inflicting damage depending on whether the target is weak or strong. Only works on incapacitated opponents. (CD: 15 seconds)
- Merciless Lunge: Hit the target with both weapons and deal damage. Each use of this power grants Merciless for 15 seconds which Decreases the cooldown of your next Merciless Slash. Cumulative 3 times. Costs 4 focus points. (CD: 12 seconds)
- Leg split: Deals damage and reduces target's movement speed by 50% for 12 seconds. Costs 2 focus points.
- Response: Retaliate after a parried or deflected attack, only usable after melee or ranged defense. Excluding GCD. Costs 3 focus points.
DISTANCE
- Force leap: Jump on an enemy and deal damage to them. Immobilizes the target and interrupts its current action. Cannot be used against targets in cover. Generates 3 Focus Points. (Range 10-30m / CD: 15 seconds)
- Blade Storm: Very powerful blow with the Force. Stun weak and standard enemies for 4 seconds. Costs 4 focus points. (Range 10m / CD: 12 seconds)
- Disabling throw: Incapacitating attack that deals damage and reduces the healing received by the target by 20%. Lasts 15 seconds. Costs 3 focus points. (Range 10m / CD: 12 seconds)
- Elimination: Throws the sword and inflicts heavy damage, Usable on targets with less than 20% HP. (Range 10m / CD: 6 seconds)
AOE / Zone damage
- Force Scan: Deal damage to 5 targets within 5 yards with the Force dealing kinetic damage. Stun weak and standard enemies for 1,5 seconds. Costs 3 focus points.
- Cyclone slot: Attack that hits up to 5 targets. Costs 3 focus points.
Statistics
Here are the different statistics that we will find on our equipment:
1. Primary
Vigor
Increases our melee damage bonus and our critical chance by the following ratios:
- Melee Damage Bonus: Stamina x 0.2
- Melee Critical Chance: Stamina x 0.02%
- 5 Stamina = 1 Bonus damage
- 145 Stamina = 1% Critical Hit
So this is the Statistics to Prefer
Endurance
Increases our health points and its regeneration according to the following ratios:
- Max Health: Stamina x 10
- Health Regain: Stamina x 0.03
2. Secondary
For secondary stats, you can choose from Critical, Surge, Potency, Accuracy, Alacrity, Absorb, Defense, Shield, and Expertise. We must eliminate those that are not used for DPS namely Absorption, Defense, Shield. Then Expertise is only used to increase our damage and our healing, and reduce our damage suffered on PLAYERS (PVP). What makes this statistic useless in PvE. Finally, Alacrity reduces the casting time and the GCD. Having no cast spells, and having no great need to reduce our GCD, this stat is also useless. We therefore have to make a choice between:
- The power: One Power point = 0.2297 bonus point.
- The precision: One point of Precision ˜ 0.03% of additional precision. Above 100%, accuracy reduces the target's defense.
- The critic: One Critical Point ˜ 0.036% chance to deal a critical strike.
- The influx: One point of Allfux increases the critical multiplier by approximately 0.1869%.
How to choose ?
The two main stats are stamina and stamina, so it makes sense to go for them as this increases your damage and health. Then I chose precision, basic melee attacks only have a 90% chance of hitting compared to 100% for special attacks. A target's defense and dodge chance is 10%. We end up with 80% on basic attacks and 90% special attacks. We must therefore increase our Precision to 110% on our main weapon to recover 90% in basic and 100% in special. On the other hand for the secondary weapon, I do not think it is profitable to go for the cap of 110%.
Personally, I think the next stat to pick is surge as it directly increases the percentage critical damage does. Then we must increase the power of all our attacks (critical or not). Finally, I choose to increase the Critique. On this point there is a lot of discussion (it's my choice and I am ready to discuss it…). For me, the Sentinel Jedi already has a pretty good chance of critical hits via DoTs.
We must now reach the second cap for accuracy, since our basic attacks only have a 90% chance to hit. It is therefore necessary to increase the Accuracy by an additional 10%, the additional accuracy increases the armor piercing. The final cap is therefore logically set at 120%.
To summarize :
Stamina / Endurance
Accuracy (up to 110% on the Primary Hand) -> Surge -> Power -> Accuracy (over 110% +) -> Critical
Combat tactics
Here you are with a more than correct Template level 50, now we will see how to make your Tank scream by taking the aggro back from them…. Then you will have to lose it quickly otherwise your Heal will be frightened and you too ...
Concentration and Centering
During combat you must generate Concentration points and then use them to launch your attacks. You will also generate focus points to be able to use one of your three abilities Zen, Inspiration and Transcendence.
Formation of its Concentration
- Hit generates 2 focus points.
- Force Stasis generates 1 focus point per second . (CD: 1 minute)
- Force leap generates 3 focus points. (Range 10-30m / CD: 15 seconds)
- Relentless strike Generates 6 Focus Points . (CD: 12 seconds)
Use of its Concentration
Concentration allows you to launch your various attack and defense skills (see list of skills).
Training of its Centering
- Slot
- Merciless Lunge
- Valorous call génère 30 centering point (CD: 4min)
Using its Centering
It allows you to launch one of these three abilities (requires 30 Centering points):
- Zen: Increases the critical strike chance of your burning effects by 100%.
- Transcendence: Increases GROUP movement speed by 50% and RAID Defense by 10%.
- Inspiration: Increases GROUP damage and heal by 15%.
Cycle DPS
This brings us to the most important part: how and when to use all of these abilities. And yes, a DPS is there to do damage, a maximum of damage, and the sentry Jedi and often nicknamed "big nag who fits in the pile" (that's true ...). But you shouldn't do it just any old way !!!
The Sentinel Jedi is a nag, but there's plenty to do! I give you the cycle (I don't respect it all the time ... you have to adapt it according to the fights):
Operation:
- Force leap
- Saber Overload
- Hit
- Relentless strike
- Cautery (apply your third debuff to your target)
- Merciless Lunge
- Catering if up
- Frappe expert
100% -> 20%:
- Saber Overload
- Relentless strike
- Slot
- Cautery (apply your third debuff to your target)
- Merciless Lunge
- Catering if up
- Frappe expert
- Force leap
- Force stasis
<20%:
- Saber Overload
- Relentless strike
- Slot
- Cautery (apply your third debuff to your target)
- Elimination
- Merciless Lunge
- Catering if up
- Frappe expert
- Force leap
- Force stasis
Burst DPS :
If 30 centering points available:
- ZEN
- Valorous call
- Inspiration
- Relic
- Cycle 100% - 20% or <20%
If not :
- Valorous call
- Inspiration
- Relic
- Cycle 100% - 20% or <20%
Prepare to press the Force Camouflage. In case you pick up aggro. To protect yourself, consider using Pacification, Sword Return, and Reprimand
Other interesting combos
Sort d’interruption :
Force Kick and Force Jump
For groups:
Force Leap> Relentless Strike> Cyclone Slash> Force Sweep> Knob Strike
The group stun with dread is also very practical.
For droids:
Droid Deactivation> Pommel Strike> Cycle open DPS
optimizations
Your equipment
This part will be completed after update 1.3
Small information: your Set bonuses are useless, you have to take a critical modifiable item (orange with increase slot).
Your Datacrons
Your Relics
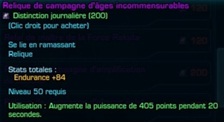
The 3 matrix crystals of green color allow you to obtain your first Relic: +58 vigor / +50 stamina / +24 critical. The second relic will be obtained with the daily distinctions (200):
To go into operation
The items to consume are of 3 different types. Biochemists will have no problem with their reusable rakata items. For others, here are the items to take:
- Médipacks
- Potency boost in prototype hypercombat: 104 Stamina - 43 Potency - 120min - Persists after death
- Hyperbataille Offensive Doping: 450 Power - 15sec - 3min
Conclusion
The Jedi Sentinel specializing in surveillance is for me a very good cac DPS to play solo and especially in a group in PvE (I have not really tested the PVP). He is able to send a lot of damage and protect himself well with a few skills even if he takes a lot of damage. In groups, you will be very useful thanks to your buffs (transcendence and inspiration).

Sorry if the guide is not yet complete, but it will evolve over time and with updates. If you have any questions, remarks or things to add, don't hesitate!


