


Many women bore Johanna's name in the service of the Crusade, and each of them dedicated her life to purifying her faith. Johanna continues this quest, which has led her to survey Khanduras in search of the star that has fallen from the sky. We meet today for a guide on the Crossroads of Zakarum, Johanna!
Introduction
 Johanna is an extremely strong warrior, able to pull through where everyone would have thought she was dead. His passive allows him to be uncontrollable, the rest of his kit consists of zone controls more than annoying for your opponents. It is time to go purify this land! ... And find an apprentice.
We therefore summarize:
Forces :
- Excellent survivability
- Very annoying in the fray
- A hell of a dose of controls
- Really badass!
- Little damage if build tank
- No gap-closer *
- Medium range
- The same fit as Skrillex
Gap-closer Ability to quickly reduce the positional gap between you and your target, catching up with them via a forward leap, acceleration, or by grabbing hold of them.

Hero's Abilities
- Passive
- A
- Z
- E
- R
 galvanization (D): Raises Uncontrollable and grants a shield that absorbs a massive amount of damage for 4 seconds.
 Correction (Q): Deals moderate damage and slows enemies by 60%, this effect gradually dissipating over 2 seconds.
 Blame (Z): After 1 second, pulls enemies in and stuns them for 0,25 seconds in addition to dealing light damage.
 Glare (E): Inflicts moderate damage to enemies and causes them to miss their next 2 base attacks within 4 seconds.
 Cleaver (R): You leap to the area of your choice. As long as you're in the air, you can steer to adjust your destination. After 2 seconds, you land, dealing heavy damage to nearby enemies and knocking them into the air.
 Divine shield (R): Deals heavy damage and stuns the first enemy hit for 2 seconds. The shield then bounces off nearby enemies, dealing moderate damage to them in addition to stunning them for 1 second.
gameplay">Build & Gameplay
The build to follow & choice tier by tier
This time around, you are entitled to not one, but two different builds! Johanna is a flexible tank, where many talents are viable. Nisador offers you his version of Johanna, and I'll tell you about mine right after. Everything is grouped together in the tabs, even the explanations tier by tier. (Hint, my build is better than Nisador's !?)
Nisador build
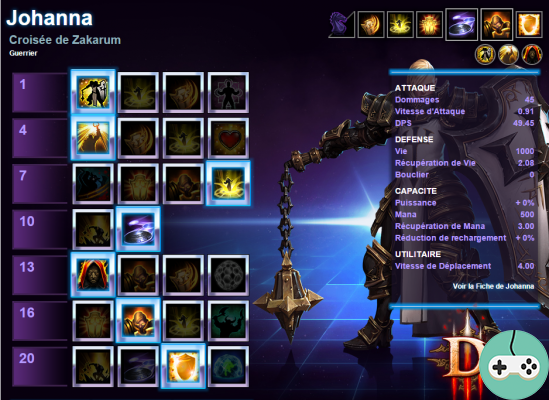
NB: Click here to be redirected to the talent calculator.
Tier-by-tier choices
- Lvl 1
- Lvl 4
- Lvl 7
- Lvl 10
- Lvl 13
- Lvl 16
- Lvl 20
 reinforcement : Using Basic Skills reduces the damage your next Basic Attack deals to you by 50%. 2 loads maximum.
Why? Johanna tends to use her spells very often, especially in combat, which allows her with this talent to block enemy attacks. Of course, this strongly depends on the composition of the enemy team and we can mention the talent Master in Regeneration which is just as powerful.
 Amplified Care : Increases cooldown effects and all healing received by 30%.
Why? Again, the choice may differ depending on the situation. In most cases, I orient myself towards Amplified care because it allows better regeneration than Laws of Hope, especially if you are gone on Master in Regeneration at level 1. This talent is still less effective if you do not have a healer on your team.
 sentence (Z): Blame (Z) increases your movement speed by 25% for 1 second.
Why? This is in my opinion one of the most powerful talents that Johanna has. For 1 second, you move faster than anyone else (except opponents under Sprint) and you move on to the attraction of nearby opponents. Whether it is to engage far enough into enemy lines (and hit assassins), chase or flee, this talent is perfect and will serve in many situations.
 Divine shield (R): Deals heavy damage and stuns the first enemy hit for 2 seconds. The shield then bounces off nearby enemies, dealing moderate damage to them in addition to stunning them for 1 second.
Why? Allowing to engage the enemy team from further away, Divine shield (R) has a short cooldown making it really interesting. Very flexible, it can also be used during the flight, bouncing on 2 enemies who are chasing you.
This does not prevent us from focusing on Cleaver (to be chosen sparingly, if one of your allies is also a warrior for example) which will allow you to control an area and position you for a Blame.
 Burning Rage : Deals 50 (36 + 2 per level) damage per second to nearby enemies.
Why? This talent will allow you to inflict correct damage in area, almost permanently on your opponents, in the middle of the melee, you will roast them slowly!
 Fanaticism (D): As long as galvanization (D) is active, increases movement speed by 8% whenever damage is taken. Cumulative up to 40%.
Why? Again, this talent is for players with very aggressive gameplay (sometimes too much). The goal is to be able to enter the fray even faster to catch priority targets in the second line with the Blame. And as it is well done, Fanaticism can also get us out of sticky situations by running away even faster.
 Indestructible : When you take damage that should kill you, you gain a shield equal to your maximum health for 5 seconds. This effect has a cooldown of 120 seconds.
Why? Talent aptly named, Indestructible will end up making you intutable. Indeed, in the event that your opponents have by some miracle succeeded in lowering your life points to 0, they will have to do it a second time! During this time, however, do not forget to take shelter, treat yourself or seek treatment.
Nazka's build
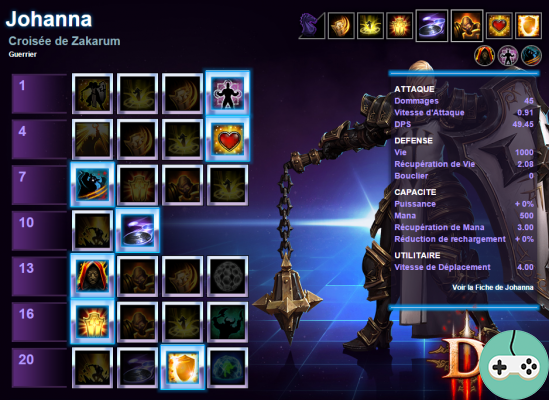
NB: Click here to be redirected to the talent calculator.
Johanna is an extremely durable hero, resistant and above all, she comes to put a hell of a mess in the fray! His multitude of controls allows him to manage his opponents to really help his teammates, while galvanization (D) allows him to do all of this freely. With this build, we will abuse your ability to stay in the middle of everyone in order to happily slap with shields and plagues. Your opponent will hate you!
Tier-by-tier choices
- Lvl 1
- Lvl 4
- Lvl 7
- Lvl 10
- Lvl 13
- Lvl 16
- Lvl 20
 Master in Regeneration : Increases health recovery by 4 per second. For every 3 Regeneration Globes collected, this bonus is increased by 4.
Why? A talent that will allow us to have excellent sustain (ability to regenerate quickly) by dint of collecting life globes. On the Haunted Mines, however, we will preferably focus on talent. The lady takes the pawn (Z). This will allow us to quickly make the living dead camps. In addition, in the case of a small card, the effect of Master in Regeneration won't be strong enough to get interesting at the end of the game.
The lady takes the pawn (Z): Blame (Z) inflicts an additional 100 damage to Minions and Mercenaries and Stuns them for 4 seconds.
 Laws of Hope : Regenerates 2 health points per second. Restores 20% of maximum health over 4 seconds upon activation.
Why? A very strong talent that quickly regenerates you a large part of your life. With that, even Malfurion can go home to bed! To be activated in combination with galvanization (D) to regenerate your life while they destroy your shield.
 Combat Momentum : Reduces the cooldown of abilities by 0,5 seconds with each Basic Attack.
Why? With this talent, you will become a plague for your enemies. In the midst of the melee to control your opponents, your basic attacks will allow you to control your enemies even more often. The more you level up, the less they like you. Crazy!
Divine shield (R): Deals heavy damage and stuns the first enemy hit for 2 seconds. The shield then bounces off nearby enemies, dealing moderate damage to them in addition to stunning them for 1 second.
Why? Allowing to engage the enemy team from further away, Divine shield (R) has a short cooldown making it really interesting. Very flexible, it can also be used during the flight, bouncing on 2 enemies who are chasing you.
Burning Rage : Deals 50 (36 + 2 per level) damage per second to nearby enemies.
Why? This talent will allow you to inflict correct damage in area, almost permanently on your opponents, in the middle of the melee, you will roast them slowly!
 Sacred Youth : Each enemy hero affected by Glare (E) heals you for 108.
Why? You gain survivability with an additional personal care capacity. However, if the enemy has heroes based on automatic attacks (Valla, Raynor, Illidan ...) we will eventually move towards Intimidating presence.
 Intimidating presence : Reduces attack speed of attackers by 50%.
Indestructible : When you take damage that should kill you, you gain a shield equal to your maximum health for 5 seconds. This effect has a cooldown of 120 seconds.
Why? Talent aptly named, Indestructible will end up making you intutable. Indeed, in the event that your opponents have by some miracle succeeded in lowering your life points to 0, they will have to do it a second time! During this time, you can take the opportunity to restore your health using Master in Regeneration, Laws of Hope et Sacred Youth.
gameplay
You are a warrior, your main task will be to take damage for your team, and to stay alive long enough to annoy the opposing team as much as possible using your controls. You will have to prevent your opponents from retreating by putting you in their path, ie the bodyblock. You will also have to protect the members of your team inflicting damage from the enemy assassins and warriors by making a maximum of mess in the melee to draw the attention on you, controlling the adversaries so that they do not reach your fragile teammates: it this is a peel for them.

The role of warrior is quite complex to grasp, because you will need to know when to annoy fragile enemy heroes and when to babysit yours. This decision-making is quite easy with Johanna: you will annoy everyone at the same time. Your ability to regroup your opponents and keep them close to you is out of the ordinary, and that's far from a problem for you, who are able to survive unchecked for a time that will seem endless to your opponents!
You hold up very well in the lane because you are virtually impossible to control thanks to your galvanization (D) which in addition, gives you a strong shield. But on the other hand, your ganking ability is also very good thanks to all the controls you have. Adapt your role to your composition: stay on the lane or be the one who walks on the map to try to make a difference and kill the opposing heroes.
In combat, your role will be, as described above, to control your enemies as much as possible by staying in their ranks for a long time. Tap everything that moves, but don't send all of your controls at once. You can group your opponents together in your allies' area spells for example, then once they flee, slow them down using Correction (AT). Your damage isn't astronomical, but your controls are really very interesting and situational. Another example where this time you have to protect your assassins: Glare (E) will save them precious time and save their life points from enemy basic attacks. Slow down the warriors wanting to throw themselves on your charges and stand between them and the opposing team. You are a wall, made of reinforced concrete!
Advanced mechanics
Johanna is not a complex character in terms of her spells per se, her role is more complex on the other hand. It is in your choice of game, your decision making, that you will make the difference. Be aware, however, that it works very well with some heroes, let's see this in more detail:


- Anub'Arak : Johanna is very interesting in a composition with two tanks. Anub'Arak deals good damage and brings more direct controls than Johanna, complementing her very well.
- Asmodan : Its damage can escalate very quickly if it is well protected, something Johanna does more than adequately. Also, its Globes d'Annihilation (A) will make holes in the life points of your opponents grouped by Blame (WITH) !
- ETC : In a similar way to Anub'Arak, ETC brings a dose of controls complementary to those of Johanna, and protects its allies very well.
- Jaina : Well protected, the Archmage of the Kirin Tor will rain an avalanche of damage on your opponents with its devastating AoE damage, which you will have previously grouped with Blame (Z).
- Kael'Thas : Similar to Jaina, Kael'Thas will happily roast your opponents using his Flame Shock (A) which will wreak havoc in the enemy ranks grouped together with Blame (Z).
- Malfurion : Good zone control with its Branches (Z) that will hold your opponents in place, it will keep you alive even longer as you generously deal shield blows to your enemies!
Conclusion
You can now go and distribute the Justice of Zakarum with great blows of the plagues, and delicately make them enter the head with your shield. Have fun with Johanna, the Crossroads of Zakarum!


