After many parts to prepare this article, here I am finally ready! : p
The last time I wrote you a presentation on League of Legends. We quickly talked about three important roles in the game:
- Carry AD, players doing high physical damage. These are automatic attacks and physical skills. (Attack speed, physical damage, critical, life-stealing, ...)
- Carry ap, players doing high magic damage. These are the magical skills used. (Power, mana regeneration, mana, vampiric spell, ...)
- Support, players supporting their team with various bonuses, protecting them and even sacrificing themselves if necessary.
There are other roles in play like Top, Solotop, Jungler. We can even complicate the matter by talking about DuoJungler but it is a fairly uncommon role.
This article will be entirely devoted to the role of Support.

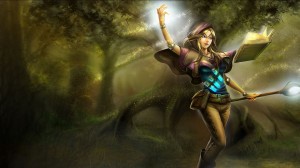
Fan-art of Supports by xMarquinhos (Deviantart)
Discover the roles with Gamesmanagers:
- Support
- Jungler
- Solotop
- Carry AD
- Carry ap
First of all, details that the rest of the article includes my take on the role of Support, month runes, my master's degrees, my equipment... There are of course other ways to play Support, but my way of doing things is highlighted here. This article will only be useful in battles in 5 vs. 5, that is to say the Summoner's Rift.
By the way, you'll find the dreaded League of Legends vocabulary here. I still try to speak correctly so that everyone can fully understand the article.
Summary:
- Presentation
- Support Characters
- Runes & Masteries
- Summoner spells
- Equipment
- gameplay
- Conclusion

Presentation
For Loliens apprentices, what is the role of Support?
The Support (you) is most often a player heading to the bottom row in order to help his Carry AD on that same row. Helping is very nice but he doesn't know how to fend for himself this adé kari? Well no! : p
Your role as a Support is to protect your Carry, especially at the start of the game. Carry can cause great damage, but its resistance is often low and it can easily be killed. You will therefore have to ensure its survival in several ways:
- By placing yourself more often a little in front of him (while remaining safe);
- By placing milestones and markers of visions (called Ward and used to have the vision of an area for 3 minutes) on the ground;
- By controlling enemy movements;
- By giving him bonuses. (attack speed, movement speed, healing, increased attack damage, shields ...).
- By letting him collect gold from slain minions and other defeated champions.
Sona, harp virtuoso. One of the sumptuous supports of League of Legends
The more the game progresses, the more you will lose sight of your opponents, so he will have to place more wards in key places on the map and help as many allies as possible. Stay close to your Carry AD as much as possible. It will be essential for you to locate your opponents in order to initiate the fights and not to be surprised. Likewise, your opponents should not know where you are.
You are clearly the mainstay of the team in the early and mid-game. Towards the end, if your game has been perfect, all you have to do is place the visions as often as possible in the key places and give some support from time to time.
Support characters (Update season 4 by Evenake)
Here is a list of the main supports which are quite complete in the current season. This list in no way represents a list that you absolutely must follow, just that these are the hottest characters.
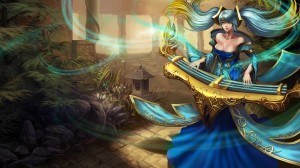
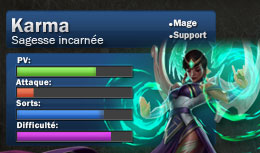
Karma, Wisdom Incarnate
Karma is quite versatile in her role of support; it has a shield which increases the movement speed of the target, a link which allows to block a target as well as good damage. Its advantage is that it obtains its ultimate at level 1, which allows it to add good effects to other spells.
- Care: Self-contained and very situational. (With ultimate and in two phases)
- Crowd control: Slowdown and cage
- Bonus: Shield that gives a movement speed bonus. (Can be placed on the whole team)
- Resistance: Moderate (+)
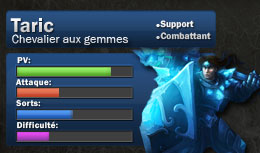
Taric, Knight of Gems
- Bonus: Increases the armor, attack damage, and power of nearby allies.
- Resistance: high.
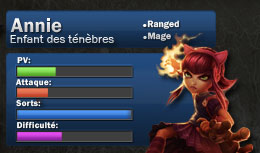
Annie, Child of Darkness
Annie is a very aggressive support, her goal is simply to wipe out the opponent with virtually no help from her allies, she has a stun and a shield to herself.
- Care: None
- Crowd Control: A passive stun that allows all of its spells to have potential stuns
- Bonus: Shield on itself
- Resistance: Moderate (-)
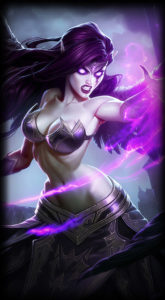
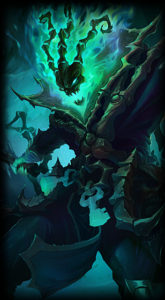
Morgana, Fallen Angel
Morgana is a little played support, in general it is used for the purpose of 'countering' a certain enemy champion. It has a cage that blocks the enemy for 3 seconds, an anti-magic damage / crowd control shield and a two-phase ultimate that stuns up to 5 enemies.
- Care: none
- Crowd control: a cage and an area stun
- Bonus: Anti Magic Damage Shield and Crowd Control
- Resistance: Moderate (-)
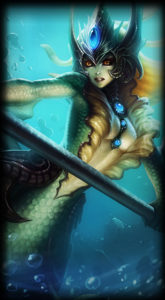
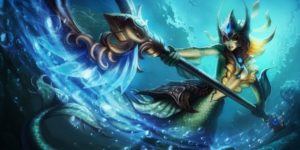
Nami, Aquamancienne
Nami is a Fish who brings with her a whole arsenal of aquatic spells! She can send a bubble that will send the enemy up in the air for 1,5 seconds, heal her allies, increase their attacks and make them move faster. Its ultimate also sends into the air and slowed down for 2-4 seconds.
- Care: Good, heals up to two people.
- Crowd Control: Two throws in the air, one of which slows down. Slow that takes effect on Basic Attacks.
- Bonus: Increases the damage of 3 normal attacks of an ally, increases the movement speed of an ally (or herself) when a spell hits the person in question.
- Resistance: Low.
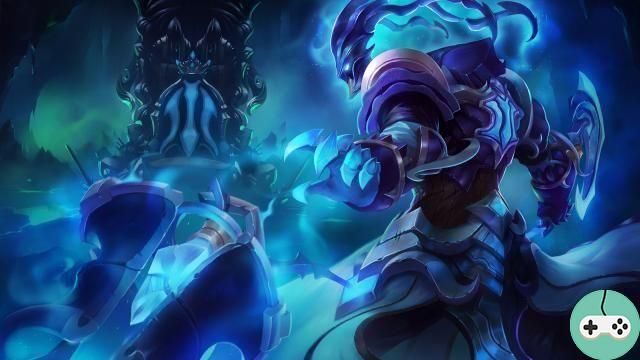
Thresh, Chain Guard
Thresh is a versatile support in the sense that he can initiate / disengage combat and can protect his allies. It has a grappling hook that attracts the enemy a bit and allows them to get closer, a spell that sends the opponent up in one direction, a lantern that gives a shield and allows an ally to arrive on its position if the latter clicks on it. His ultimate is a cage made up of 5 walls: when a wall is crossed by an enemy he disappears by slowing this enemy and inflicting some damage.
- Care: None.
- Crowd control: Grapple, slowdown, directional throws.
- Bonus: His lantern which allows you to bring an ally on you and give a shield.
- Resistance: Moderate (++).
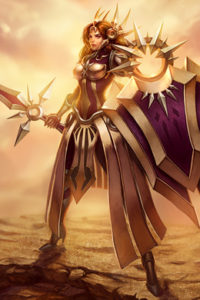
Leona, Radiant Dawn
Leona has three immobilization skills which makes her a queen in the matter. Very effective for aggressive compositions. She can also protect herself with a shield which, when exploded, marks nearby enemies. The next friendly shot at those marked targets deals more damage. His ultimate can immobilize / slow down an area. All of his skills hitting targets mark them for a period of time.
- Care: none;
- Crowd control: a skill to knock out + a skill to extend your sword to an enemy. If the hit is successful, it knocks him out and comes to him + ultimate immobilizing enemies in the middle of the area of effect, those on the edges are slowed down;
- Bonus: shield on itself reducing the damage received and marking targets (all of its skills mark targets hit);
- Resistance: high.
Runes & Masteries (Update season 4 by Evenake)
Runes and mastery points are acquired as you level up. At level 30, you have 30 places for your runes and 30 points for your masteries, so you earn one of each per level. There are 4 types of runes:
- 9 brands
- 9 Seals
- 9 Glyphs
- 3 Quintessences
These things are very important later in order to "specialize" your characters. You can become more resistant, do more damage, regenerate your mana faster and more.
Runes
Runes can be bought and have different prices depending on their qualities and levels.
- Tier 1: Level 1 to 9
- Tier 2: Level 10 to 19
- Tier 3: Level 20 to 30
Here are the runes that I have selected to best play my support.
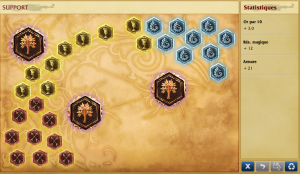
So we see that I have increased my magic resistance, my armor and that I gain 3 additional gp every 10s. Explanations:
- +12 magic resistance: I like to play a resistant support, the players believe that we, the supports, are weak whereas with these runes oh, surprise I am harder to fall. By taking these runes, I make sure that I take less magic damage.
- +21 armor: just like i pointed out above i like to be tough when playing support. Additional armor will give me better survival in order to better help my Carry AD. If he goes back (returning to the nexus to regain life points and buy equipment), I will be able to defend the tower without any problem while waiting for his return.
- +3 po / 10s: in game, I quickly take two pieces of equipment allowing me to gain 5 gp every 10 seconds, which makes me 13 gp every 10 seconds or a little more than 1 gp per second. This point should not be overlooked because as a support, you will have to let your Carry AD recover all the gold, leaving you with nothing. A vision beacon costs 75 gold, it will only take me a minute of play to buy one "for free". Eliminating an enemy may bring in a lot of gold, but the assistance also brings a lot of it even if it is a little less. In any case, it is your Carry AD which must "carry", which must be equipped. You are there to help him with this task.
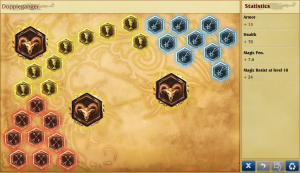
We can also afford to play a little more aggressive by taking for example magic penetration runes, as follows.
Masters
- "Classic" support
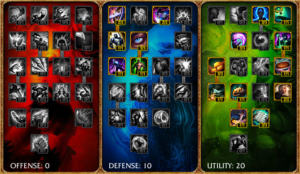
To use the list above, this page is mainly used by 'classic' champions like: Janna, Lux, Nami, Soraka. These masteries are focused on utilities, they are made for rather beginner supports. In general, we start with the latter and then gradually move on to the other two.
- Support "Tank" :
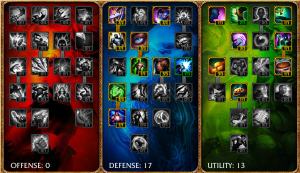
For: Alistar, Blitecrank, Galio, Leona, Maokai, Nautilus, Taric, Thresh. These masteries are as indicated for the tanks, if you couple the runes points of life to them you will be intutable.
- "Power" support:
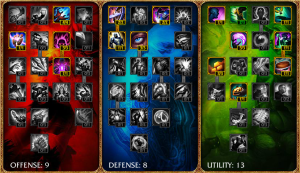
For: Annie, Karma, Kayle, Lulu, Lux, Morgana, Nidalee, Nunu, Orianna, Sona, Zyra. These masteries are for power-oriented supports, they allow you to inflict monstrous damage and increase that of allies. Gone are the days of Season 3 when supports didn't even scare a henchman.
Summoner Spells (Season 4 Update by Evenake)
For summoner spells, there are several variations but my favorite remains: Flash + Fatigue.
 Flash allows you to quickly get away from a fight, to pass through thin walls or to quickly engage in a fight to surprise the enemy.
 Tiredness Slows an enemy's movement speed by 40%, attack speed by 70%, and skill and item damage by 35% all for 2.5 seconds.
ou
 Conflagration allows you to prevent opponent heal, add a small touch of damage. To be used at the start of the fight to avoid taking the kill.
Equipment (Update season 4 by Evenake)
Now let's talk about the equipment. This is basically always the same. I then change according to what the team needs. I will walk you through step by step how to build the equipment I have chosen for the Support role.
Le Support he will have to have equipment to launch his skills faster, improve his armor / magic resistance / number of life points, he will need something support his teammate and other playing partners.
- We start with an Ancient Coin or a Relic Shield (for melee), a classic gold coin object that allows you to support your Carry AD, you then take two Healing Potions which will become Biscuits thanks to the masteries in order to to stay in line as long as possible. We then take a Beacon Totem to have the vision.
- For the first return to the base, it is necessary to improve the Ancient Medallion Piece of the Nomad (Relic Shield → Armband of Targon). We then go on a Ruby Crystal, if possible we transform it into a Stone of Vision. We then buy a Beacon of Vision and potions to finally return to its line.
- During the second return to the base, you have to buy your Stone of Vision if you have not already done so, the Boots of Speed (if possible the Boots of Mobility). As always, have a Vision Beacon on yourself and Potions.
- From level 9, transform your Grand Totem into a Grand Totem of Vision, you can now focus on your equipment because you have all the wards with your items.
- You must then complete your Nomad's Medallion in Ascension Talisman. (Bassard de Targon → Face of the Mountain)
For the moment, we have built the base, but here are the situation items:
- The Iron Solari Medallion which is the improvement of the Legion Aegis is to be done when your allies are not going to take it, it gives an aura which increases resistance as well as an active shield.
- Mikael's Crucible is a great pick-up item that heals an ally while removing crowd controls that affect them.
- Randuin's Omen is very useful if your enemy is harassing you with large physical spells that you can counter with their armor and health bonus. Additionally, this gear has an activatable passive that reduces movement and attack speeds of nearby enemies by 35% for 1 sec + 0,5 sec for every 100 combined armor and magic resist you use. to your champion. Passively, you have a 20% chance, when hit by a Basic Attack, to reduce the attacker's attack and movement speed by 35% for 3 sec.
- Various power items for AP supports such as Deadly Fire Bracelet, Liandry's Torment, Zhonya's Hourglass ,,,
Remember, throughout the game, to place your Beacons and Vision Milestones in key locations on the map! It is your role as a support.
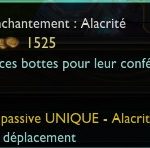
Note: There are enchantments to place on the boots.
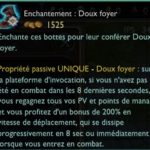
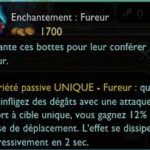
Boot Enchantments
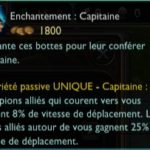

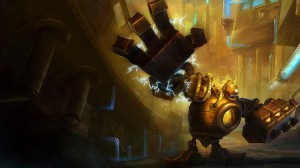
Blitzcrank, Steam Golem
When your inventory is full, signal to your allies that you will not be able to place a ward for a few minutes with a simple "I'm full-stock, I couldn't ward the map for some minutes" of place in inventory, I could not keep - set vision milestones - for a few minutes). They will then react accordingly and buy some wards to help you during this time.
To keep things running smoothly, remind your allies in the top row to buy something to light up the bush just below them. Can it save and it doesn't hurt to revive their memories?
gameplay
Like all teams, players will need to communicate with each other in order to achieve effective team play.
Communication & Vision
Your role as Support will be to signal when enemies below are no longer visible. They might then be moving up to attack your midline ally! Loss of sight of enemies on the lines is indicated by a "ss bot"which means" miss bot "or rather"We lost sight of the enemies of the bottom line".
- if you have lost sight of the two enemies below, signal it with an "ss 2 bot".
- if you have lost sight of only one of the two enemies, report it by the name of the missing character. for example "ss Alistar Bot"
- if they come back to report a "re 2 bot" or a "re Alistar bot".
Other players make different reports but I find that the ones I am suggesting to you are clear. Very often we read an "SS" but we have no information from Who? Which line ? and time is wasted searching for this information.

Janna
Don't hesitate to use the conversation! I insist on this point because too few use it (Or on the contrary, use it too much ...). Report only what is important to you.
You also have at your disposal the G key (+ left click) signaling a point to attack and the V key (+ left click) signaling a point from which one must move away. Do not mix these keys. If you can clearly see one of your enemies from the bottom going up, signal it with:
► "ss XXX bot" then make 3 G signals to designate the direction in which it is going (from the bottom to the top via the mini-map therefore). ◄
I insist, co-mmu-ni-quez !! ?
Regarding vision, by that I mean posing Visions milestones et Visions tags commonly known as Wards.
You need to know the key points, the important locations of these wards. Here they are :
Tribush
When you are in the bottom row or even on the top, the tribush will be the preferred place for enemy players who want to disturb you. This ward will save your life a lot of times, whether you are on the purple or blue team. Do not hesitate to have to fight to put a ward as vital as this one, of course that does not involve any suicide. If you are on the side that has the tribush, you can put a normal ward or a pink ward there. If you choose the latter, defend it, do not let it die just because the enemy support will have wanted to ward on its side.
Bush 1, bot
When you're down, this bush (We call Bush bushes) is the most important, you have to have a Ward in it almost constantly. Place it slightly to the left of the bush in order to have the best possible view.
Note: You can also put it next to the wall at the top left in order to have more vision but removing the sight of the bush.

Bush 2, situational bot
When you're in trouble down below near your tower, it's best to place a ward in that bush to counter any attacks that might come from around here. I usually place it in the middle.
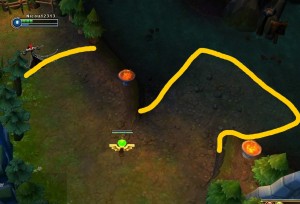
Ward's tip, bot
It is possible to ward off the lower bush while being out of sight. To do this, get as close as possible to the decor and position your cursor as far as possible in the decor. By default, your Ward will be placed in the bush!
Be careful though, this trick leaves a whole small shadow area and an enemy could hide there (if there is already) ... Which is a very big surprise effect.
Astuce de Ward, great
Likewise, it is possible to apply this technique at the top which does not include the shadow flaw of the bot trick. To do this, get as close as possible to the decor and position your cursor as far as possible in the decor. By default, your Ward will be placed in the bush!

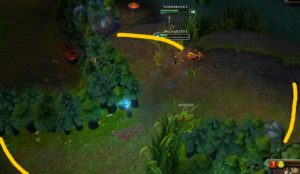
Blue golem protection
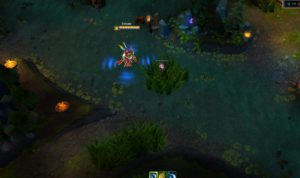
In the game, you will need to protect the Blue Golem. This jungle monster grants increased mana regeneration and decreases skill cooldowns. You have the choice between two wards, these possibilities are represented by a pink ward and a normal ward in the image:
- The pink ward (which can very well be a normal ward) is used to secure the interior of the blue, it is a ward that we place to avoid traps and to be able to steal the blue. If you place it in the enemy camp, be sure to communicate it to your jungler who will act on it.
- The normal ward is used to have an overview of the crossing, to observe the movement of enemies. If you know the position of certain opponents, you can therefore act with your team to take a Dragon or even a Nashor.
Protection golem rouge
In the game you will need protect the Red Golem. This jungle monster decreases the movement speed of the target when you hit her via an automatic attack and deals damage based on its level over time. Place your Ward in the designated location for a better view: Golem + surroundings
You can do the same for the second red golem.
Jungle path, pic 1
Again, there are of course several possible wards:
- On the one hand, the ward which is inside the bush. It is used to secure the back of the enclosure of the Dragon or Nashor.
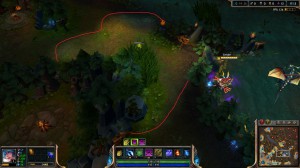
- On the other hand, the ward which is placed in the middle of the crossing. It is used to obstruct movement, not just during a Dragon or Nashor action like its little sister.
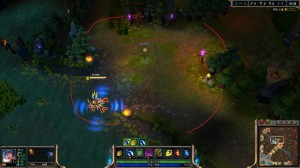
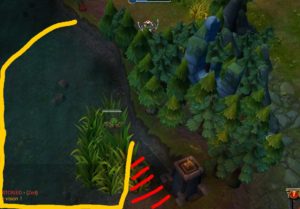
Jungle Path, pic 2
This point is very important and allows you to see a large area. Place it where the decoration fits into the earth, "at the peak", in order to have the best possible view. There are 4 such points and the same technique can be applied.
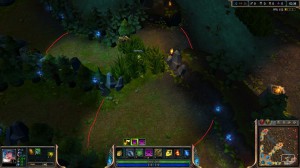
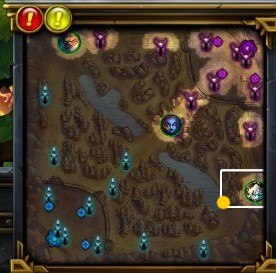
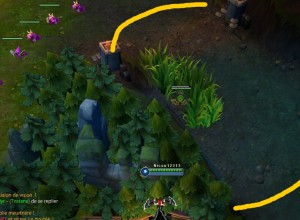
Jungle Path 3
The middle AP Carry can go through there in order to get the blue Golem which is located just above. You will know its movements, your Jungler will just have to pick it up. This passage is often used to pass "incognito". With your vision, it's missed! Place it at the end of the bush of this screen.
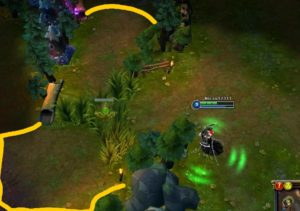
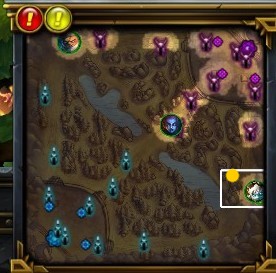
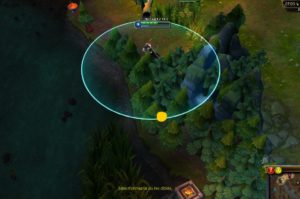
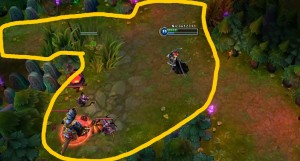
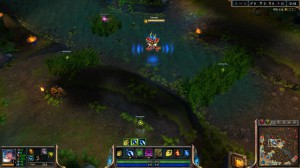
River bush
This bush is certainly small, but this is its advantage: some people do not even go inside! This is the ideal place to place a pink ward, the first pink ward you place will be this one, it allows you to have a very good vision and little chance of being discovered. It can be placed either at the Dragon or at the Nashor, it depends on the situation. For example, during a game I placed a ward at this location on my first back, it was destroyed after 30 minutes.
Of course it will not always happen like that but in the role of support, there is a fight, a war: that of vision.
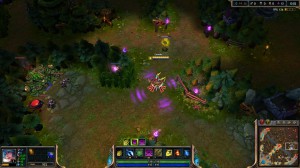
Dragon, Baron Nashor
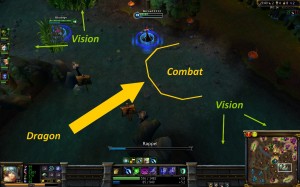
These provisions are common examples for the protection of the Nashor or the Dragon, of course your team should help you fill in the gaps due to the ward limit. Here is the classic example when you are in the top team, you have very good overview vision with only one blue gap that can be resolved by your allies.
Here we have the common example of a disposition when you are in the bottom team, once again count on your allies to fill in the gaps.
By the way, regarding the Drake, all too often players attack it and leave it there. In order to avoid having it stolen, you really have to think about making it move! ?
There are obviously other ways to place your Wards, other places as well depending on the situation or the team you are in.
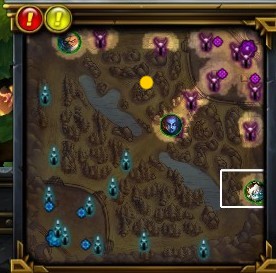
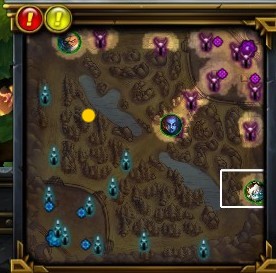
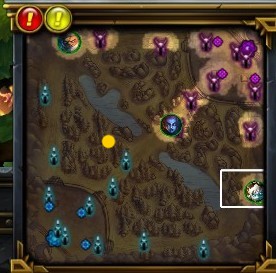
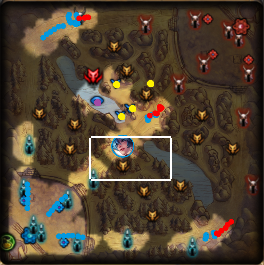
I made you a little map of all of Ward's interesting points. Like all our images, click on them to enlarge them! ?
- In Orange: The usual Vision milestones.
- In Purple: Vision Beacons for Drake (Below) and Nashor (Up).
- In red : The Indispensable Vision Milestones.

Start of game
At the start of the game, I advise you to put a Ward in the bottom bush at 2 minutes of match time. This will therefore fade after 5 minutes since the Wards all last 3 minutes.
Position yourself slightly in front of your Carry AD in order to take possible shots against it. You have a Healing Potion in case of a big hard hit.
Above all, do not attack the minions but concentrate on enemy movements in order to launch them some self-attacks if you can shoot from a distance. If you are melee, just stay close to your enemy and threaten them with a few skills from time to time. Don't be too aggressive!
More often than not, Carry AD will kill minions while you are hidden in the bush far below awaiting a chance. If you can't see the enemy Support, then throw a Vision Milestone in the second bush right next to you.
As soon as you feel it right, tell your Carry AD which character to attack, then send a G signal on the target enemy and forward! You can limit flash on it for a big surprise, apply fatigue to it and attack it just like your Carry AD does. Be careful not to kill the target, it is not for you to do so. If your teammate really can't do it, go for it; really as a last resort.
- Let your Carry AD collect the gold and build their equipment
- Press the S (Stop) key once to stop moving and not launch automatic attacks.
- Keep a close eye on enemy movements and warn your teammate of a retreat with the V signal if danger approaches.
- Report SS bot.
- Build your Nomad's Medallion and your Rubis Crystal as soon as possible.
Luxury
Mid game
You must have warded the card correctly and be equipped with a Nomad's Medallion, Boots of Mobility, Iron Solaris Medallion, and Large Totem of Vision.
The map is correct, you have vision at key points. The Drake and your Blue Golem are protected. If possible, also protect the Red Golem if enemies come to visit your Jungle.
- Stay close to your Carry AD as much as possible.
- Ward off the map at key points and areas frequented during the game.
- Protect your allies more globally.
- Start preparing what Ward the Nashor upstairs. To do this, follow the examples and do not hesitate to try your own arrangements.
- Think about what equipment to take next: What does your team need?
Game over
The Dragon Nashor is protected when needed, just like your Red and Blue Golems, the Drake is also protected. Here are their respawn times:
- Blue Golem: 5 minutes;
- Golem Rouge : 5 minutes ;
- Drake : 6 minutes ;
- Nashor: 7 minutes.
You have the most complete equipment possible to protect your team according to its needs.
- Un Iron Solari Medallion ou Omen of Rhanduin should now be yours. If you have money you can even buy both. A Mikael's Crucible can also be there if you're using a lot of mana.
- All you have to do is save room to keep Warding or equip yourself with something you need from the list of items.
Normally, in 40 minutes you should have collected 11.000 gold coins. It is an average.
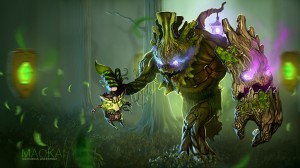
Maokai, tortured treant
Conclusion
Support is therefore a very fine, very protective role that few players like to use because "it goes 2 dega !!!". Well, ok, I'm a bad language, we don't hear (a lot) this kind of phrase at a better level anymore.
If you like to protect your team, make everything run smoothly, and others to quench their thirst for blood, this role will be perfect for you!
Playing Support from the very beginning, I'm really happy with the things that can be done with this role. There are plenty of champions to choose from, each with their own playing styles and characteristics.
There is also a new Support which will be released shortly, I can't wait to test it! Nami, aquamancienne.
I hope that this guide will have been useful to new players as well as to those a little more seasoned and veterans of the game.
Please do not hesitate to leave your comments regarding your playing style, your equipment / runes / masteries and other things on this subject, I would be happy to discuss it with you!
See you soon for a new article about ... The Jungler !
Here is my Support presentation video. Brand new to the shoutcast for me, would I improve my speaking little by little?
Scores League of Legends : Support