


Skyforge, with its Prestige system, has opted for a smoother and more constant progression of the game's avatars, and an indicator of evolution which is intended to be closer to the actual capacities of the characters. This system, which marries perfectly with the replayability function of the content, presents on the other hand certain traps which require a need to know how it works in order not to fall into it and to make the progression experience more fluid and pleasant.

The Prestige being, for the most part, equal to the sum of your character's statistics, the choice of the latter is essential in the construction of a coherent Prestige. Imagine 2 immortals of the same Prestige, one (A) having only developed its damage and critical hits, the other (B) having developed a little its hit points, its critics, its impulse. Although B will have more hit points than A but will do less damage, or Skyforge, with its lack of healer, pushes us to "kill before being killed", which would give A the advantage. by lowering the life of his opponents faster, A will recover healing orbs faster, which gives him a survival advantage over B. You therefore find yourself with 2 characters who will have a different performance in play, but of the same Prestige. The concern is that the game will not differentiate between its 2 players and will put them face to face with content of the same difficulty, in which B may have difficulty (which will be felt more and more as and when as you climb to Prestige).
This need to mount your Prestige wisely will go through several aspects, the one I will discuss in this article is the choice of your equipment and therefore your statistics. In Skyforge, the number of pieces of equipment is very limited, which has the advantage of limiting the action of "farm" that can be seen in other games where you are looking for hours for this cloak, this loop. ear or other bracelet. The downside is that each of its few pieces will have a much bigger impact on your stats, so an error in your choice will be very significant and will have a big impact on your efficiency. This guide describes in detail how statistics work. Even if it seems important to me to know it, there is a summary at the end of the article if you prefer to get to the point.
Damage, how does it work?
To help you in your choice of statistics, you will first need to understand how they work and how they will modify your damage.
Let's start with a quick reminder of basic statistics. These statistics can be found in the Atlas, in the temples as well as by the equipment. Here are mine, at around 11000 Prestige:
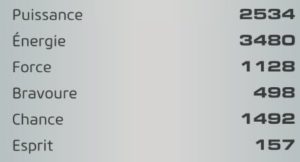
- Potency will increase base damage. Can be found on the primary weapon.
- Energy will increase your health points. Can be found on secondary weapon
- The Force will influence your base damage (the tooltip is not very well translated, we come back to it shortly after). Can be found on the rings.
- Valor increases your damage bonus. Can be found on the rings.
- Chance increases your critical damage. Can be found on the rings.
- Spirit increases your Impulse damage. Can be found on the rings.
Skyforge also has a number of secondary stats. Most are self-contained but there are 4 which are associated with 4 basic stats: Accuracy with Strength, Temperament with Valor, Crit Chance with Luck, and Discharge Recovery with Spirit. This set will give us a numerical score for each type of damage. Mine again:
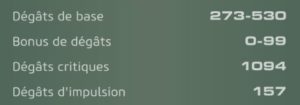
It is from these scores that the damage of our skills will be calculated. Each of them has a damage coefficient, which will be used with the base damage to calculate that of the skill in question. This base damage is first calculated by power and then modified by Force. The latter will increase your maximum base damage (unlike the tooltip). Then comes the Precision, which will increase the contribution of your Strength to the Max damage, contribution which will also be increased by the symbol Ultimate Strength. To finish on this damage, the Precision will also reduce the gap between Min and Max damage, increasing your Min damage.
Complete formulas for those interested
BonusForce = Force * 0.2 * (1 + Precision% + ForceUltime%), for Ultimate Force, each node of this symbol unlocked in the Atlas will bring you 10% if you activate it.
This bonus corresponds to what the Strength, Precision and Ultimate Strength set brings you
Max Damage = Power * 0.103 + BonusStrength
Diff = Power * 0.103 - Power * 0.097, corresponds to the difference between Max and Min damage without taking into account the Strength
Min Damage = Power * 0.097 + (BonusForce + Diff) * Accuracy%
Strength, & Co, therefore statically increases the damage set of your skills, while decreasing their variability.
The bonus damage will be added to the damage of your skill, after the coefficient. It will therefore be the same, regardless of the skill used. On the other hand, the value of the latter will depend on the number of remaining hit points of your target. If we take my example, the damage bonus will be 99 if my target has 100% of its health, but will only be 33 if it has only 1/3 of its health left. Temperament increases your Bravery contribution to the Bonus as does Accuracy for Strength, as does the Mobilization symbol (such as Ultimate Strength). The second effect of Temperament is to give a chance (equal to% Temperament) to inflict your maximum damage bonus, regardless of your target's health.
Complete formulas for those interested
Bonus = Bravery * 0.2 * (1 + Temperament% + Mobilization%)
Critical hits work a little differently from other MMOs. If your hit is critical, no multiplication of your normal damage, here Critical Damage will be added to your damage after being multiplied by the skill coefficient. It is therefore more profitable to do reviews with the skills having the highest coefficient (the latter will be available on the Aelinet soon). Your luck contribution to Critical Damage is increased by the Maximum Recoil symbol, as with other stats.
Complete formulas for those interested
CriticalDamage = Chance * 0.6 * (1 + Max Recoil%)
Impulse damage can only be triggered by certain skills (written in description). Once used, the gauge is empty and begins to fill (for 8s) and a new Impulse damage can be done until the gauge is full. Discharge Recovery decreases this cooldown, while increasing Spirit contribution. There is, again, a symbol called Intensity of Impulse. This damage is not modified by the coefficient of the skill.
Complete formulas for those interested
Impulse = Spirit * (1 + Recovery% + Intensity%)
Finally, there is a final secondary stat, called Impact Strength, giving you a chance to multiply your base damage by 2, which comes closest to the critical we are used to seeing.
Choice of equipment
Now that we've seen the impact of stats on your character's performance, we'll need to apply it to gear choices.

For this, there are 2 rules that seem to me to be essential in this process:
- Judging a piece of equipment solely by its Prestige is not a good idea, and equipping only the highest prestige items will do you no good.
- It is necessary, for the whole rings / chapels / symbols, to keep a coherence and not to disperse.
The first rule applies to all equipment. Those curious who looked at the formulas saw that Potency's contribution to damage was very low. This is one of the complicated points of Prestige, while 1 point of Power will bring the same Prestige as 1 point of Strength, 1 point of the latter will increase your damage, at least, by 2 times more than a point of Power. . So doing a "Prestige Race" won't do you any good in the medium term and risks getting you into complicated situations.
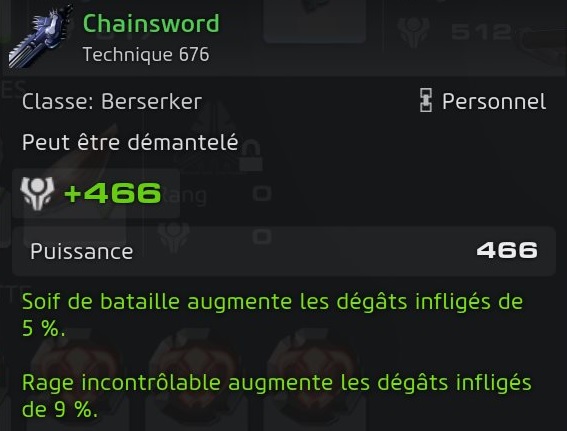
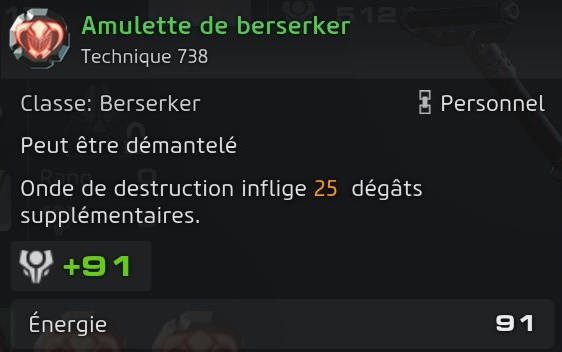
For weapons as well as amulets, their Prestige contribution depends only on their Power / Energy value. We have seen that Power was not particularly profitable, and that paradoxically, the number of HP was not what ensured survival the most, the only interest of the weapons is therefore the bonus provided by the green weapons or more. This is why you should NEVER have bladed weapons (in a pinch, when you start a class). These bonuses, very powerful, have no impact on Prestige, so will make you more powerful without your enemies being. There are only a few different types, choose a bonus that affects one of the skills you use the most, and keep those weapons until you find one with the same bonus but of higher Prestige. Even if it may seem strange not to equip this blue weapon with more Prestige, it will not bring you much and may even do you a disservice by increasing the difficulty without increasing your performance sufficiently. The same is true for rings, which brings us to the second rule.
You will need, rather quickly, to focus only on 2 statistics at the levels of your choice of rings, chapels and symbols. We have seen that basic statistics are closely linked to secondary statistics, which multiply their effects tenfold. Since Skyforge limits the number of sources for these stats, a bad choice will pay a heavy price when it brings the same Prestige as the good one. So when I speak of coherence, it is that if you choose the Force, it will be necessary to look for the chapels of Precision and the symbols of Ultimate Force.

So which statistics to choose? Well that will depend on your main class. Technically, as long as you keep consistency, there aren't really any bad choices, there will just be some more optimized than others.
- The Force will increase all of your damage indiscriminately and is an ideal candidate for the majority of classes. In addition, the Force goes very well with the Impact Force. It is hardly that the classes with skills typing a lot but with low coefficients (Cryomancer and Gunner for example) which will not benefit as much, the bonus provided being less because of the low coefficients.
- Bravery is of little use without a good Temperament score (at least 15%) in terms of progression, since it is only on bosses that it can have a real impact (normal enemies). lose their lives too quickly, thus reducing the value of the bonus). On the other hand, with a high Temperament, it could replace Strength for classes using a lot of low coefficient ability.
- Luck is for me the statistic to be climbed. Critics can affect any skill, even every "tick" of damage over time. In addition, if your class has talents that influence your critical chance (Assassin, Kinetic, Berserker ...), the question does not even arise. As if that weren't enough, Chance has a very good return between value and damage equivalence. 60 Chance points provide 60 Prestige for 40 damage points, the same in Valor bringing only 12, for the same Prestige.
- Spirit is the newest one, only works on certain skills at a fixed interval. Storing Spirit only has a real advantage over other stats for 2 classes (Lumancien and Knight), which greatly benefit from impulse. Spirit having the best yield of the 4, focusing on Spirit will not penalize you, as long as you remember to use impulse well all the time.
Summary
If we summarize this guide:
For weapons and amulets: Do not look at the Prestige or the color (unless it is white, immediate dismantling), only interested in the bonus provided. If it increases your damage, it's all good, if not, wait for the next one.
For rings / chapels / symbols: Choose 2 stats, and only take rings with them. Strictly speaking, if you come across a ring with only 1 of the basic statistics (with a nice improvement in the latter) but with a significant bonus on one of the associated secondary statistics.
I advise you to go on a Strength / Chance set, with in order of priority for the chapels: Precision, Impact Strength and Critical Chance. Of course, you will also have to look for the associated symbols in the Atlas (Maximum Recoil and Ultimate Force).
The Bravery / Luck combo can also be effective with chapels: Temperament, Critical Chance. Maximum mobilization and recoil. My preference still remains on Force / Chance.
I'm done with this gear guide, which is one facet of how to progress wisely in Skyforge. I have, in my previous sprees in the Beta of Skyforge, fallen into the trap of the "race for Prestige" and paid the price rather quickly (around 9k Prestige), with adventures impossible to finish. My current progress is much smoother and more enjoyable since I pay attention to that. I recommend it particularly. There is another aspect to take into account, which is the Technical / Prestige duality that I will discuss in a future article, which is another phenomenon, arising from what we have seen here, and which can cause you problems. .
Do not hesitate to ask your questions in the comments, I will try to answer them as best as possible.


