


Mereel Jaster, Commando of the Kraken guild on MotF, arrived on the game at 2.0 but subscribed only to 3.0, I will present my way of playing the DPS commando. So get ready for your cannon will smoke, your energy will falter. A way of playing, a balance between raw power and endurance, to walk to the sound of the Imperial Anthem on the body of your enemies
The commando is, it seems, a 5-key class, and yet I'm always surprised to see so few at the top of the pyramid; because there is a certain subtlety in its gameplay. A friend asked me the question: "And then when you mouse click, it does not become 2 keys?" As Shevadra would say; "We don't give a fuck, just slaps and survival!"
So prepare your guns, for we are the rock in the midst of the firestorm

Generalities
I will not dwell and just recall its main advantages and functions.
- Heavy armor, though 80% of gear is now adaptable.
- Ranged damage / healing (30m range).
- No more energy cell to distinguish specialties.
- Possibility to dispel or dispel a member of the operation group and heal it.
- High mobility
- Resurrection of allies.
- Assault gun and generator equipment.
Three specializations:
- Assault
- Artillery
- Combat nurse
The Commando Artillery
Burst specialty (inflicting large damage quickly), currently the most optimized on the vast majority of bosses, it offers an undeniable advantage, which is its speed to move from one target to another, with a single damage over time ( DoT) to pose (the gravitational burst). But be careful, even if it is easy to do a good DPS in artillery, you have to go to the trouble of really mastering it.
You should also know that doing a large DPS is not enough: avoiding taking a maximum of damage is also a quality in a DPS, especially in the commando which is extremely mobile.
Commando 5.0 note patch: simplified artillery spec
General changes that impact PvE
- The explosive salvo (to be avoided in Artillery) is now exclusive to the Commando.
- New Active Power: Resonating Deterrence, which absorbs all direct damage aimed at you
Artillery
- Passive: Cover fire modifies the effects of the Supercharged Cell. Requires and converts 10 Super Charge to recharge 10 Energy Cells. Increases armor piercing by 5% for 8s. In addition, the damage dealt by Gravitational Salvo, Demolition Salvo, Flurry of Shots, and Vortex Shot increases Alacrity by 1%.
Uses in PVE that may be useful
- Knockout Force (Updated): Explosive Salvo immobilizes the target for 4 seconds. Direct damage inflicted after 2 seconds stops the effect. The effect is available every 8s.
- Parallactic Combat Stimulants (Mod): When stunned, immobilized, knocked down, or other incapacities, you recharge 20 cells (was 10 cells). And your next tech power deals 10% more damage.
- The effects of the combat shield have been combined with those of the medical zone. The medical area has been removed.
- The effects of the Supercharged Defense have been combined with the Heavy Soldier effects which have been removed.
- New use: Man-army. Electro-Net grants Man-Army Power, increasing Alacrity by 15% for 9 seconds. And the Supercharged Cell reduces the cooldown of Adrenaline Rush by 5 seconds.
The different powers
- The attacks
- Utilities / Energy management
- Defensive powers
Mono attacks
 Shooting Flood
Features:
It is the basis of your DPS, in a fight it represents 35 to 40% of your overall DPS. It has an excellent DPS / cells consumed ratio. You must use it as soon as it is available (up).
To know :
This must be combined with the triggering of (proc) Fire curtain (see the chapter on procs).
 Gravitational burst
Features:
This is your DPS filler, that is, it is to be used if no other priority power is available due to the fact that it has no cooldown. The burst is only used to trigger the curtain of fire. On impact on the target, it reduces its armor by 20% and increases the damage of the demolition salute 25% over a period of 45s.
To know :
Use it in first attack during each change of target, it drops the debuff vortex gravitationnel. For each burst, you accumulate 1 charge of “Supercharged cells (see the chapter on utilities) and its use allows you to accumulate 1 load of locking tracing (see the chapter on procs).
And avoid chaining this spell 3 times at most.
 Demolition Salute
Features:
This is your main shot!
To know :
This is only used if your target is affected by your "Vortex gravitationnel". This power gains self-criticism (auto crit) from your Eliminator Set Bonus.
 High impact shooting
Features:
High impact shooting is one of the big shots in your arsenal. It can only be used if your target is affected by the vortex gravitationnel.
To know:
To maximize its yield, use it when you have 5 charges of interlocks tracing (see the chapter on procs).
 Vortex Shot
Features:
Instant, it allows you to remove the incation time of your next gravitational burst.
To know :
Like all your other offensive powers, use it while under the effect of vortex gravitationnel.
 Electro-net
Features:
It is a DOT (damage over time) with a very good yield and the best dps / cells consumed ratio. Its cooldown is very long. Remember to check back regularly.
To know :
If your target is mobile, it will do 20% more damage.
 Pestle shot
Avoid as much as possible but use if you are at 15-20% energy and your energy recharge or energy saving is not available. No more than 2 shots in a row, the best: 1 in 4. Or better: none.

Multi attacks
 The Mortar Volley
Second attack to do on multi, if you engage in zone combat.
 Plasma Grenade
Features:
Incorporates in about 1.33s (depending on your alacrity) and spreads to 8 targets. The damage is triggered for 6s.
 Avalanche Shooting
Features:
Only worth it if you have the point Avalanche Shooting (25% more damage) which is at the Ability level. You can sacrifice strengthened immutability of the Mastery level if you wish to take it.
 Adhesive grenade
Some use it, I find it not worth it due to its consumption of 15 cells for very little damage.
 Technological manipulation
Features:
Utility Excluding GCD (global reload time), it allows you to make your next power instantaneous. Use only with your gravitational burst in mono cycle. In the case of a multi cycle, use it with your Plasma Grenade.
 Cell economy
Features:
For best use, place it before the deluge of shots, your biggest cell consumer or during one of your zone attacks.
 Recharging cells
Features:
Utility Excluding GCD (global reloading time), it allows the reloading of 50 cells. It is also an offensive spell when changing targets or needing to increase its damage slightly thanks to the talent. cell capacitor (Ability level). It recharges 15 additional cells and will give a gain of 10% alacrity for 6s.
To know :
Don't wait until you run out of energy to use it! Use it between 40 and 25 cells min.
 Supercharged cell
Features:
Utility Excluding GCD (global reload time), it can reload 10 cells (more details in the patch note). Use it as soon as it is available.
 Medical injection
Features:
Each of these uses also grants a supercharge charge to get to 10 and give you the ability to use your supercharged cell.
To know :
To be pre-cast before each fight to benefit from the supercharged cell from the start of the fight.
 Resonant deterrence
The brand new CD of the commando, it is a reflection as for the guard. It therefore absorbs all imminent direct damage intended for you during the time it is activated, and returns 50% of the damage absorbed to the attacker.
Damage absorbed: Strength and Techno.
Does not work on group or random clives without boss targeting (sweep attack), nor on DOTs and Debuff (therefore internal damage) that you receive.
 The fun
Perfect for breaking mechanics, because the 5 diversion charges allow you to absorb big damage in addition to reducing our animosity. It intercepts and completely absorbs the next Tech or Force attack.
(Example: To be used at the end of the Curse on the Dread Guards, it avoids taking the yellow / green areas or to take the balls on Brontes without waiting for the charges).
 The reactive shield
This guide is not intended to teach how to play in PvP, open can be used but there are surely better ones for this case. The points presented here are also not the same as in PvP. One piece of advice in this situation: use your bump (spell to repel), cut (spell to interrupt), stun (spell to stun), and mez (spell to charm) it is always useful.
The points of use
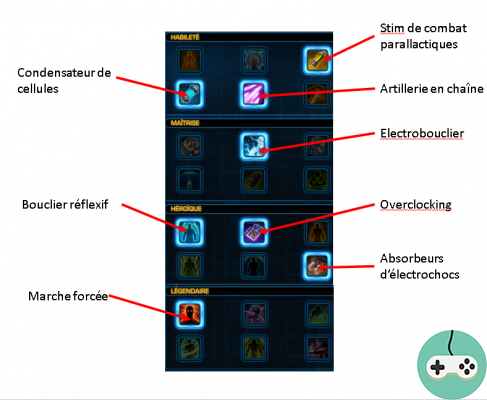
Why these points?
- The Parallactic Combat Stim allows in combat to regenerate energy if one is interrupted and increases the damage of the blow which follows the interruption, it is always a plus.
- The cell capacitor is compulsory because it increases the efficiency of our cell recharging, not to mention the slight gain in alacrity.
- Electrshield, to do damage to the boss when it does to us.
- The choice of the reflective shield is simple: you never have enough defensive spells. And this point allows our shield to come back faster, it brings other advantages on some bosses that you will see at the end of the guide. Overclocking is very important in opening, not to mention the increased damage and the slight time saving it gives.
- Shock absorbers, a lot of bosses do area damage or ticks that aren't really worth slamming a true defensive spell. This relieves healers of damage taken, which is always a plus.
- Forced march, essential to be mobile
Depending on the bosses, you can switch between chain artillery and reinforced immutability, the man-army can be useful for gaining alacrity on additional enemies (adds), it is not mandatory but can replace the shock absorber.
The rotation
Spirit of Rotation
The gravitational burst placed at the start of the fight is used to put the armor debuff immediately (gravitational vortex), the dopant is placed in 2nd position to have it until the second demolition burst.
The use of super-charge is not made from the start to take advantage of its recovery of 10 cells and for it to last until the second demolition salute, that's why we place electro-net avant la super-charge .
La gravitational burst in 8th position is done under the trigger (proc) of the vortex shot to have it instantly. We must use overclocking to start the fight as quickly as possible and to have combined triggers. So the techno manipulation is used instantaneously for one second gravitational burst.
The goal being to have for our 2nd demolition salute (in 12th position) all the processes: end of the super-charge, dopant, the 2 relics and of course the Set bonus.
La gravitational burst in 13th position is also launched instantly thanks to the second charges of the techno manipulation due to overclocking, which resets the reload time of the deluge of shooting.
Be careful, this opening of combat is only possible with 13.05-13.90% alacrity otherwise you risk having shifts between procs (triggering) and cooldown (reloading) of powers.
During the fight, you will still sometimes roll 3 gravitational bursts. So pay attention to your energy or wedge a pestle shot between 2 gravitational bursts if you are below 45% energy and you do not have your energy regeneration spells.
To maximize your DPS, if the high impact shooting did not proc, that the vortex shot and the demolition salute are not available but your you have just triggered your deluge of shooting. Do not use it right away, redo hi gravitationnel then one of the priority spells before casting your deluge of shooting.
Practical details
- To be cast at 2 of the count at the start of the fight
 Power dopants
- +
 Clickable power relic instead of mastery depending on bosses (Brontes, Nightmares if you do Anomalies, Calphayus). Otherwise put a Mastery auto-proc relic.
- Only under curtain of fire
- Under trigger of vortex fire
- +x1
- Only under triggered gun loaded + gun overloaded
- Only under curtain of fire
- Under-cell super-charged, doping, triggering eliminator, triggering relics
- Under the second load of manipulation under overclocking
- Energy saving either here (normally you are at 60-70% energy), or at your 4th flood
The priorities
- Demolition Salute with or without Eliminator Bonus

- si
 x5
x5 - si

- Unless the boss is very mobile, where he goes into 4th position
- To trigger the curtain of fire and loaded cannon charges
Understand the why of rotation and its procs
From Jàra's guide
Only procs acting on the DPS rotation will be developed
+  The loaded cannon + overloaded cannon
Description:
Each use of the gravitational burst confers the loaded and overloaded cannon, increasing the damage of high impact shooting and its 3% critical chance per stack with a maximum of 5 stacks. The talent gravitational influx double the number of charges each time gravitational burst.
Imperative:
Before using your high impact shooting, wait until you have the 5 loads of "Loaded gun".
Fire curtain
Description:
La gravitational burst et the avalanche of gunfire cancel the recharging time of the deluge of shots and increase its damage by 10%.
Imperative:
Do not use your Flurry of Shots that under the triggering of fire curtain.
Eliminator bonus
The "6 pieces" set bonus is to be acquired as quickly as possible.
If you are in 22 * gear, keep it and replace it as you get new 23 * or 24 * armor. You don't need to have all the pieces in the Set, 6 is enough; You can therefore put in 7th room an armor of index 240 (craftable) if you are in 23 *!
Equipment and Stats: 5.0 & 5.1
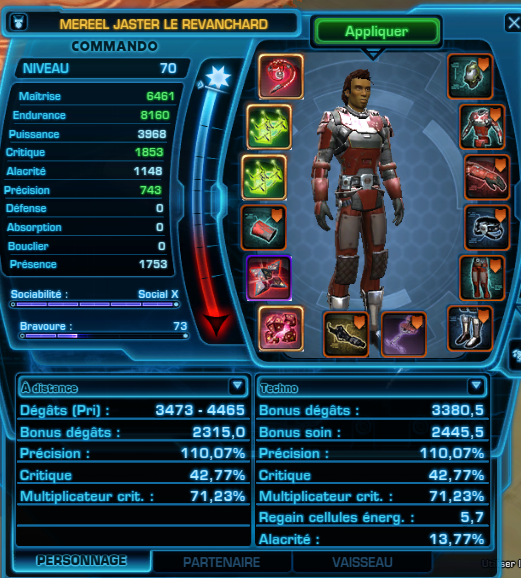
I chose to increase my crit as high because it allows to have 2 hits out of 3 under critical which allows me to be sure to do my Flood of shooting on an entire fight almost always under critical. I did not increase my alacrity because I often found myself running out of energy ... Poor management probably due to the fact that my powers returned faster.
I also tried the optimization with 41% crit and potency but my DPS, admittedly slightly more stable, was in the majority of cases lower. So I rely heavily on criticism, I think many will tell me that this is a mathematical miscalculation but, compared to my essays, this is the best I have found.
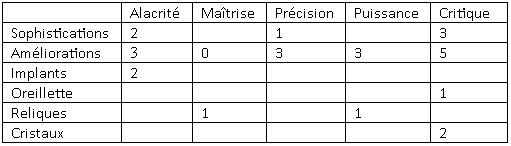
The distribution on my equipment (with a precise stim):
Optimize your DPS by exploiting the mechanics
First thing, you have to know your cycle, so the pole so that it goes in and not just 1, it's 5 to 10 until you have a good handle on your spell triggers and everything that goes with it. It will take you a while, but you have to, and no pole on the fleet, thank you very much. So on your ship and consider using the life and armor debuffs. Same even if you are in the energy potatoes halfway through the post, continue to learn how to catch up. It is better to do 10 posts than to go on a CDE or a PDK!
A good DPS is also a player, especially in distant, that takes the least possible damage, to relieve the healers and let them concentrate on the Tanks. The less damage you take, the more healers can hit from their side as well.
Using the spells below to gain DPS will not make you a good DPS. To earn DPS, you need to know the Boss's placements, you need to anticipate.
You can use CDs to gain DPS, but avoid taking the boss's attention back (aggro) just to boost your DPS slightly (so consider using the diversion at the same time). This can be used to avoid Boss Enrage if your party is too low in DPS but understand that you need to be able to pass Bosses without Enrage except some in Nim.
The best advice I can give you is to learn how to master your class before you use them and be fully familiar with the strategies. Be careful, in many cases, you will take damage, warn your healers and tanks. If they don't agree don't!
(The list is not exhaustive)
Temple of sacrifice:
Revan: Immutability during Push or Pull
Karaga Palace:
Jarg & Sorno: Unloading of Sorno. (Reflection and Electro-Shield) if you do it with a single tank.
Explosive conflict:
Calcinis & Stormcaller: Double destruction. Rotate CDs and use reflective shield.
Warchief Kephess: Under the Walker. The 2 CDs if you want at the same time, but don't do it when there are the Ad "warriors + the others", you risk taking the aggro back and getting killed instantly.
Nightmare from elsewhere:
Absolute Horror: Yellow AOE from the debuff (deterrence) + small ad (reactive shield)
Fright Guards: Curse (to be cast before the end of the debuff: risk of recovery rather to use when you are strangled and use your Diversion which absorbs the Curse). This avoids running across the room to take yellow / green AOEs. This means less movement and therefore less risk of being out of reach of the Boss.
Kephess: Red laser (you don't take damage so less healing for Heals), AOE in P3.
Lair of infamous thugs:
Titan 6: Ad (This allows you to tap Titan and lower the life of a drone at the same time without it going to annoy a healer)
Slayer: Arsonist & Demolisher AOE (Avoid Demolisher damage)
Dreadmaster Styrak: Lightning (deterrence), the rolled dragon ball you can take it with the reactive shield + the diversion (practical for the Off tank to keep its CDs.
Dread Fortress:
Draxus: Shield bearers with good CAC and electro shield rotation then deterrence, this also allows you not to take too much damage and therefore have to leave the dome to be healed
Corruptor Zero: Missile Barrage
Dreadmaster Brontes: Boules (balls with diversion or deterrence) = avoid waiting for stacks so gain DPS.
Dread Palace:
Dreadmaster Tyrants: Flames at the entrance (attention, take care of huge agro !! and only deterrence works)
Pests:
Intendant Bulo: Ad (Barrage to avoid moving, diversion during the barrage to avoid taking damage), the goal here is not to scratch the DPS by the reflection but to save time by avoiding moving, which also gives other players in the group more room to position themselves.
Thank you
I thank my colleagues and commando comrades Jara, Rhexor and Urthennech who referred me to when creating this guide.
One of my regular scores is:
- http://parsely.io/parser/view/248619
The best:
- http://parsely.io/parser/view/238287/0
The equipment with which its poles were made half 240-242
PS: This is not the ultimate guide; each boss requires adjustments, but it allows you to drop the HM and get away with NIM.


