


A guide from Mnemosys-within, says Nemo, to the PvE-oriented Healing Scholar.
Following the last Red Five Guild Sponsorship evening, I made the decision to write down what little knowledge I had about the Healing Scholar class.
As a foreword, I want to reassure everyone: it is not about denigrating the work of others or saying "That's the good word!". On the contrary, the exchanges we had during the evening were most interesting and constructive. Hence the fact of confronting each other's ideas, points of view and ways of playing in order to bring as much as possible to those who seek to improve in the classroom.
Hereby, my goal is to provide solutions, which are certainly not the most suitable or the best, but which are the ones I use to treat you in-game. Everyone is free to be inspired or not, to learn things or not, to see the mistakes that I can make or not ...
So, it is my own self-criticism that I am presenting to you, but which I hope will prove useful to those who intend to play Erudiut Soin one day.
Summary
- Introduction
- Points of Use
- Discipline
- Healing powers
- Healing spell priority advice
- Make damages
- Equipment and statistics
- Interface
- Small comparison between care classes
- Conclusion
Introduction
In the world of Star Wars The Old Republic, we are faced with 3 types of healers designated below in the order of family, class and specialization:
- Soldier -> Commando -> war medicine
- Smuggler -> Thug -> surgery
- Jedi consular -> Scholar -> protection
In this topic, we will only focus on the Healing Scholar class. This healer is very competitive in keeping the whole party alive, whether in PvE (Player vs. Environment) or PvP (Player vs. Player).
It has interesting strengths, but also weaknesses that should be taken into account. For the strengths of the class, we will note:
- Excellent synergy with his co-healer in Operation.
- Great mobility, ideal for treating while moving or resting.
- An ability to do interesting treatments in single target or multi target.
When it comes to weak points, we will particularly insist on:
- Its low protection, due to its light armor and because it only has a few Uses that increase damage reduction (and again, using the corresponding Use points).
- Its problem with reassembling an entire group when it has taken a lot of damage in a very short period of time (only Wandering Rectification allows us to do this, but it is not enough for the whole group. group).
So much for the presentations! Now let's get to the heart of the matter with first of all ...
The points of use
You have 3 levels at your disposal: Skill, Mastery and Heroic. Among all the possibilities, only 7 Usage points to distribute… The choices you are going to make are therefore decisive.
First, an overview of what to expect:

- Skill
- mastery
- Heroic
Seismic control : Increases damage dealt by Force wave by 25%. I choose him in PvE to help as much as possible to do multi-target damage. This is the only point that can be discussed on the Skill level.
Jedi Resistance : Increases damage reduction by 3%
Pain relieved : Increases all healing received by 10%. Does not affect redistributed life.
The last two are essential. For PvP I replace the first point with:
Benevolent haste : Benevolence increases the target's movement speed by 50% for 6 seconds. This effect is only available every 12 seconds.
Telekinetic Defense : Increases the amount of damage absorbed by your Force armor by 10%.
Valor : Reduces damage taken by your Rescue target by 25% for 6 seconds. Additionally, increases the healing done by the Force Rectifier by 30%.
Force Mobility Turbulence, Healing Trance, and Force Serenity can be activated while moving.
Life guard : Your Force armor, Force barrier, and Tenacious Stronghold restore 2% of your total health every second for their duration. Healing increased to 8% with Tenacious Stronghold charges.
The choices here are dictated by the fact of increasing the survival of the group as much as his own. For PvP, I would say there are a few variations on the points of use, but you have to adapt your playstyle accordingly. For my part, I prefer to stay in a style close to PvE, that is to say in support.
Discipline
As you advance through the story or level up your character, your character develops new skills or powers. Very often, the average player is not really interested in these developments, and this is a major fault in my eyes!
Indeed, if you do not intend to play at a high level, that does not pose a problem, you do not need to know your class inside out… On the other hand, if you want to participate in more level content. complex, you must take the time to study the mechanics of your character. * it reminds me of something we already talked about *
Therefore, to answer your questions, you have to go and study your talent tree (called discipline path in the game, but I don't like the name). It is located next to the Usage points you chose just before.
On this tree, read every line, every power. Once the mechanics are understood, combine them by testing the “blank” powers on yourselves: you have to appropriate the winning combos so that they become reflexes and that they allow you to maximize your healing.
So let's look at this together taking my values at the time of writing the topic:
Délivrance : activation: 1,78s; Strength: 34; range: 30m. Restores 7181 - 8281 health to a friendly target.
foresight : passive; Reduces knockback taken while activating healing powers by 75%. Reduces animosity generated by healing by 10%.
We have here a good example which arrives from level 12! This passive power helps us a lot, but we have to come to understand it. What exactly is he doing? What is the setback suffered? And the animosity? Quite simply, when looking to channel a healing spell, there may be times when you get attacked while channeling. Therefore, your care will take longer to be channeled. This is the recoil undergone, and you can visualize it on your channel bar. So you know that from now on, your healing spells will be more efficient thanks to this power. As for animosity, it reflects the threat you generate. Thus, healing represents a threat, which is not easy for a neophyte!
Consequence here: less threatening care! There are things that will always make us laugh a little!
Unchanging force : passive; Reduces the Deliverance activation time by 0,5s and the Force of Benevolence cost by 5.
I will take an example here so that you understand the importance of cross-referencing the data. I am only interested here in deliverance. The delay is reduced, but we saw a little before that its activation was done in 1,78s. This means that without this passive power, its activation would take 2,28s! It's not the same music at all ...
Assignment : passive; your new youth grants cession for 15 seconds, increasing the effects of your next healing power:
- Benevolence: Critical strike chance increased by 60%.
- Deliverance: Activation time reduced by 0.5 seconds.
- Healing Trance: Critical strike chance increased by 25%.
- Hi: Force cost reduced by 30%.
- Wandering Grinding: Immediately heals each target without waiting for them to take damage.
Surrender is therefore a particularly interesting temporary buff for your next healing spell. From my perspective, the order of priority in using the buff is: Wandering Rectification> Healing Trance> Deliverance> Benevolence.
Preservation : passive; Reduces the Force cost of Force armor by 15 and reduces the duration of Force imbalance by 5 seconds. Force imbalance is the debuff that prevents being targeted by Force armor again. It lasts 15s thanks to the reduction.
Healing trance : pipe: 2,13s; cooldown: 6,7s; range: 30m; Restores 12180 health to a friendly target and consumes 48 Force points for the duration of the channel.
Mending of wounds : passive; restoration negates all negative physical effects and restores 1746 - 2296 health to the target. Dispell spell, important for both PvE and PvP.
Force Shelter : passive; increases the duration of the new youth by 6 seconds. In addition, the New Youth protects its target for 45 seconds. Armor rating of protected targets increases by 10%. The power of new youth takes a serious boost!
Serenity : passive; Increases Force critical strike chance and damage reduction by 3%. Another power that slightly increases our statistics. It is always appreciable!
Clairvoyance : passive; increases your healing bonus by 5%. It appears in the Strength tab of your character sheet. It is calculated based on your Power, Strength, and Skills / Buffs index. It is indeed the whole of the care bonus which is increased by 5% and not your 3 price indexes separately. You must not exaggerate !
Hello : activation: 1,78s; Strength: 54; cooldown: 10,7s; range 30m; Applies a regular healing effect to up to 8 allies within 8 yards of the target area, restoring 7138 health for 10 seconds. Once the target has received the regular healing effect, they can leave the area while continuing to heal. Our treatment zone fate explained clearly and simply. We will come back to this in more detail in the next chapter. Note that you already had advantages on this spell without even having it available until then!
Resplendent : passive; Critical healing from healing trance grants 1 charge of resplendent, increasing the effectiveness of your next salvation or retribution.
- Retribution: Restores 5 additional Strength points and consumes 1 charge. Retribution does not cause your fatigue when used in conjunction with Resplendent.
- Hi: Reduces the activation time by 0,25s for each of the first two charges or activates it instantly with the third charge. Consumes all charges.
The power associated with the healing trance which gives us a temporary buff of 30 seconds. The delay resets when you get an additional charge, but not when you consume one. Two incidences for this buff, we'll get to that shortly after, but just be aware that fatigue is the debuff you get when using retribution and not having a shine charge.
Guardian of the Force : passive; healing trance channels and procs 20% faster, and Wandering Grinding grants resistance to targets it heals for 45 seconds. Resistant targets internal and elemental damage reduction increased by 3%. All is said ! The buff added by the Wandering Grind is called Resistant.
Amnesty : passive; The Force Barrier now purges the fatigue effect caused by Retribution. Additionally, spending a charge of Resplendent on Retribution grants Amnesty, increasing your Strength regain rate by 2 for 10 seconds if you are not suffering the effects of Fatigue, or otherwise negating a stack of tired. Amnesty effects will be prematurely lost if Retribution is activated without a shine charge. Everything is clear here, but you have to take the time to do some dry runs to see what is going on. Test the different situations mentioned and see the results directly on your buff and debuff bars.
Renovation : passive; 1 second after resetting your New Youth on a target, the target will regain 876 health and gain all remaining healing from the previous New Youth. An extremely interesting effect! As in the previous point, do some dry runs to clearly understand what this entails. I was amazed the first time!
Erratic rectification : instantaneous ; Strength: 35; cooldown: 13,3s; range: 30m; Places a corrective force around the target, which restores 7394 - 8550 health on the next wound taken. Once the target is healed, the Wandering Grinding hits a friendly target within 20 yards. Wandering Grinding lasts up to 30 seconds for each target, and can move up to 3 times (4 targets in total). Wandering Grinding can only be placed on one target at a time.
We finally unlock the power of errant rectification. We have seen that the latter has already been extremely boosted as we advance in the path of discipline. I remind you that the errant rectification only lands once on a single target. This implies that the previous one will be deleted in favor of the new one if it has not been used.
Altruism : passive; mind crushing, derangement, deliverance, and salvation grant altruism, which allows your next benevolence to activate instantly and removes its Force cost. This effect is only available every 10 seconds. So you have 4 ways to obtain free and instant benevolence! Two offensive methods and two while healing. Enjoy it!
Scholarly rectifier : passive; Increases the healing done by Wandering Grinding by 5% and reduces its Force cost by 10. Look no further, now you know why erratic rectification is so effective!
Be sure to associate your Usage points, your set bonuses, group inspirations with your discipline path… anything that can lead to a change must be taken into account, considered, because it can have an impact. affect the way you treat effectively. Cross the information to understand the whole situation.
More generally, you have to question yourself regularly. Do you think you are the best? So why did a member of the group fall? Why aren't you the healer in PvP? Was it your fault, were the circumstances special?
Even the best waiter healer knows someone he considers even better! Thus, your goal is to constantly seek to improve yourself by testing, researching, exchanging with other healers… Do not rest on your achievements!
Healing powers
As we have just seen, the Discipline Path is already a rich source of information about your healing spells. Nevertheless, I suggest you come back to them and detail them as much as possible. What do you want, you are a Care Scholar! So this is your base, and you owe it to yourself to master it.
In this part, we will study the powers taken one by one, but also the possibilities they offer you by combining them with each other. Let's start by listing all of the healing powers available to you:
- New youth
- Délivrance
- Force Rectifier
- Force armor
- kindness
- Hello
- Erratic rectification
- Healing trance
- Restauration
- Force barrier
- Force Self-Feeding
- (Flot the Force)
- The utilitarian powers.
Reminder: The values taken are those from my character at the time of writing the guide.
 New youth : instantaneous ; Strength: 27; Cooldown: 5.3s; Range: 30m. Immediately restores 1995 - 3096 health to the target, plus an additional 2546 for 15 seconds.
After the immediate treatment, you will receive a long-term treatment every 3 seconds, i.e. 5 more small treatments after the first. It also grants two additional buffs on cast: Abandonment for 15 seconds and Protection for 45 seconds.
To this, we can add that the fact of reusing your new youth on the same target gives you the renovation. This treatment is particularly useful since it can potentially be more effective than benevolence.
Use: Due to its many bonuses, use the new youth as soon as possible! I recall the order of priorities for the following treatment, even if it is the situation that commands: errant rectification> care trance> deliverance> benevolence.
Remember to make the most of the renovation, especially on your tanks in operation. You can switch between the two tanks without any problem.
Note that you will start most often during your first new youth, if you have your two relics, with your power surge and mastery surge bonuses. Make the best use of these bonuses by avoiding overheal from the start or do some DPS.
 Délivrance : activation: 1,78s; Strength: 34; range: 30m. Restores 7181 - 8281 health to a friendly target.
Once the casting is complete, there is no cooldown.
If you benefit from the surrender, your casting time will be reduced by 0,5s. What's more, if you also have the Force Mystique critical bonus (buff given by the 2 piece set bonus), your next release will automatically be a critical.
Finally, think about your talent tree. Your selflessness provides you with instant free benevolence in Force every 10 seconds when you use deliverance. An interesting combo of the blow.
Use: Rescue is an interesting heal to use in operations, especially with your Force Mystic critical bonus. This is also one of the powers that activates your altruism, so use it as much as possible to manage your healing during combat.
The cession is interesting to use in PvP because we will try to control you as much as possible. However, for PvE, prefer Wandering Grinding or Healing Trance whenever possible.
 kindness : activation: 1,33s; Strength: 45; range: 30m. Restores 5829 - 6930 health to a friendly target.
Remember the effects of surrender and altruism in order to tailor your care as much as possible.
Use: As soon as you can use the effects of altruism, take advantage of it. The heal is useful for quickly raising a person with little health, but it will cost you a lot of Force points. Good management of your care should allow you to avoid these situations if your group is competent.
 Force armor : instantaneous ; Strength: 17; range: 30m. Surround the target with a force shield that absorbs a large amount of damage and lasts for 30 seconds. The target suffers a Force imbalance and can no longer benefit from Force armor for 15 seconds.
If you pair the correct Use point (Life Guardian), your Force armor will heal you for 2% of your maximum health per second.
Use: In general, do not use your Force armor on another Scholar. Its use must be done in priority on your Tanks. Use it regularly on yourself as well in order to turn your life around without extra care.
What's more, your Force armor absorbs a large amount of damage (around 10k) so you can use it to absorb big damage that you can anticipate or on DoTs while you are boosting your tank's health.
 Force Rectifier : instantaneous ; cooldown: 30s. Immediately restores you 11214 - 12645 health. Cannot be used on others.
Its use has no general cooldown and costs nothing in Force! So, use it during this time to save time to heal the rest of the group. The amount of treatment performed being relatively large, beware of overheal.
 Hello : activation: 1,78s; Strength: 36; cooldown: 10,7s; range: 30m. Applies a regular healing effect to up to 8 allies within 8 yards of the target area, restoring 6914 health for 10 seconds. Once the target has received the regular healing effect, they can leave the area while continuing to be healed by the effect.
You receive a total of 11 heals via the salvation effect. An ally can gain healing from multiple Heals from different healers at the same time. However, especially in the case of an Operation group of 16, your salvation only affects 8 allies at the same time. The placement and organization of the group is therefore of certain importance in order to maximize the usefulness of your salvation.
I remind you that the cession only reduces the Force cost by 30% so it is not very interesting to chain this combo. On the other hand, your healing trance can grant you up to 3 charges of shine. These can have a definite impact on when to use your salvation. Indeed, if you do not use these charges via retribution to regain your Strength, the effects on your salvation are as follows:
- 1 Charge of Resplendent: decreased casting time by 0,25s
- 2 Charges of Resplendent: decreased casting time by 0,5s
- 3 charges of resplendent: the spell is highlighted on your power bar and is instantaneous.
We will also note that salvation is one of the spells making you benefit from altruism so the next benevolence will be instantaneous and free in Force! An interesting combo at our disposal, but not necessarily optimal for your cycle.
Use: Often you will hear from other scholars that you need to use salvation only (most often if not) when you have accumulated your 3 shine charges. On this point, I have to disagree. Why ?
Quite simply, the best use of your salvation can be when you have 2 or 3 stacks of shine. Indeed, one requires 1,3s of incantation and the other is instantaneous. However, instant application of salvation triggers a GCD (Global CoolDown = cooldown between two spells) equivalent to casting salvation with 2 charges! Thus, you chain your spells at the same speed depending on the two ways of proceeding.
My advice: once you have obtained the 3 charges of radiance, use a retribution and only after your salvation. You thus benefit from the amnesty while making the most of your radiance charges for your salvation.
Using the 3 Glow Charges is really useful if you need to use your salvation while moving or in PvP as you will be constantly being targeted.
Do not forget that the salute is a group spell, therefore its use on a group of less than 4 people is to be avoided since it is not efficient and profitable enough.
 Erratic rectification : instantaneous ; Strength: 35; cooldown: 13,3s; Range: 30m. Places a corrective force around the target, which restores 7144 - 8299 health on the next wound taken. Once the target is healed, the Wandering Grinding hits a friendly target within 20 yards. Wandering Grinding lasts up to 30 seconds for each target, and can move up to 3 times (4 targets in total). Wandering Grinding can only be placed on one target at a time.
Coupled with the use of Surrender, your Wandering Grinding immediately heals targets without waiting for them to take damage. Thus, your 4 wandering rectifying charges will be consumed one after the other by propagating from ally to ally.
If a charge is used, but no ally is nearby, the remaining charges are lost. Additionally, once healed by the Wandering Grinding, you receive the Resilient Buff which increases your resistance to internal and elemental damage by 3% for 45 seconds. Do not try to spread this buff imperatively if it can lead to overheal.
Finally, you could see that failing to combine Surrender and Wandering Grinding places the Grinding on your target for a maximum of 30 seconds as long as it takes no damage. If the errant rectification is still on your target, but you use a different one on a different ally, the first errant rectification will be lost. Thus, you cannot accumulate errant rectifications on different allies (it would be too strong otherwise, because we would then advise to place them in prevention until use).
Use: Use your errant rectification when the situation requires serious care. What's more, unless your party is taking continuous damage, make the most of the demise. The errant rectification can come back to the same ally twice, you can use it to reassemble the life of a single ally thanks to this combo (especially useful for your tanks in operation).
 Healing trance : pipe: 2,13s; cooldown: 6,7s; Range: 30m. Restores 12445 health to a friendly target and consumes 48 Force points for the duration of the channel.
This spell heals you 4 times during its channeling to reach the amount of the description (unless you critically).
Use: the treatment trance is a good single target treatment which is to be associated with the cession for even more efficiency. It is to be used regularly because of its loads of radiance which will be useful for you to manage your Strength and your salvation.
In addition, it is easily usable thanks to the Use point (Force mobility) which allows you to use it while moving. Very useful for placing or repositioning in operation while continuing to heal.
 Restauration : instantaneous ; Strength: 14; cooldown: 10,7s; Range: 30m. Removes up to two negative mental or Force effects inflicted on a friendly target.
This is the dissipation (dispell) of the Scholar. It provides light heal to the target, but that should not lead you to use it to heal. The point is really to purge the negative effects.
If we want to be precise about the care, it is provided to you via the mending of wounds in the points of use. The restoration thus offers 1768 - 2318 points of health to the target.
Use: When it is possible to dispel a target, it is almost always more effective to use it than to heal directly. In PvP, use your dispel regularly (don't hesitate to overdo it) since, I remind you, everyone will be controlled by effects of this kind!
 Force barrier : pipe: 8s; cooldown: 3 minutes. Projects a Force barrier that makes you immune to all controlling, damage, or negative effects while channeling them. This power does not respect the global cooldown and can be used in the event of a control. While the Force Barrier protects you, charges build up to grant Tenacious Stronghold, a shield that absorbs an amount of damage determined by the number of charges present at the end of the Force Barrier. Stronghold of Strength grants immunity to interruptions.
The Force Barrier will heal you 8 times while channeling for a small amount and 5 times more heavily after channeling ends for 5 seconds (if you stack your Stubborn Stronghold charges and with the Life Guardian use).
Your healing while channeling depends on your stats. For my part, I am at 1658 health points recovered per tick (base amount).
You start the channeling with a stubborn Bastion charge and pick up another every 2 seconds. Depending on when you interrupt the channeling, you will benefit from the 5 additional healing ticks or not:
- 1 Tenacious Bastion Charge = no additional healing
- 2 Tenacious Bastion Charges = base amount x 2
- 3 Tenacious Bastion Charges = base amount x 3
- 4 Tenacious Bastion Charges = base amount x 4.
Use: This is your ultimate protection spell. Especially useful in PvP, it can allow you to save yourself in case of bad placement in operation or if the tank is doing its job badly.
 Force Self-Feeding : instantaneous ; Strength: 45; cooldown: 5 minutes. Increases your Mastery, Stamina, and Presence by 10%, as well as those of your Operation Party members within 40 yards. Lasts 10 seconds.
It is an artificial healing power since it temporarily increases your stamina. It is mainly used during key moments such as the engagement or the end-of-fight phases on the bosses.
 Force flow
I will not dwell on this power. It can provide you with a cone heal if you use the correct Use point (psychic invasion), but the heal is ridiculous and breaks your heal dynamic due to applying the GCD. To get an idea, you need to apply it on about 4 - 5 people to perform a treatment greater than a benevolence. In short, use your point of use elsewhere.
Utility powers
Here we will see 3 powers that do not provide healing, but which happen to be formidable weapons for our class: Retribution, Misty Spirit and Rescue.
 Retribution : instantaneous. Restores 40 Strength points by tapping into the light energy around you. Using Retribution tires you out, reducing your Force regain rate by 2 points for 10 seconds. This effect stacks 4 times.
Resplendent charges and amnesty counteract fatigue and allow you to manage your Strength to provide healing throughout combat. In the worst case, if you run out of Force, spam retribution until you have sufficient Force and let the debuff go away on its own (10 seconds duration). Better that than seeing your group fall.
Note that the fatigue debuff reduces your strength regain rate by 2 Force points per accumulation and that this impacts your regain base which is 8 points per second. So, at 4 stacks, your Strength regain ratio is 0! Indeed, the alacrity giving you a regain bonus is a percentage so 0 x 12% for example will always be 0.
 Misty mind : instantaneous ; cooldown: 45s. Mists the minds of your enemies, moderately reducing your animosity. This power can act outside GCD. Use it to reduce your threat to all your enemies. * I don't know the threat reduction value, but some say 25%. *
 Rescue : instantaneous ; cooldown: 53,3s; Range: 30m. Moderately reduces the target's animosity and, if the target is in the party, pulls them towards you.
More commonly known as a grappling hook, it allows you to save your allies while reducing their threat by 25%. What's more, if you use the Use of Valor point, your target will gain 25% damage reduction for 6 seconds.
Be careful not to use it on the tank in PvE.
Healing spell priority advice
It may disappoint a few, but for a fight there is no such thing as a care routine. This is because the damage is not continuous or applied to the entire party (quite often).
Suddenly, your task is to know the mechanics of the fight in order to anticipate hard knocks and reassemble the person or the group in the best conditions. This is valid for the key moments of the fight, but for the rest, you will have to do selective triage among those in need of care.
Since there is no substitute for prevention, consider using your Force armor on your party members and yourself. Of course, prioritize your tanks since, logically, they are the bosses' favorite targets. The other cases of its privileged use concern the DOT and the large targeted damage (example: the grenade of the walker of the Sword Squad on Temple of sacrifice).
For the actual healing use, use the new youth as soon as available and most often associate it with your healing trance. You will thus obtain better management of your Force and be able to act quickly in the event of a hard blow.
The hard knocks precisely! When the going starts to heat up, use your newfound youth and your wandering rectification. For single-target treatment without the availability of errant rectification, opt for a combo of new youth, deliverance and benevolence.
That brings me straight to the next point: Make the most of your Force Mystic Critical Bonus and selflessness. They are available, use them at the right time to maximize care while limiting overheal.
A few powers that I haven't detailed, but which can get you out of a difficult situation: Force content and mental alacrity.
 Strength Content : instantaneous ; cooldown: 1 min 20s. Grants 2 stacks of Force content, increasing the Force critical strike chance of your direct attacks, healing to 60%, and increasing the range of Telekinetic Throw and Debris Cascade at 30 yards. Each time a direct Force power critically hits or a channeled Force power is activated, 1 charge is consumed. Lasts 20 seconds.
This power is also active outside of GCD, so use it at this time to maximize your performance. Note that the priority of healing changes when you use it: healing trance> Force rectifier> deliverance> benevolence> errant rectification.
 Mental acuity : instantaneous ; cooldown: 1 min 46.7s. Gain 20% alacrity and immune to knockback and interrupts for 10 seconds.
Like Force content and Force rectifier, this power can act outside of GCD. Note that this power is very useful in PVP.
These two powers, especially in combination, can allow you to tackle an emergency requiring considerable care in a short time.
I will close by recalling the order of use of the surrender buff provided by your new youth: errant rectification> innervation> deliverance> benevolence.
Make damages ?
Uh… Is this a guide to the Care Scholar? Yes, absolutely! You are in the right place, do not doubt it any longer. Your job is to keep your whole group alive.
However, there is a considerable difference between the healer who serves and the healer who is not (overheal). Your goal is to maximize the usefulness of your healing, which means that as soon as you can do something else, you need to help your party with the damage phase.
Any help you can give your DPS is good to take since that's all they won't have to do. I'm absolutely sure I'm not the only one to have seen bosses hold up with less than 50k health! What if you had typed a little more?
The stake is there, and we will see two ways of doing damage: for single target and for multi targets.
Monocible
For a single target, prefer the following cycle: weakened mind> mental crush> telekinetic throw = disturbance = throw.
Remember that mental crushing and inconvenience endows you with altruism. This makes your next benevolence instant and free in the Force. A good combo to continue providing care.
Multi-target
Multi-target attacks actually only apply from 3 enemies. For these groups of enemies, only one attack to remember: Force wave.
While we're not going to actually study them, let's see what these offensive spells look like.
 Weakened mind : instantaneous ; Strength: 32; range: 30m. Weakens the target's spirit, inflicting 6478 internal damage over 18 seconds.
 Ecrasement mental : activation: 1,78s; Strength: 36; cooldown: 13,3s; range: 30m. The Force crushes the target's mind, instantly inflicting 3468 - 3646 kinetic damage, as well as an additional 5119 kinetic damage over 6 seconds.
 Telekinetic throw : pipe: 2,67s; Cooldown: 5,3s; Range: 30m. Inflicts 8849 kinetic damage to the target and consumes 40 Force during the duration of the channel. Also slows the target's movement speed by 50% and immobilizes weak and standard enemies.
 Disturbance : activation: 1,33s; Strength: 36; Range: 30m. Unleashes a blast of telekinetic energy on the target, inflicting 4249 - 4427 Kinetic damage.
 Projection : instantaneous ; Strength: 36; Cooldown: 5,3s; Range: 30m. Throws debris at the target, inflicting 4220 - 4398 Kinetic damage. Weak and standard targets are also stunned for 3 seconds.
 Force wave : pipe: 2,67s; Range: 30m. Channels the Force to the ground at the target's location, causing it to tremble, consuming 60 Force and inflicting 6290 Energy damage to up to 8 targets within 8 yards during the duration of the channel. Weak and standard targets have a 33% chance to be stunned by the earthquake every second.
Equipment and statistics
First and foremost, I want to stress one essential point for me: no matter what equipment you have, if you master your character, you will be able to heal anywhere as long as the group does not fail. 'no matter what. So remember this! Before you want to index 224, start by knowing and mastering your class. It is not the equipment that makes the skill, it would be otherwise known ...
Having said that, having better gear actually allows for higher healing and DPS potential. But what interests us about our equipment is the set bonus that goes with it! Thus, for a Scholar, we will use the Mystique de Force set in 6 pieces minimum so as to have all the bonuses granted by the set.
These coins are what we call tokens, they fall in Operation only. They exist in index 216 (Insoumis), 220 (Exarch) and 224 (Ultimate Exarch). You can associate parts of the same set but not having the same index, this is not a problem, you will keep the bonus associated with the number of parts of the set that you wear.
Example: You are wearing a Force Mystique torso and boots at index 216, and also Force Mystique's gloves and head at index 220. Thus, you will benefit from the 4 pieces bonus.
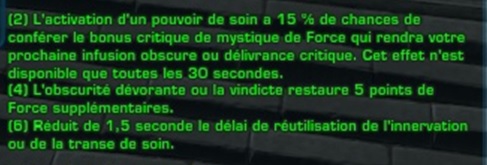
Here you have the bonuses granted by the Force Mystic set. As you can see, the bonuses in 2 and 6 pieces will be particularly useful to us! This is less the case with the 4-piece bonus, but it is still appreciable.
Regarding the relics, I made the choice to use those of Concentrated Punishment and Unexpected Assault.
The Relic of Concentrated Smite has a 30% chance to increase Mastery stat for 6 seconds when attacking or healing, with this effect only available every 20 seconds. The Relic of Unexpected Onslaught has the same power, except that it is the Power stat that is increased.
I've seen some prefer the Devastating Vengeance Relic over the Unexpected Onslaught, but I'm not a fan for the following reasons.
You have your equipment with its bonus and your relics, but what about the stats to reach? For once, I relied on the theorycrafters who are much more competent than me on the subject. 4.0 has led us to revise our statistics by now focusing much more on criticism and alacrity.
Clearly, here are the capes to be reached in index 224:
- Endurance 6410
- Mastery 5372
- 2931 power
- 1433 review
- Alacrité 1351.
Your own stats may vary slightly depending on whether you've put in a Stim, Dope, Buffs, collected all Datacrons, etc. Keep the overall impression to be achieved.
Basically, they calculated which gear provided the best heal per second ratio. They arrived at the above statistics and this leads us to put normal power modules (no version A, no version B!) And to distribute Critical and Alacrity as follows: 5 sophistications, implants or Critical headset AND 5 sophistications, implants or Alacrity headset (also in normal versions).
Regarding your Weapon and Catalyst, put Critical Crystals.
As for the upgrades, put 7 in Alacrity and 7 in Critical.
I'll just come back to the choice of relics now that you have the stats to hit. Let's look at my stats with incomplete equipment:
- Mastery: 5052
- Endurance : 6020
- Wattage: 2701
- Crit: 1329
- Alacrité: 1288
As you can see, I'm missing a bit of review, but I'm already at almost 42% review! Why want to add more if not to gain a little on the crit multiplier? Privilege the power for the blow, it is my opinion.
In order to temporarily increase your stats and your survival at key moments, consider Triage doping agents, analgesic stims, medipacks and grenades.
One last tip to improve your stats: get all the datacrons. You just need a Republic side character and an Empire side.
Interface
This is what my interface looks like, with the added bonus of a little connection bonus!

Build your interface in such a way as to be efficient in your actions. For my part, I opt for the following choices in particular:
- I display the spell cooldown text (change in preferences).
- Buffs are small, while debuffs are large. I also see all the debuffs and not just the cancelable debuffs.
- You can't see it here, but I have enabled concentrated targeting.
- I activated the option of highlighting effects which allows me to see my effects more easily, and this for all of my targets.
Finally, one last point to point out, but that I put aside: all of my spells are bound. This allows me to be more responsive in my actions and therefore to save precious time.
Here is another image (with bonus login as a bonus!) That shows you what my debuffs are doing on the operation frame or for myself.

Small comparison between care classes
In this chapter, I suggest you see the possibilities of each class of care in the theory at index 224. You will see in the table below the theoretical care per second (HPS) according to the class.
All these figures come from the official forum, at the following address:
http://www.swtor.com/community/showthread.php?t=847112
A little hint before saying that the Scholar and the Sorcerer are cheated? Well, you have it all wrong, there is much better!
Moral: from 3 targets to heal, the Thief and the Secret Agent are well above! However, in fact, all the classes remain competitive since we should never send so much care!
Conclusion
We have seen in this guide the strengths and weaknesses of the Healing Scholar from my own perspective. Also, be critical in view of this presentation: ask yourself both about my choices and about those you have / are going to make.
If there are just a few essential points to remember, remember that the Healer is competitive in any operation group and that it is not the equipment that makes the healer.
Indeed, you can very well manage (in any case, as a healer) to pass operations in Difficult mode as I was able to do on Asation with all of my equipment in index 192. So these are the skills you have and the knowledge of your class that make you a good healer.
So this was my first guide. I really hope that this was beneficial to you: either you learned something there, or it reinforced your choices ... For my part, I believe that knowing the class is something essential in order to take a maximum fun in the game.
With those good words, I say good game to you, and see you soon!
Mnemosys-within, says Nemo. Scholar Heal on the Battle Meditation server.


