Guide for beginners or newcomers to story mode operations. The information in this guide is often subjective, and reflects a certain vision of the game.
With the arrival of Knight of the Fallen Empire (KotFE for close friends), we will now have the possibility to start the adventure directly from level 60. If we add the XP x12 bonus for class quests, we will meet again today (and tomorrow) with a large number of players dropping in at level 60 who often missed out on the essence of our favorite game.
As a result, it can happen that the ZL in Hard mode and Operations in Story 60 mode are big failures. It "quits rage" and it insults in all directions, the community suffers, the game at the same time, and at the end of the chain it falls on me, and that, my friends, that m is INTOLERABLE!
Also this guide is intended for those who wish to discover the beginning of the High level content, namely the hot spots in Hard mode and operations in Story mode. If you stick to ZL tactics and have a lot of fun like that, then the following is just superfluous (but good to be conquered safely etc.).
Summary :
Your hero
We start at the beginning, because starting at the end makes knots in the brain!
Server
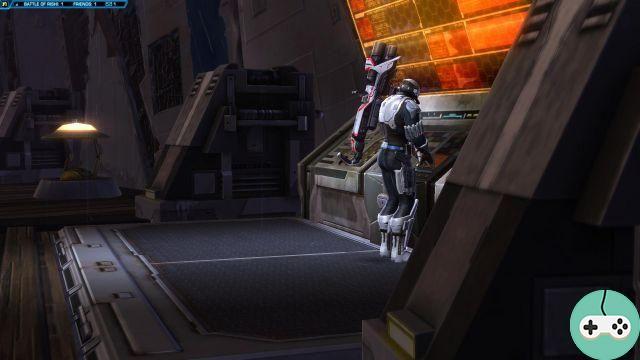
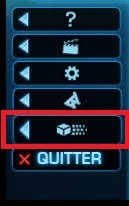
If you are just new to SWTOR, and have never created a character, you will need to choose a server. If you have already created a character and want to create a new hero, that hero will be registered by default on the last server you logged in to. To change the server, you just have to click on this little button, at the bottom left.
There are currently 3 spanish speaking servers, and if you are not good at languages, I advise you to stick to them (interactions between players are the key to a successful MMO). Among these we find:
- Darth Nihilus (DN): specialized in player versus player (PvP)
- Mantle of the Force (MotF): specialized in player versus environment (PvE)
- Battle meditation (BM): specialized in role playing (PR or RPG).
But whatever your preferences or the reasons which brought you to this game, the essential criterion in the choice of the server, is the community, or the presence of people whom you know, since you can practice all the aspects of the game on all servers (PvE, PvP, RP).
An aspect that is important; the number of connected players, the HL content necessarily being several, the larger the community the more your chance of finding a group increases. To find the server that suits you, you have to search the net a bit; who are the ones who organize the most events, who are the nicest speakers, who are the ones who complain about the lack of people. I will not give this information so as not to influence possible migrations, make your choice!
But ultimately this choice is not irrevocable, since you can change server for a small tribute in cartel coin (at the time of this writing, its cost has dropped by 95% and has dropped to 90 coins from the cartel).
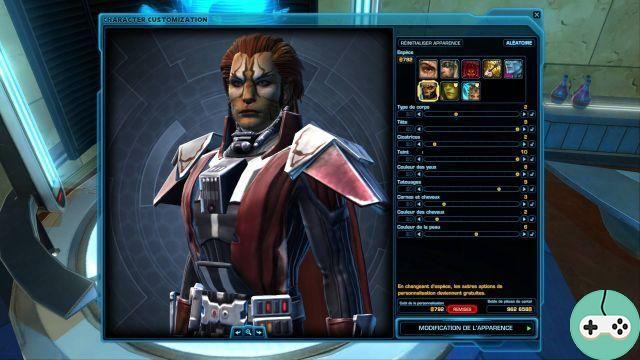
Username
As with most MMOs, depending on the exploits you perform, you will be able to unlock titles that will be added to your nickname.
Let us add that, if the SWTOR universe is no longer canon, and is part of the extended "Legends" universe, it is still perfectly incorporated into the general universe of Star Wars. 40 years of products (comics, comics, films, video games) are thus assimilated by Bioware and winks are frequent in the game. So we avoid Obbbiwan or Annaquin, especially if you want to participate in PR events! This choice is not final either, you will also have the possibility to change it via the Cartel Market but it is very expensive!
If you have no idea, the game offers you a nickname generator which sometimes gives quite satisfactory results!
Faction
There are 2 playable factions in SWTOR, Empire and Republic. This choice is final for your character so choose well. The playable classes are the same, but their stories differ.
You will not be able to interact with a member of the opposing faction. And the only dialogues that you will be able to maintain will be on the / dire channel (you will therefore have to be next to the person).
Class
Link to the Classes page
There are 4 classes in SWTOR, each having its "mirror" in the opposing faction. The powers are the same (they have exactly the same effects), but do not have the same names and do not have the same animations.
 Soldier
 Jedi Consular
 Jedi knight
 Smuggler
 Bounty Hunter
 Sith Inquisitor
 Sith warrior
 Secret agent
When you reach level 10, you will be able to choose an advanced class. The choice of this specialization is final and will give you access to 3 "Disciplines". It is this Discipline which will determine your role in combat (we will explain the roles a little below). Disciplines can change during the game (the "respé"), it is free on the fleet (from the Skill Mentor, Combat Training area) and at any time when you have unlocked the field respecialization via the advantages of character of your heritage.
These Disciplines will allow you to choose between the roles of Tank, Healer and DPS.
Role
As we have seen, there are 3 roles:
 Tank
Tank
 Healer
 DPS
DPS
- Tank
- Healer
- DPS
He's there to take the brunt of the group's damage. His posture allows him to generate twice as much threat than he should (also called aggro). The enemy always attacks whoever has the biggest threat, make it you!
For this, he has several weapons: his posture which doubles his threat, certain powers which will increase the threat by more than double the damage caused (the powers where it is specified: "causes a large amount of animosity") and finally them. Provocations (taunts).
Let's go back in more detail to these provocations which are often used in a catastrophic way by our apprentice tanks.
The provocation forces the opponent to attack only you for a short time, but it also multiplies the threat that you have just generated (so you should NEVER open the fight with a provocation), finally it decreases by 30% boss damage if the boss doesn't attack you.
You must therefore use your provocation after one of your powers which has just generated a big threat, or when you lose the aggro. I will develop aggro management in the Combat chapter.
Finally, all tanks have a protective shield that they can place on a player. This must be placed in priority on the biggest DPS (… and yes!). This protective bubble has 2 effects; it protects (a little) the person and it decreases (a lot) the threat which it generates. So why shouldn't it be put on the healer? Because this is in principle the player who causes the least threat, and if the DPS starts the fight correctly, he should not take hits. Some DPS on the other hand will strongly compete with aggro, so you will have to put the bubble in them so as not to force them to slow down their damage (which would be detrimental to the success of the try). Obviously, some combat mechanics inevitably inflict damage on the whole party and in these (rare) situations the shield on the healer can be an asset.
Its role is quite simple, since it has the function of keeping the whole group alive (easy to say…). A good healer is a good "sorter of the wounded", the latter must indeed determine which member of the group requires the most care (no, it is not necessarily the one with the least health).
Let's take an example: the tank is 50%, one DPS is 25%, and the last DPS is 75% in a single boss fight. It is normally the tank that has aggro here, so it must be reassembled as a priority, the DPS at 25% is certainly in danger but as this one should not take a hit, you can afford to let it hang around. a little (he only had to snap a defensive power, that idiot - explained later).
The healer must be careful to only heal when necessary (avoid the "overheal") because he risks increasing his threat and causing his energy to drop unnecessarily. What to do then? Well type of course! Any help is good to take ...
Finally, all healers have a dispel power. This power can negate up to 2 negative effects on the targeted player. A good healer is one who will frequently use this dispel to help the party and not just when asked. This will facilitate the course of the raid / ZL and sometimes it is quite simply essential for the survival of a player (all the negative effects are not cancellable by the dissipation, we will speak about it again in the chapter Interface).
Its role is to do damage and in the fastest possible way. But a good DPS must also know: interrupt the powers cast, lower your threat so as not to take back the boss (all classes have at least one "desaggro" spell), and above all must be placed correctly (the tank does not move or little, the healer will not move until the entire raid is properly placed, so be smart).
Why is this a complicated role to play? Quite simply because the damage requested is sometimes so important that you will not be able to provide it without:
- a perfectly controlled rotation cycle
- optimized equipment
- shortcuts on your powers (we'll see that later)
Equipment
Link to the equipment page
Each class has a main statistic, when an item of equipment falls with this statistic, you have priority. It is useless to put another main statistic than the one assigned to you, the loss of efficiency is considerable. If, however, you wish to recover a piece that is not intended for you (to give it to a reroll or to take away the sophistication, or for a paternal), you can ask the authorization of the other members of the group.
In operation, since there are many of us to avoid flooding, we generally use this code: the raid leader points to an object, and you do
- +1 if it's for the character you are playing in the current role
- +2 if it is for a reroll or for another role of your character
- +3 if it's to learn the plan.
Usually you will then be asked to do a / rand (virtual dice roll) to determine who wins the loot.
Regarding the optimization of your equipment, well it would take pages and pages of theorycrafting to explain how to do that. You can find others on English-speaking sources.
I would just say a word about what is called "optimized parts". This term is mainly used for sophistication and it designates those which, among the 3 statistics offered, have the least Endurance and the most useful statistics. This is true for DPS and Healers but also for Tanks! Stamina is not a priority for these over Absorption, Defense or Shield.
No, a tank with 60 health points is probably not a very good tank, it will take slaps at 000k and it will be very difficult to heal it. Generally, a good tank still has a little more health than the others, thanks to its Stamina boost and its "inverted" armor where Endurance is more important than the main stat.
At the moment you can:
- Manufacture (and therefore buy from the Galactic Market) optimized sophistication 186
- Pick up 192 upgraded sophistication in ZL HM and NM Operations (except Tank)
- Buy sophistications and optimized implants and earpads 190 on Ziost (except Tank)
- Exchange coins for tokens (operation rewards) that include 192 and 198 enhanced mods and sophistication
You should know that an optimized room with a level just lower than a non-optimized room is not necessarily less efficient!
For exemple :
- Soph opti 186> Soph non opti 192 et = Soph not opti 198
- Mod opti 186 = (see slightly higher) Mod not opti 192
Finally to make HL content, you need to make modifications to your armor pieces. these can be crafted and therefore purchasable at the Galactic Market.
Except for modifications which cannot have a higher index, the minimum index to cross all the HL content is 186. This means that your weakest part must be at least 186. Of course you can do it with an index lower but it will necessarily be necessary for a member of the group to compensate for your shortcomings so think carefully before registering on the group search!
Crew skill
Link to the Crew Skills page
How will your crew skill allow you to break through HL content? Theorycrafting is expensive, very expensive even, so you might as well have the necessary funds and your job will help you. In addition, certain crew skills allow you to manufacture opti 186 or even 192 elements (but there, for the components it will be complicated).
All trades are equal in HL, but some more than others (thank you Coluche!).
So I'll try to give you an overview of their usefulness at level 60:
- Armor Crafting : This profession does not have much HL utility, but it will still allow you to craft 4 upgrades including Sights and Tips as well as the 10 upgrade kit (essential prerequisite for placing an upgrade). From a purely financial point of view, the arrival of the "outfit designer" is quite beneficial since all the skins you make can sell for a good price at the Galactic Market.
- Synthweaving : This is exactly the mirror of the previous one for Force users, so here you will also have access to 4 upgrades including Stamina and Willpower.
- Weapons manufacturing : this profession presents two major interests. He is the only one capable of supplying you with an 186 cannon, the Reserve Distinctions vendors on the fleet do not sell a primary weapon, higher level cannons can only be obtained by doing (and finishing) operations. Knowing that the cannon is the part of your equipment that will influence your damage / healing the most, you will need to get one before attempting the HL content. In addition, this profession also gives access to 4 improvements, including the essential Precision improvement.
- Cybernetics : Very useful profession since it will allow you to craft armor and mods (not optimized) 186, although you can find these parts from the vendors of the fleet, it will prevent you from spending your distinctions to collect only a small piece of the coin you are purchasing. The real interest of this profession remains its earpieces which are optimized and index 186. You can also make grenades which can have their uses but especially in PvP.
- Artifice : Here we are approaching the essentials! As for the manufacture of weapons, this profession will give you (and will be the only one for that) 186 handles (equivalent to cannons but for Force users). But it also makes it possible to manufacture optimized sophistication (this is also the only way outside token to obtain them for Tank). And it's not over ! It allows you to craft all 186 relics in the game, again an exclusivity outside of the operation booty. Finally, but this is less useful today, this craft also makes all shapes of crystals (all stats, not all colors), in RESPECTABLE colors (fed up with wacky colors).
- Biochemistry : In my opinion the most important job for the HL. It makes it possible to manufacture optimized implants 186, but above all it makes it possible to manufacture stims and dopants. We are not going to lie to each other the dopants are not necessary as long as you do not want to try the adventure in Nightmare, on the other hand the stims add you almost an additional piece of armor and for 8 hours. It is a considerable asset. Regarding the dopants, you can freely use those of level 55 which are reusable and only use the 60 (which are not) for the Difficult and Nightmare modes.
A little point on reverse engineering
This mainly concerns optimized atria (Cybernetics) and implants (Biochemistry). It's by reverse engineering items you've crafted that you'll be able to learn the next higher blueprint. But for the aforementioned objects, their reverse engineering will give not 1 but 3 different plans which each in turn will give 3. The goal in the end is to recover a purple object which has only 4 statistics:
- Endurance
- Main statistic
- 2 (no more) useful statistics (Power, Surge, Critical, Accuracy, Alacrity)
It is only these objects that will be considered optimized.
Also, without ever having set foot in operation or in ZL HM, you can have equipment with:
- optimized sophistication (no mods) full 190 (daily from Ziost)
- 186 cannons or grips purchased from the Galactic Market or crafted (Weapon Crafting - Artifice)
- 2 relics 186 bought or crafted (Artifice)
- an optimized 186 headset purchased or manufactured (Cybernetics)
- 2 optimized 186 implants purchased or manufactured (Biochemistry)
And with that, you will never cause the group's discontent when you join them on the Hard Mode ZLs or in Operation!
Partners
Link to the Partners page
If you have never done it before, it is imperative to complete all the quests offered by your companions. These appear according to their affection during your adventure. Each Companion Ailment of each type (Melee / Ranged Tank, Melee / Ranged DPS, Healer) raised to its maximum earns you 1% in one of the secondary stats. Please note, bonuses cannot be combined, and count for Legacy. So, if you've gotten maximum affection with all mates of each type once, there's no point in doing it again.

For example, in index 198, take the last% of precision which takes you from 99 to 100% (that doesn't look like much, but the precision heading (758) is essential to reach, base you are at 90% so that one in 10 hits misses its target) will cost you an entire piece of armor and even more for the lower indexes. So you can't get into theorycrafting without having done this.
Your fight
Here you are the most beautiful with perfectly optimized equipment, you know the strategy, your role, that's good! But you still have 50% of the way to go!
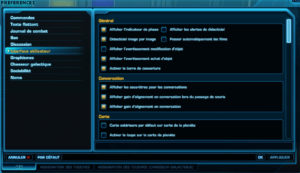
Preferences
The first thing to do is to press the Esc key and click on Preferences. In the Game tab you have a whole bunch of menus.
You will have to go through all these menus and choose what suits you best in the game. I will list the essentials here:
- In the tab Controls / Camera, it will be necessary to choose 100% in camera distance. This will allow you, if necessary (especially in operation), to have easy access to a better overview of the combat, to see who is doing what, which adds have fallen. Obviously, I'm not asking you to play with hindsight set to the maximum, but put 100% anyway to have sufficient amplitude depending on the situation.
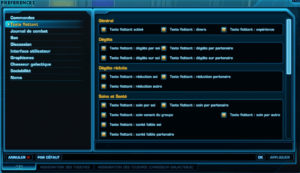
- In Floating text, you will need all the information mentioned so click on everything.
- In User interface / Tooltip, you have to check the box "Show detailed tooltips of the object", you will be able in the loot phase to see immediately if one of the components of the part interests you (the optimized sophistication for example).
- In User interface / Operating frameworks, check "use the operation frame as a group frame", this will allow you to get used to the same interfaces whether you are in ZL Difficult mode or in operation.
- In User Interface / Cooldown Settings, you MUST click on "display the cooldown text", you cannot manage your DPS / Healer / Tank cycle without this information!
Shortcuts (Binds)
Here is arguably the most important part of this guide, the one that is yet the most underestimated: the Bind.
To be a good DPS, a good Tank, or a good Healer, it is strongly recommended to assign shortcuts to your powers. Each combat power, whether this one is defensive, whether it is part of your cycle, whether it is a proc (a power that only triggers in certain situations) or a filler (a power of filling in your cycles), it must be associated with a key (shortcut) on your keyboard or mouse.
Certainly, there are some very good mouse clickers (which do not play only or partially with the mouse) but they are very very rare and do not expect to be one of them. Finally Mozart with one finger will always play better than you with 10, but it's Mozart! There have only been 2 in 1000 years (Mozart and Paul McCartney).
Why is binding essential and will allow you to gain 50% DPS, Heal or Threat?
I have 2 strong arguments:
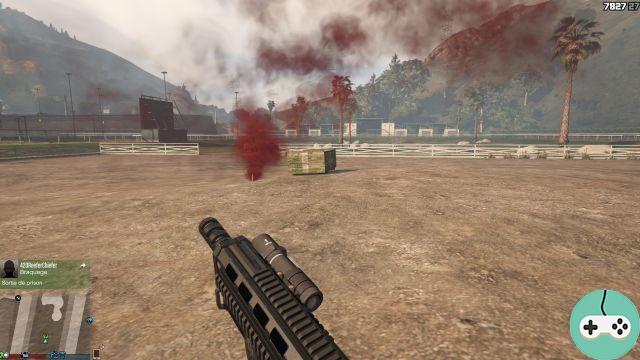
- the click of your mouse is of capital importance, as we have seen previously it is used to manage the orientation of your camera and should only be devoted to this. So try to look behind your back while continuing to tap on the boss, to prevent adds or possible damage zones (the tanking phase on Blaster for example).
- On GCD (General Cooldown), you cannot actuate power as a result without waiting for the end of this GCD which is basic of a second and a half. You will tell me that you have plenty of time to go to the next power, that's not wrong! But since 3.0, alacrity finally brings down this GCD and the "full alacrity" sets "being more and more competitive, it becomes an ordeal for our mouse clickers. Most importantly, ALL classes have a Power Off General Cooldown, these don't have to wait the 1,5 seconds before being cast, so you can cast them at the same time as another power, how can you do this with the mouse (maybe you know how to click 2 different places at the same time? the circus pinder is recruiting)? Finally all your powers of interruption, desaggro, protection, aggro, require a very high reactivity and the bind will save your life!
Also how well to bind?
There are 2 rules which in my opinion cannot be circumvented:
- Practice is the key to a good binding, so you have to start binding from level 1. At the beginning, you will have 2-3 programmed keys then one more, then one more etc ... and you will arrive at 30 binds at level 60 without realizing it. It's a bit like the piano lesson: Do - Do re - Do re mi - Do re mi re ... If you are already level 60 and have never used shortcuts, you can reroll to learn, or start with 6 then 8 then 10 starting with the most important powers to bind.
- Homogeneity, this is especially true if you suffer from rerollite, your shortcuts must be alike so you don't have to relearn everything from the beginning. For example, my desaggro power is V on all my rerolls, my interrupt power is T, etc ...
What are the most accessible keys ?
Before knowing what to put and where, you must first look at which keys are the easiest to access.
If you are lucky enough to have a mouse with several programmable buttons, these buttons will be preferred. Then on the keyboard we find: 1234 EAFCV and "space". It all depends on your dexterity, why not M (but here's the paws!). The "space" key is too important to let it jump, I advise you to put it elsewhere (I put it on the mouse wheel click).
What are the priority powers?
If you followed my reasoning, the answer is ALL! But to start you must imperatively assign a shortcut to:
- All your reactivity, defensive, release, interrupt, speed, throw, grapple powers
- Your filler offensive powers, those who proc, and those outside General cooldown
- Your damage (or healing) cycle
- Your Damage Zones
- The rest (I even tied regeneration for the sentry in particular)
If you don't have a lot of room, you can double or triple bind. All you have to do is program a power (on V for example) and program another on Shift + V and a third on Ctrl + V. I do very, very little multibinding, I don't like it that much, but if it works for you, don't hesitate!
Interface
To maximize your performance, you need to modify your interface.
You must first activate everything that is not. I am talking here in particular of the target of the target, which is essential for the Tank and the DPS in their threat management, and for the healer to know the progress of the boss, its phases and to do damage.
Remember to activate the tracking system of your DoTs (Damage over time) in order to be able to follow them more easily. There is no "right" interface, only the one that suits you best. Make sure you have an unobstructed view so you don't miss anything as the fight unfolds. You will need 6 quick access bars, no less!
Course of the fight
Before starting the fight, make sure you know the strategy perfectly. I am not going to lie to you, to explain the same thing for the hundredth time, that tires you and I understand that some hesitate, but not to do it and to make the try fail, it is worse and you risk to make yourself out of the group. It is illusory to think that it will not be seen! So don't hesitate to ask IG if you have any doubts, otherwise check out the Games Managers pages, you will find everything you need for ZLs and operations.
During the fight and especially on the add packs before the bosses, the tank must have aggro on EVERYBODY, not only on the biggest. It is up to him to start the fight and he must therefore think about how to optimize his engagement according to the disposition of the enemies. DPS must start with the weakest and end with the biggest.
If you are a good DPS (which should be the case now ^^), you will have to manage your threat so as not to "turn" the boss. To do this, don't hesitate to use your threat reduction power as often as possible (it's a spell outside the general cooldown so no excuses).
Sky an AoE (damage zone)! So let's be clear, if you stay in a boss damage zone, even once, failure is guaranteed! So as soon as we are targeted, we STOP what we are doing and we move (preferably avoiding backing up, because we walk more slowly). A little trick is to jump once out of the area to update your position and be sure the server no longer sees you in it!
If despite everything, you happen to take damage or keep the boss's aggro, then you have to slam a Defensive power (CD), which will allow you to hold out while the Healer takes care of lifting you up.
Before the tank engages, it will sometimes place signs above certain enemies. Usually everyone should target the target. Please note that the other acronyms generally mean exactly the opposite, namely a CC. The CC (or crowd control / crowd control) is a power that will immobilize a target for 1 minute, it is important not to hit these targets either directly or in a collateral way with your damage zones.
Conclusion
SWTOR is a particular MMO since it is based on a very rich background. So even if you are not too concerned with the RP aspect of the game, a little knowledge of the universe will allow you to considerably increase your enjoyment of the game and will avoid certain moments of solitude like this one:
(Unknown whose name we quickly forgot): "It's really beautiful Alderaan, it's my favorite planet!"
(Proust): "Yes, a pity that this one is only 3000 years old!"
(Unknown): "Oh good? !!! But why?"
(Proust): "..."