


Eviad / Viandeur is back for a third guide to the Galactic Starfighter (GS / GSF) game mode. It directly follows two other guides and will be completed by a fourth a little later.
This guide is in line with the guides published previously: the one concerning the theory and the one concerning the ships (choices and commands). I will not come back to points already mentioned in these articles, except to add a few details (it is therefore recommended to read these articles if you are new to it).
After having seen all the technical aspects of the galactic combat, one can approach the heart of the matter, that is to say all that relates to the destruction of mass and other happy pleasures: the combat.
This guide is very subjective, as it is based only on my personal experience. Don't expect to find all the tips and tricks that can be seen in the game, I will only talk about what I know and master. This means that this guide will necessarily be non-exhaustive.
Organization of the guide :
- The game modes and strategies specific to them: deathmatch and domination.
- Domination
- Objective and Cards
- Operation
- Some strategies
- Death Match
- The cards
- Bonuses
- Domination
- End-of-match rewards
- Regarding statistics and requisitions
- Regarding the missions
- Concerning the medals
Game modes and strategies specific to them
There are two game modes in GS: "Domination" and "Deathmatch", and I will present their characteristics to you.
Regardless of the type of game, each match opposes two teams, which can be from opposite sides (Republic VS Empire), or from the same side (Republic VS Republic or Empire VS Empire). No mix between the two factions.
Each team is made up of a maximum of 12 players and is most often made up of 8 or 12 players (maximum of players in a game: 24)
Domination
Objective and Cards
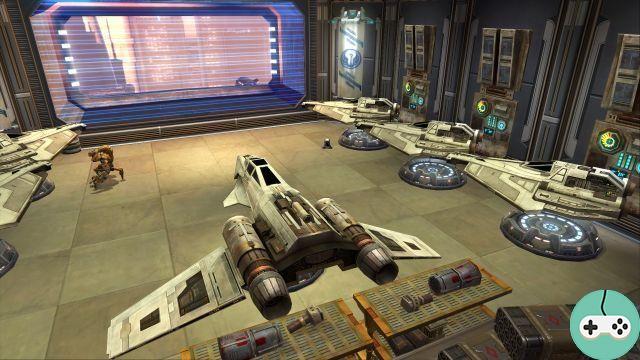
The "Domination" game mode essentially revolves around the control of strategic points, called "defense satellite", and which are three in number on each card.
The goal of each team is to capture these checkpoints.
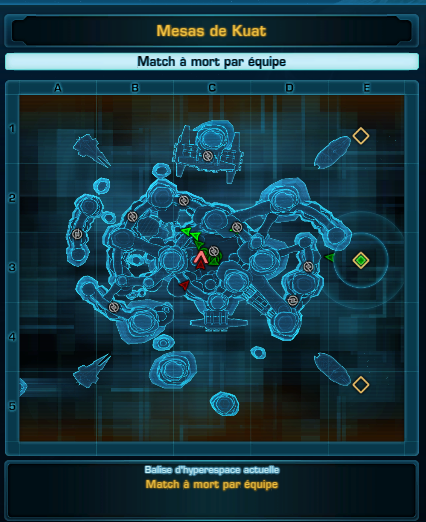
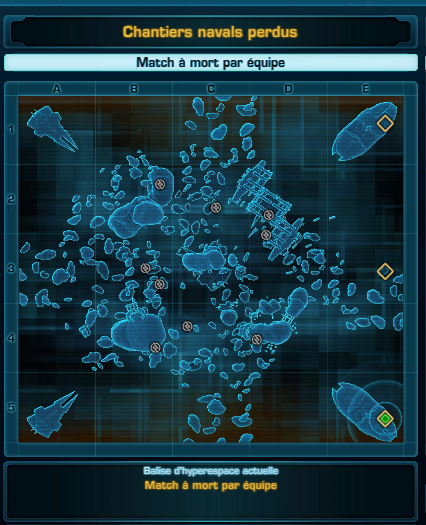
Three maps available for this game mode:
- Kuat tables
- Lost Shipyards
- Denon Exosphere

How domination mode works
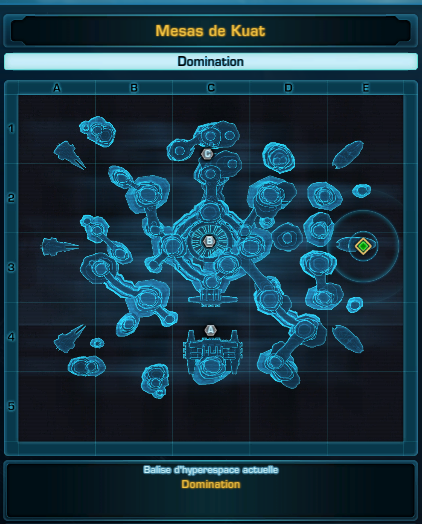
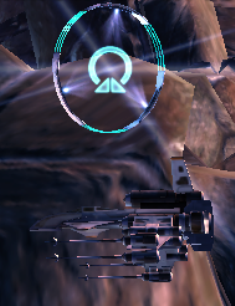
The control points (your objectives) are named A, B and C. They can be of three colors:
- A white colored lens means no one has captured it - it's neutral.
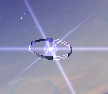
- A green colored goal means it's captured by your team
- Conversely, a red colored objective means that it is captured by the opposing team.
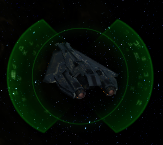
Example of an objective captured by your team:
Scoring: Every second, your team earns one point per controlled objective. And every time an enemy dies (you kill them or they commit suicide), your team gets a point as well. The first team to reach 1000 points wins the game. However, a time limit is imposed: if after 15 minutes none of the teams have reached 1000, the one with the most points wins. The points earned by the death of players are negligible compared to those obtained through objectives (the difference will only be felt in an extremely close match), so don't focus only on the direct confrontation with the opponent.
In a domination match, it is the team that has at least 2 goals that is on the way to winning.
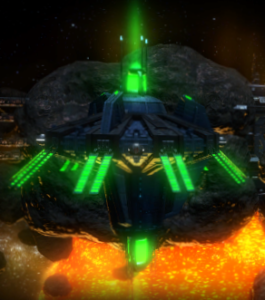
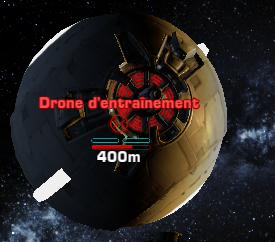
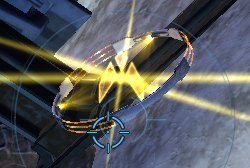
When an objective is captured by one of the teams, it will regularly appear defense turrets around it (3 maximum). These turrets will instantly attack any enemy that gets too close to the satellite, they only attack with blasters (no missiles), they are stationary, and have a maximum range of 6000 meters. These turrets deal a lot of damage, so it is generally advisable to destroy them first when taking an enemy objective. Example of an enemy defense turret (I cheated a bit, I went into the tutorial to quietly take a picture of a turret):
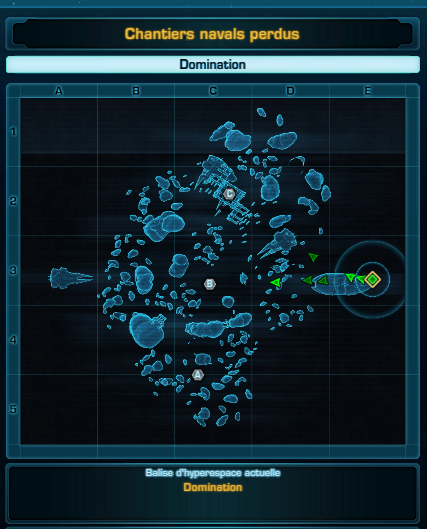
In addition, capturing an objective on the "Chantiers Navals" or "Mesas" map results in the appearance of an additional spawn point which is quite close to the objective captured by the allies (which allows you to therefore to better defend).
You capture an objective by staying within range long enough, and that results in a green circle circling around you. To capture the objective, there are two necessary conditions:
- The defense turrets were destroyed beforehand
- No enemy is close enough to the defense satellite
You can see the progress of the satellite capture on the satellite blades which serves as a progress bar. The greater the number of allies near a satellite, the faster the capture will take place. Note: the greater the number of allies, the faster the appearance of defense turrets after capture.
You can follow at the top of your screen (by default) the evolution of the score of each team and the state of the three satellites A, B and C (neutral or captured by you / by the enemy, depending on the color)
Do not get too close (less than 15 meters) enemy flagships (point of reappearance of the opposing team), you risk being killed in two seconds by the turrets of it.
When you respawn, select one of the small white diamonds on the map to choose your respawn location (works similarly for Deathmatch mode).
Some strategies
- Beginning of the game: at the start of each domination game, all objective satellites are neutral, and at equal distances from the two teams (in any case theoretically, because the way to access them can be faster for a team than for the other, thanks to the relief which can facilitate or prevent rapid access to satellites). The goal is therefore to jump on the satellites to capture them before the enemy. The scout, which is the most mobile and fastest ship, is of enormous importance here. Capturing the objective before the enemy does has three advantages:
- Even if the satellite is disputed between the two teams, as long as you have control of it, your team earns points.
- The quick respawn point that appeared thanks to the satellite capture gives you a huge strategic advantage (only on the "Mesas" and "Lost Sites" maps)
- The Defense Satellite will start producing Defense Turrets while players are there to defend it, et that no enemy is also present above. This is a significant asset. In the case of enemies circling around the satellite, the production of turrets is neutralized, but the spawn time of each turret continues to decrease, although these do not spawn. Thus, if an enemy neutralizes the production of your satellite without taking the point because an ally is also present, then if the enemy moves away a little from the satellite after the time it would take 2 turrets to reappear if it was not there, then they will appear instantly and at the same time when the enemy has moved away from the neutralization zone of the satellite.
- Be careful, capturing a satellite before the enemy does not offer an absolute advantage. This is why it is necessary to prepare in advance "after capture", with heavy vessels like the bomber (this is only one example among others)
- Satellite Defense: You can leave a captured objective without any player defending it, as defense turrets can perform this function. However, this system is only sufficient for isolated assaults (and more!). This is the reason why one or more members of your team must imperatively return to defend the objective if it turns out that one of the defense turrets has been destroyed (this means that we are trying to capture the objective). To be more effective, watch for messages on your screen saying: "Thing has destroyed Turret of Defense". In addition, a satellite in the process of being captured (defense turrets taking damage or no one in the satellite capture area) has its triangle icon flashing. Small Notes:
- It is still preferable to permanently leave one person in defense of each satellite (in addition it gives medals anyway). Indeed, a good opposing player may be able to destroy the three turrets and therefore start the neutralization of the satellite in the time interval which will be necessary for you to orient yourself in the direction of said satellite after the message "What is it? destroys Turret of Defense "for the first of them (in less than 10 seconds).
- Note, in the event of an attack by excess enemies, DO NOT SEEK TO DESTROY THE ENEMY, content yourself with warning during the operation, and waiting for reinforcements. In the meantime your one and only task will be to occupy the enemy while surviving while remaining stuck to the point. Charge your reinforcements to take down the enemies, not you!
- Satellite capture:
- Rules to follow: you can obviously try to capture an objective alone, but alone or with others, there are different rules to follow:
- Check the number of defense turrets: it's fairly easy to do, just observe the state of the satellite that interests you and see how many points are attached to the triangle: one point corresponds to a satellite.
- Do not rush into the heap, and advance carefully until the objective enters the range of action of your sensors (you can then see if there are opposing players defending the objective, and you can act accordingly. Be careful, do not overestimate yourself!).
- If you can, destroy the turrets of defenses over 6000 yards away, so that the turrets don't deal damage to you. Small inventory of cool weapons against defense turrets, more or less effective (this is only my point of view for this classification !!!):
- The electromagnetic missile, which will momentarily deactivate all turrets within 4500 meters of the enemy hit, but which has a relatively slow activation time. The good news is that the range is quite high (7000 meters, greater than that of the turrets so you can lock without being bothered by them), and that only one of these missiles on a defense turret disables the one. - here and the other two at once, leaving you free to destroy them (Bird of Prey / Quell, Spearhead / Bloodmark and Herald / Imperium). In addition, this missile deactivates or destroys any surprises left by a bomber (deactivated drones and destroyed mines).
- The electromagnetic armor piercing / plasma cannon that one shot (OS: kill in one shot) the turret, once upgraded (armed vessel, all types)
- The ionic electromagnetic gun (Grabuge / Mutilator). Having like the previous one a range of 15000 meters, it will not allow you to perform an OS on a turret, however, improved at the fourth level you will be able to hit 3 enemies near your target, inflicting 50% of the damage to them. You can thus bring the final destruction almost simultaneously to the three turrets. In addition, it also affects the mines / drones present!
- The electromagnetic field, which deactivates all the turrets within a radius of 4500 meters around you (effect strictly similar to the missile (on drones and mines included), but you must already be near the defense satellite. Novadive / Black Lightning)
- Rockets, which don't require activation time, have an acceptable range (if upgraded), and are great on amorphous targets (Novadive & Flash / Black Lightning & Bumblebee). In addition, they ignore armor from the first level of improvement.
- Heavy or Burst laser cannons, which upgraded, have 100% armor piercing, causing you to severely damage the turrets with each shot. (Note, however, about burst cannons: their reduced range means you are subject to turret fire).
- Proton and Thermite torpedoes that go one shot a turret from afar, despite a fairly slow activation and reload time (found in the available weaponry of virtually all ships)
- Distortion field, for 3 to 6 seconds (depending on the upgrades selected) you will be almost untouchable for the turrets, enough to allow a melee approach if you are able to destroy them in this short time. (Novadive, Grabuge and Flash / Black Lightning, Mutilator and Bumblebee)
- If you CANNOT destroy defense turrets with a range greater than 6000 meters, you must follow these steps if you want to survive:
- Get closer to less than 1500 meters from the turret of defense while firing on it. Let me explain: if the distance between you and the nearest turret is between 5000 and 1500 meters, you will be shot at the same time by the other two (i.e. 2/3 turrets shooting at you, depending on of your position). Suffice to say that it tingles.
- Shoot the turret you are attacking and at the same time lock it with a missile. Therefore, if you judge that your weapon power reserve is too low, that you risk being destroyed by the turret, or that you run out of time (an enemy behind you for example), release your missile. Otherwise, keep shooting the turret.
- If you want to kill 2-3 turrets in a row on a single post, here's what I would recommend: start with your weapon and shield reserve at the max, use offensive power (s) on the first turret, activate defense power (s) on the second, wait for the shield reserve to regenerate a little, attack the third with blasters + any other useful bonus, and go as fast as possible to limit the damage. Only use the missile in an emergency (see 2.), which often happens in this kind of assault. This is of course a general case which can adapt to many different vessels, but there are a myriad of different and effective procedures.
- Knowing when and how to attack: It is obvious that, alone or with others, you should not attack a post where the enemy is in excess. In addition, there is no point in trying at all costs to capture a satellite if your team already has two, first take care of defending the 2 before considering the capture of the third. Here are some totally subjective little tips on the art and how to capture satellites without being too hassle:
- Express Bourrin : after locating the apparently least defended enemy satellite, you wait for a certain number of ships to reappear and you all attack a single post at the same time, destroying all the enemies as quickly as possible, in order to limit the arrival reinforcements that would hinder you in capturing the point (It is obvious that with this method, you will not go unnoticed, so you have to be quick and efficient). The number of ships accompanying you for the attack of course varies depending on the opposing defense.
- The Accordion : mainly in the case where you observe that many enemies have come to defend a control point at the same time, or have captured it together. There is then a large concentration of enemies on a particular satellite, probably leaving the others under their control without effective defense. Your team must first attack one of these points, enough for these attacks to pose a threat to the opposing team. Secondly, you will have to attack the post which had just been taken over by the enemy. This way, it is very likely that you will be able to capture at least one satellite. Explanation: Either the opposing team leaves the post which has just been captured to divide itself in defense elsewhere, leaving the first post defenseless, or this team, or part of this team, remains in defense on the first post which comes to be captured, and one of the two fronts will eventually give way.
- The bait : do you remember the sentence just before? "It is obvious that, alone or with others, one should not attack a post where the enemy is in surplus" Forget it! This technique is not for the new beginner player, it consists in knowingly attacking a point alone or in duo in front of a redundant enemy. The goal here is not to take the objective directly, but to hamper the enemy enough so that they keep their surplus where you attack. You thus place the enemy in understaffed on another point, that your allies can capture. The main downside here is that it presupposes a lot about the talent of your allies. In addition, it is necessary to be in a vessel cut for survival in order to occupy the enemy as much as possible! Example: Novadive / Black Lightning with 3 missile unlocks.
- Combining "the bait" with the "accordion" allows an even more effective result : you thus maintain the important concentration of enemies on the same point, but with reduced allied forces!
- Rules to follow: you can obviously try to capture an objective alone, but alone or with others, there are different rules to follow:
- The case of the bomber and the armed vessel:
- A bomber's defense of an objective is a major advantage, as it can disperse mines and drones around the checkpoint, making it difficult to destroy defensive turrets and capture an objective. The good news for attackers is that the anti-turret defense arsenal (see above) is also very effective against enemy mines and drones, especially electromagnetic missiles and electromagnetic fields, as well as cannon. electromagnetic ionic weapon of the Mayhem / mutilator weapon which, improved, propagates its range of action to targets around the one hit. Thanks to these weapons, you can therefore hit the bomber, its drones and its mines in one shot, provided that it is all nearby, which is often the case in the context of objective capture. WARNINGS : a bomber will be more effective in closed spaces than in open spaces without much disturbing relief: on the one hand the probability that an enemy turning around the objective enters the range of action of a mine / of a drone is larger, on the other hand it will be more difficult for the enemies to move away from the bomber to attack it without taking any risk (because of the relief). Therefore, favor the presence of a bomber in C on "Chantiers Perdus" and in B on "Mesas", before deploying it on other points.
- Posting an armed ship in defense can be a wise choice, as it can stick to the objective by attacking enemies from far away, without them having had a chance to hit it. For the attackers, the priority should no longer be to destroy the defense turrets but to kill the armed vessel. Otherwise, the armed ship will gladly tear you apart while you vainly attempt to destroy a defense turret. CAUTION: A VA will be more effective in open spaces than in closed spaces: there is no relief behind which enemies can hide in open spaces.
Death Match

No worries here, you won't have to read a huge block like when describing domination mode! Indeed, the game mode "death match" will wake up the nag that lies dormant in you. The goal of the game is simple: two teams oppose each other and each has to zigzag as many people as possible on the opposing team without being fooled.
Point Scoring: Each time an enemy dies or self-destructs, your team earns one point. The first team to reach 50 points wins, but there is a time limit: if neither of the 2 teams wins at the end of the allotted time, the one with the most points wins. Finally, if the two teams are tied at the end of the allotted time, the first to reach the final score wins.
WARNINGS : special mention to zazous who commit suicide merrily, whether against a wall or during a 4 against 1. As much in domination mode, it is not that bad to die stupidly, as much in death match, your the number of players killed / number of dead ratio is much more important. You must therefore know how to manage the risks you take, whatever the level of your ship (maximally optimized or without any improvement).
The cards
There are 2 maps in Deathmatch mode:
- Kuat tables
- Lost Shipyards
Bonuses
To spice things up a bit, bonuses have been scattered around the map. They are represented by small colored circles (the color varies depending on the effects). To take a bonus, you must spend on it, it will disappear immediately after. These bonuses have a limited effect over time.
You can see the location of these bonuses on your minimap, by gray symbols. These are the places where they appeared, but that doesn't necessarily mean there will still be a bonus when you get there. In addition, your minimap is in 2D and the environment is in 3D. Even if you are at the location of a bonus on your minimap, the actual location may be above or below you. Here are some tips that can be useful to you to succeed in taking a bonus:
- Visually locate them on your own, it's pretty easy, they flash when you get close enough.
- Since the places where they appear are fixed, it is enough to memorize a few of the places where they are regularly found.
- Each specific location always contains the same bonus. If two locations can be identical in 2D on the map but different once in the 3D environment (because at different altitudes), some bonuses will have a unique 2D location. Learn to memorize which bonus and where, so without being there you will be able to know that such and such is in such and such a place. (Mainly useful for damage overload)
- Each bonus lasts 45 seconds.
Small summary of the bonuses that can be found:
- Red wine : this is the "damage overload". You inflict double damage with all your primary and secondary weapons. This therefore does not include drones (see the patch-notes on this subject). This is probably the bonus that has the most potential to reverse a game.

- Violet : Your speed is increased by 30%, your dodge by 15% and your engine power regeneration is doubled. Plus, you instantly get your full engine power back when you pick it up. Handy if you run out during a leak. You therefore gain in mobility and survivability.
- Yellow : Double your weapon power regeneration. In addition, your weapon power is totally regained instantly when the bonus is taken. Likewise, you reload your stockpile of secondary weapons. Particularly practical therefore for the autonomy of the guns of an armed vessel, or for vessels using rockets or quick-locking missiles (we quickly tend to run out of rockets). You therefore win in terms of offensiveness.
- Blue (or light green depending on the person): double your regeneration of power shield and removes the "recently consumed" attribute for your shield power. In addition, your shields are instantly fully recharged when taking the bonus. You therefore gain in resistance (to a certain extent anyway, you are not immune to an attack with weapons with a high shield perforation, see, who ignores it completely)
Well-known fact to be aware of: suppose your name is Jacky (don't ask me why ...) and you get the bonus " damage overload ". A warning message will appear on the screen of all the pilots of the opposing team (and also allied) which will announce: "Jacky has the damage overload". If the opposing players are warned, it is to counterbalance the destructive effect of this bonus which makes it possible to skyrocket the score of his team if we are doing well. You can therefore be assured of becoming the enemy to be defeated first if you collect this bonus. You must therefore try to destroy as many people as possible before you get tricked, even if it means using all your powers. In addition, it is very practical to accumulate other bonuses with this one, because you have more defense / offensiveness, and therefore are more effective.
Detail: unlike domination mode, flagships in deathmatch do not attack (to be exact they no longer attack since update 2.6.1) enemy team ships. You are free to use this advantage to trap the opposing players as soon as they reappear, but be aware that it can annoy more than one (including me !!!), because it is a flagrant lack of fairplay, it prevents assaulted players from playing with a minimum of fun, and above all it's not cool. No need to use the excuse "Well of the flagships, you have three, you can change", because some teams are very happy to place a bomber on each point, as much as a single reappearance where your ship takes 2 mines and a missile lock even before the appearance of the image ... it is already judged too much by some. Do not complain about a lack of players after such practices!
End-of-match rewards
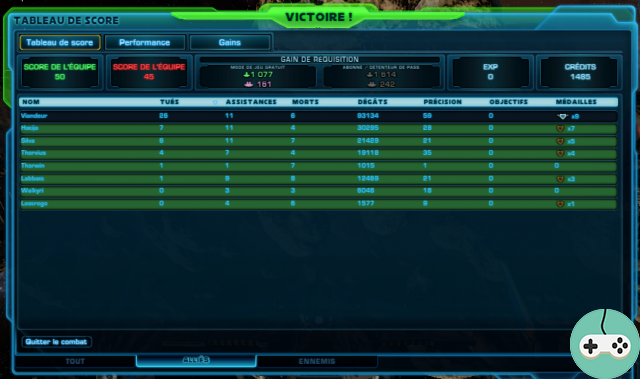
At the end of each match, we give you a full review of the match, showing you:
- The final score (victory or defeat)
- Your stats (like your accuracy, or your kill / death ratio)
- Ship and Fleet requisitions won
- Experience and credits earned.
- The medals that you obtained for the various actions that you carried out (pass the mouse on the number of medals of a player for details).
Regarding your statistics
If you are a perfectionist, you can go see your performances for each ship for the part you just did. You can also with the details of your Gains requisitions for each ship and with the explanation of where each requisition comes from.
Regarding requisitions
The requisitions of vessel (At vert) allow you to buy new components and improve them (optimization) (only usable on the ship on which they are earned). The requisitions of fleet (At purple), which are more "rare" because they are obtained in smaller quantities, mainly allow the purchase of new ships. You can also use it to upgrade those you've already purchased if you don't have enough ship requisitions (although this is not recommended: save them for ship purchases, especially if you're just starting out). Finally, fleet requisitions are also used to buy new crew members for your character (1250 distinctions per member), this should not be neglected because it allows you to optimize your crew, which is just as important as l 'equipment !
Regarding the missions
It should be noted that the mission daily and that weekly, both dropable at the Fleet or Coruscant PvP terminal (and not shareable), allow you to collect a lot of requisitions. You also get " distinctions fleet »By completing these missions (40 for the daily and 80 for the weekly), which you can exchange at
- le fleet merchant (galactic market section) versus
- pilot outfits
- equipment for your NON-GS ships
- boxes of rare materials 50/55
- le galactic conquest merchant against fortress decorations (having for theme the space hunters of course).
In addition, you also earn fleet distinctions by completing “heroic” non-GS ship missions (also called “railshooter” or PvE space missions and which are to be collected in the cockpit of your personal ship)
Examples of decoration to obtain: the vessels to the right and to the left of the image.
Concerning the medals
A brief overview of the medals that can be obtained
- Damage medals: 10 / 000 / 20 damage inflicted
- Objective Capture Medals: 1/2/3/4 captured objectives
- Defense Turret Destruction Medals: 2/4/8 /? turrets destroyed
- Mechanic medals: 2000/4000 repairs carried out (possible by hydrocle on oneself or repair probe / drone)
- Player Killed Medals: 1 enemy killed solo, 2/5/8/12 fatal hits
- Assistance Medals: 4/8/12 enemies weakened by you and subsequently killed by another player (or self-destruct)
- Defense medals: 1/2/4/6/8/10 minutes of defense of a captured objective (stay close to it)
PLEASE NOTE: the medal system is not a system that allows you to say whether a particular player is better than another, and should not be an objective in itself. Let me explain.
If we take a closer look at how medal obtaining works, we realize one essential thing: playing with different ships in the same game means that we have fewer medals (try and you will see). The explanation is that there is "redundancy": each time you change ships, the medals you won previously are kept, but you start from zero, and you will therefore earn the second time. same medals (you will have them in duplicate, by doing for example 10 damage with a first ship then a second you will have two medals of 000 damage and none of 10). The thing is, those "duplicate medals" don't count towards the final scoring. A player who has not changed ships will theoretically have more medals than a player who has changed ships during the match ...
Theoretically, yes. But this is only a disadvantage if you do the same actions as with the previous ship. On the other hand, if the two ships have different roles (example: with the first ship, you only attacked and inflicted damage, and with the other defended and healed), you may have more medals than what you would have had by keeping one ship the whole game (the more medals you get, the harder it is to level up). Medals are therefore not the ultimate tool to determine if a player is at a good level.
In addition, trying at all costs to win medals may simply make you lose the game (typical example of the player who will seek at all costs the confrontation in domination mode without worrying about the objectives to be captured).
Finally, it is more profitable (for in-game experience, credits, requisitions and fun too) to win a game with few medals than to lose one by winning a lot.
Here ! Be aware that I initially wanted to make only one guide on combat, but seeing that it was way too big, I decided to break it down into two parts, one that you just read, and another to be released soon and which talks about more complex and general combat techniques.
As usual, feel free to comment and react: although I am an experienced and regular player, I am not the best!


