


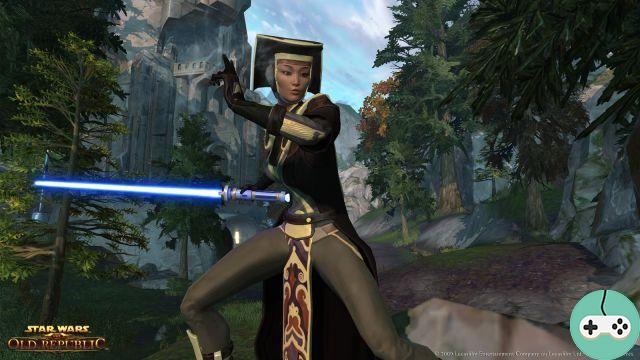
A guide offered by Frénégonde on Protection Scholar, especially for PvP.
Hi everyone, I am Frenégonde from the "Lumina" Guild on the Mantle of the Force server. I've been playing Heal Erudite (Protection) in both PvE and PvP, but since 4.0 mostly in PvP. I said to myself, why not offer a little guide.
Be careful, I don't have the science, and there are many more ways to play the Healer in PvP than what I am going to offer you.
This guide is intended for all players, new and experienced alike.
A little "weird word" point:
- Stun = stun the target
- Bump = to throw
- HOT = long-term care
- DOT = damage over time
- CtoC DPC = damage caster on contact
- AOE = spell or area healing
- Taunt = provocation
Summary :
- Powers
- Fighting skills
- Interface
- Statistics
- Cycle
- Survival
- Conclusion
Powers
Assets
- Care
- Dissipations
- Nudges
- Defensive / offensive powers
- Force management
 Strength armor : it protects you by absorbing a lot of damage, as well as to all those on whom you will put it: do not hesitate, be generous in bubble!
 New Youth: heals over time and boosts your next healing power. To be placed as often as possible, especially just before the Trance of Healing, the Erring Rectification (which I call the ping pong) and the Deliverance.
 Healing Trance: you launch a treatment for a little more than 2 seconds (depending on your alacrity). This spell allows, among other things, to trigger a passive called Resplendent (I will come back to this later)
 Benevolence: Heals between 5000 and 6000 approximately (off critical) for approximately 1,32 seconds of cast (depending on your alacrity). This power can be done instantly under certain conditions and then becomes very interesting!
 Hello : THE Erudite's zone spell! It poses a healing over time that lasts 10 seconds. Normally, we have to cast it for almost 2 seconds, but here too, we can put it in instant under the right conditions! Its other advantage is that you no longer have to stay in it to benefit from it, you just have to go there!
 Force Rectifier: Instantly restores you at least 10000 health points. It is the only power that only works on you.
 Erratic Rectification: it's ping pong! This spell sends a healing ball at 4 people within 30 yards. If possible, do a New Youth just before you send your ping pong.
 Issuance: a very big heal but a little more difficult to place for my taste in PvP. It is indeed the only spell that you are forced to cast in place, but you can considerably reduce its duration, in particular by doing a New Youth just before (5 seconds less casting!).
 Catering: removes 2 Damage over Time from a Force user and restores some health.
 Strength of will : it is the power to use when an adversary paralyzes you or puts you to sleep. Be careful, use it at the right time because you will have to wait 2 minutes before you can use it again.
 Mental Alacity : 20% more alacrity for 10 seconds and you are immune to interrupts and knockback. Thanks to this, you can further reduce the casting time of Deliverance among other things.
 Strength Content: basically, it will boost your next 2 treatments. But then, really roughly!
 Self-Feeding Force: increases the party's mastery, stamina and presence by 10% over 40 yards. To be used really at the right time because it only comes back every 5 minutes (unusable in arena).
 Force Speed: + 150% speed for 2 seconds…. This power will save your life so much! Especially with the right point of use… I will come back to this a little below.
 Phase Walk: since 4.0, the Scholars are also entitled to it and I will not complain! You're going to put it in a corner and when you're in bad shape, boom, you teleport. Enough to drive those who attacked you crazy!
 Barrier Force: la mega bubble. For 8 seconds, you are immune to everything. Above all, once activated, do not touch anything! Choose your time to activate it because it will not come back until 3 minutes later.
 Rescue: Ooohh the grraaappiinnnn. You attract your target towards you (valid only for a member of your group).
 Force Stun: and a headache for the villain who dared to attack you, one! No but ! You deal damage and stun the target for 4 seconds, just enough time to escape!
 Force Lift: you are giving away a free flight lesson, how nice! Your opponent will float quietly for 8 seconds (unless he dissipates, someone hits him first, or has Damage over Time).
 Confused Mind: interrupts the target's current action ... in short, annoying thing.
 Force Slowing: Deals damage and Slows the target by 50% over 8 seconds. Very handy when someone is chasing you…. He will crawl as if he had just swallowed 5 BigMac and 8McFlurry!
 Misty Spirit: reduces the animosity that emerges…. Yes it is useless in PvP, unless you have set the point of use which allows to reduce the damage by 25% for 6 seconds. It's up to everyone to see.
 Force flow: Tired of being surrounded by a slew of ever more pressing fans? Never mind, a little Stream of Force and presto, you send all these little people away! And, if necessary, you can send treatment at the same time.
 Projection : pebbles.
 Telekinetic Throw : more pebbles for longer.
 Force wave : you create an earthquake on an area ... and yes, more pebbles (your area power).
 Disturbance: Hadoken. In short, a ball of energy that hurts.
 Weakened mind: damage over the duration of 18 seconds and, oh joy, no cast, it's snapshot.
 Ecrasement Mental : damage over time of 8 seconds but which requires an incantation of approximately 1,8 seconds.
 Retribution: gives you strength when you're dry. Use it before you're completely dry anyway, it's better.
Liabilities
Resplendent : Passive that stacks up to 3 times when Critical Healing Trance. It is this passive that allows you to instantly cast your salvation instead of charging it. Using Salvation will consume all 3 stacks of Resplendent. Or if you are low in Strength, you can use each of the Resplendent charges with Retribution to recharge yourself for no consideration.
Protection : When you place a New Youth on someone, you grant them this passive which increases their armor index for 45 seconds. Rest a New Youth resets the delay to 45 seconds.
Altruism : the next Benevolence is activated instantly and does not cost Force: yay, a free treatment! But how to get it, you will ask me feverishly? Well quite simply by asking a Hi or just after a Deliverance! This passive lasts 15 seconds.
Benevolent haste : if you put your point, here it is! Right after Instant Benevolence and Free (see Combat Skills).
Seven bonus: your set bonus has triggered and lasts for 25 seconds, hurray! Your next Deliverance will be critical.
Assignment : Obtained by placing a New Youth and lasts 15 seconds. Your next healing power will be more effective.
Critical influx : if you have chosen the Relic which gives criticism, here it is, it has just been activated! Be careful, not to be confused with the confetti of the day of life, because they had the great idea of making the same icon.
Main influx : congratulations, your other relic has just been activated! Finally… if you have chosen the relic which increases Mastery.
These are the main liabilities to watch out for in my opinion in order to optimize your care.
Combat skills
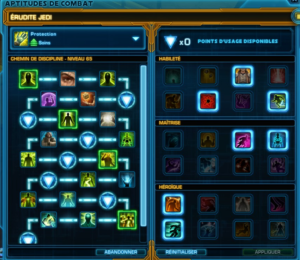
This is the discipline I use most of the time in PvP. I'll explain a bit about the powers I use and why. After that, it also depends on the players with whom I tag: if there is a Tank, or only Dps, or another Healer.
It is really through your choices here that you will best express your way of playing your Scholar, more defensive, more aggressive, more in support of the group, or a mix of all of that.
- Skill
- mastery
- Heroic
3 points to be awarded
Jedi Resistance: increases damage reduction by 3%… since I'm in light armor, I take!
Compassionate Haste: la Benevolence increases movement speed by 50% for 6 seconds. Effect available every 12 seconds… this power saves lives! In PvP, mobility is extremely important, and this point can just help you outsmart your opponents or help an ally join you faster.
Humility: After a Force Stun, the target does 25% less damage for 10 seconds. I chose this point because I use Force Stun a lot and receiving (me or allies) less damage for 10 seconds is a real relief.
OU
Psychic Invasion: the flow of Force heals without using your Force = free healing. I also use the Force flow a lot, so I regularly change my points depending on my mood. In my opinion the 2 powers are very interesting. To see according to the way you play.
Issue : Force Speed removes all effects that affect movement and makes you immune to those effects for its duration. Considering the mind-boggling amount of Damage Over Time you receive in PvP, being able to remove all the slowdowns and save yourself by knocking everyone out while you crawl around like a listless snail at rest, that makes all the difference!
Valor: When you grapple someone (Rescue) they take 25% less damage for 6 seconds and your Force Rectifier's healing increases by 30%. I hesitated for a long time to choose this point, but in the end, two effects for the price of one, since I use Rescue regularly (a lot in huttball!), I find that it relieves me a lot when I heal someone. 'one and take less damage. It allows me to be able to reassemble it more quickly and to concentrate on the rest of the group.
OU
Many other points of use are interesting, it all depends on the way you play:
Telekinetic Defense: your bubble (Force Armor) absorbs 10% more damage. Very interesting because suddenly it is less care.
Wake of Force: Force Stream immobilizes targets for 5 seconds. Very handy for sowing your fans, and it can make a very interesting combo with Psychic Invasion: not only does your Force Flow heal but it also immobilizes the enemy.
Discharge: I was talking to you about it earlier. With this point, as soon as you activate your Pushback, you gain 25% damage reduction for 6 seconds. It can make all the difference when you are attacked alone, while your allies arrive for example.
I'm not talking about all the others, but you understand the principle, it all depends on your way of playing: more defensive or offensive or on mobility.
Mobility of strength: essential ! I'm adamant about it: essential, both in PvP and PvE for that matter! It is this point that allows you to launch your Healing Trance by moving… to test it is to adopt it!
Kinetic Collapse: Once bubble (Force Armor) ends, it ends with a nice flash of light that blinds those around you. They find themselves blinded for 3 seconds. I love this point! When you have 3 CàC DPS that jump on you, start their burst and there FLASH! Hop, you take the opportunity to quickly slam a Force Speed and get out of there. Obviously, it generates a lot of hatred in the enemy… they don't really like being photographed and don't appreciate your photographic art! You are a misunderstood artist and will therefore be extremely targeted!
OU
All the other points are super interesting too! It's painful but that's how it is! I will talk about two that I tested and which are also very good:
Ethereal Entity: a 2 in 1. Reduces area damage by 30%. Additionally, when you use Phase March to return to the marked location, you are immune to jumps, pulls, interrupts, and knockback for 6 seconds.
Guardian of life: your bubulles (Armor and Barrier) restores your health ... so another free treatment that does not draw on your Strength. Nothing more annoying for someone who was killing you and who sees that you put your Barrier in force and that you regain your life.
Interface
Regarding your game interface, I'm not going to tell you how to organize your action bars and your shortcuts, but rather how to optimize your operating environment.
- Remember to increase the debuffs and minimize the buffs on this frame, because these are the debuffs that interest you the most. For example, I set the buffs to 0,1 and the debuffs to 0,70.
- I also adjusted the health and turned on the health text so that I quickly see what's going on at a glance without having to squint. For the healthy width I put at 122 and the healthy height 22
- The target of the target: allows you to see how targeted you are!
- The target usage bar: very useful to see what is casting the one you are targeting and to better be able to cut off his power. Personally I put it just below the frame of the target.
- And for the place of the operating framework, it's up to you to see what suits you best. But remember that the more things you have on the screen, the less you will see the map.
- You can also check "Show only cancellable debuffs", which will prevent you from slamming your Restoration on debuffs that you cannot cancel.
Statistics
Here we are on the point which has been the subject of great debate since the dawn of time. I'm not going to offer you a recipe or a magic combo, but just my way of playing which may not be the one you are used to. I took the bet to bet on alacrity. Here are my stats and the details of my equipment (full index 208 with improvement and stim):
- mastery : 4532
- Endurance : 5441
- Engime : 2369
- Critical : 922
- Alacrity : 1470
Equipment :
- Critical : 3 sophistications + 1 implant + 7 improvements
- Alacrity : 4 sophistications + 1 implant and the atrium + 7 improvements
- For the relics, I chose Concentrated Retribution for Mastery and Devastating Revenge for Critic.
Why these caps? I think it's the right balance between alacrity and criticism. It's a more nervous, more responsive way of playing that suits me well! You can also opt for other caps, more "classic" with Alacrity around 1000 / Critical 1400, which is also quite viable: you will do more healings but less often. I chose to focus on less important but much faster care.
Do not forget your little piquouze of Advance Versatile Analgesic Stim which brings a bonus to Mastery +198 and Potency + 81 for 480 minutes.
Also think about your Datacrons, especially since 4.0 where they are now linked to inheritance, which gives additional interest to collect them. They will come in handy, both in PvP and PvE.
Cycle
Ah, the sacrosanct cycle! I tell you what I'm doing, now that you've seen the powers, the liabilities, coughed cough:
Opening: the bubble! Always ! As many people as possible without forgetting each other!
Just before the doors open, I take this opportunity to raise my charges of Resplendent, just to be ready!
In PvP, it's very complicated to give a canned cycle, the situations vary so much! But in simple: always New Youth and Healing Trance (the 3 charges of Resplendent), I check the bubbles and give them to those who take dear. When I see several taking damage: New Youth and Wandering Rectification. If I have my 3 Resplendences (I manage to have them almost permanently) I ask a Hi either on a group, or in the middle of the passage. For example on Void Star, when a group opens a door and we have to go from one room to another, I always say hi in the hallway, since everyone will be passing by. I remind you that for Salvation, you no longer need to stay in it, you just have to put the tip of your toe in to benefit from the treatment over time. Once I have asked my Hi, I take this opportunity to launch Benevolence (which suddenly is instant and free).
Another spell that I spam: Restoration… especially when you see the kilotons of damage over time that accumulate (no I'm not exaggerating, it's not true!). If you see that you are a little forgotten in your corner and that your set bonus is activated, take the opportunity to do: New Youth + Deliverance. If the situation is really tense in healing, just before sending this, activate Mental Alacrity and Strength Content: big boost for your healing and your Deliverance cast will be reduced from 1,8 to 1,1 seconds.
Have your eyes everywhere: when one of your allies loses their life like an iPhone loses their battery (oulala le taunt), and you can't seem to put them back together, it might be a good idea to grab them at that time and to throw his pursuers with a Stream of Force. And too bad if he groans because you cut him off his DPS… anyway he was going to die and die, we don't do any more DPS!
There you go, I don't have a miracle recipe. All I can tell you is that I always manage to do all my spells on the move (except Deliverance of course), which allows me to run around without losing care.
Big mod, this is what it can give:
++++( OU depending on shine loads) ++
Survival
How to survive?
If you are on vocal: shout. Otherwise, write and pray.
By being a little more serious:
- As soon as you arrive in the war zone, quickly find a place to stall your Phase March: a clue: this is where all the others are!
- Then, avoid isolating yourself too much: the Healer / Tank pair can be the preferred association (especially for zone defense. Example: pylon or door defense), each putting a protection bubble on the other, and for your friend Tank it is very beneficial in PvP, it will thus gain points of protection in more. Be careful, downside, if a Tank has given you his bubble but you are miles away from him, it is useless (your enemies will do everything to separate you!).
- Use and abuse the Force Flow. Move all the time. If you have a clingy fan, you put a little headache on them (Mind Crush) and run away, in Force Speed if possible.
- You will be dizzy as often as possible: don't panic (but you can moan and get upset). You have a destun (Force of Will), you can join your March phase and at worst, slam your Force Barrier. Also, if you've taken Kinetic Collapse, you have a good chance that those who stun you will too (and knock !!). Choose carefully when you are going to use your destun! Never fate at the first stunning ... except in a life-threatening emergency. Usually I try to use it when my resolution bar is white (the resolution bar: just above your portrait it fills up as I get dizzy and when it is white you are immune against them).
- Also know how to keep your destiny to get out of an Electro-net. It is the "plague" of the scholar !!! It's a commando / mercenary power rot. It sends energy damage to you for 9 seconds, with a + 20% damage bonus as soon as you move, all with 50% reduced movement speed, and the inability to take out your Force Barrier or dump it. 'use your Phase Walk. Do not forget that you will suffer with an Electrofilet, but also all your group copaings which will be subjected to it. This is where you are going to have your full role of supporting the group ... and there that you will be recognized for the good you are going to do to them. You will be the undisputed hero of the war zone (well what, one can dream).
- Don't forget the PvP stims and dope that will save your life more than once!
- And hide! Play with the scenery, (example: turn around a pole, get stuck in a corner,…) just to cut off the spells of distant DPS which hurt a lot. Use Force Slow, Confused Mind, Force Lift, and Mind Crush to sow and slow down your decidedly very persistent fans. Be careful, however, with the resolution bar. As I told you, once it's white, there's no point in trying to cut spells, stun or throw your fans: you won't be able to get rid of it for a few seconds. So when it's like this: run and heal and run again!
- If you've had to use your Phase Walk, consider putting it down, preferably somewhere other than the first time, unless no one has seen you!
- If you had to use your Force Barrier: While you are under Barrier you are going to feel like ham above a lion cage ... very appetizing and very dead if you don't act very quickly once your Barrier will have fallen. Be careful, depending on your server delay, think about triggering it around 15% to 20% (max) of remaining life, when your Phase March is no longer available, and especially when you are caught in a DPS burst. As soon as it is finished, or even a little bit before (I sometimes cut it 0.2 seconds before the end for example to take scavengers who are waiting for their pittance by surprise), you can use dopant + medipac + Rectification of Force + Force Flow + Force Speed to get you up and save you as quickly as possible. Little tip: if you can wedge a little hi under your feet before slamming your Barrier, that's even better.
Conclusion
- Good damage resistance thanks to the bubble
- Powerful single-target healing
- Extremely mobile: many active treatments in motion and / or in "instant" (all except one in the end)
- Good set of group support spells
- Fragile when dizzy (without bubbles or regular care, you are a poop)
- Management of the Force quite tense: it empties quickly and does not fill up quickly (the opposite of the Thief / Agent)
- Relative weakness of area healing (less powerful than that of the Thief / Agent but starts instantaneously and we no longer have to stay in it, so it's quite mixed for me)
There you go, it was my first guide. I hope it brought you something other than a migraine. It's just about my experience and how I play. I did not put the precise figures for each of my treatments because I find that it is something too fluctuating: it depends on our equipment, if the one we are treating has taken the 10% point of care in more, if it is a light, intermediate or heavy armor, in short, too annoying! But to give you an idea, depending on the matches, I am always at more than 1 million heals, more generally around 2 million (I once reached 4 million heals on a game). !). I've seen other Healing Scholars with different capes and usage points do great too. For me, it's all about finding your own way of playing and having fun. After all, it's just a game!
And thanks to Zéribane for his help!


