


Many players have tried the latest game mode offered by Bioware in SWTOR and surrendered after a few games, tired of repeatedly dying against better equipped ships. However, if the equipment plays a significant role in this mode of play, it is far from essential to have fun and to win. For this, it is necessary to understand the principles of this game mode and to benefit from some tips that I will give you here.
First steps: The configuration
First of all and to fully understand the rest, it is imperative to activate a basic disabled option in the game. Escape -> Preferences -> Galactic hunter -> View detailed ship weaponry tooltips
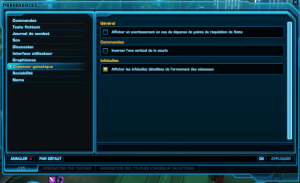
This will later be used to compare the different weapons and their differences, range and damage are not everything.
You can then, if you wish, change the key assignment via the tab at the bottom of the window. I strongly advise you to assign the weapon power and motor power assignment keys to mouse buttons 4 and 5 if you have them, they will be used a lot and their basic assignment to function keys F1 to F4 does. is not practical.
Second step: What do I do with my ship?
Now is the time to get down to business. Press on H to open the Galactic Starfighter interface and discover your first ships, namely a scout and an attack fighter.
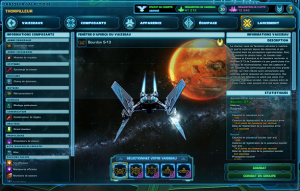
As you can see, there are 5 tabs at the top of the screen which I will summarize here:
- Ships tab: View of your ships and the ability to buy new ones with Fleet Requisitions
- Components tab: The different weapons and systems of your ship to evolve
- Appearance tab: Color and paint options
- Crew tab: The crew members of your ship, who have their own characteristics
- Launch tab: A summary of your selected ship and access to the queue
If you go to the equipment tab and hover over an item of equipment, you will see a detailed description appear (thanks to the option activated above).
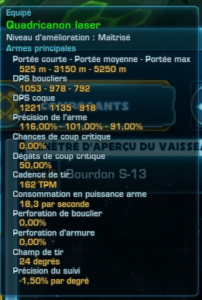
On each system, this information is different but is essential to help you choose from all the available options. When it comes to weapons, besides damage and shot distance, pay close attention to weapon accuracy and tracking accuracy. The accuracy of the weapon tells you the chances of hitting, depending on the distance to the target, if the target is right in the middle of your sights. Tracking accuracy is your weapon's loss of chance to hit for each degree from the center you deflect to fire. In the example above, if you shoot at the limit of your firing cone, you lose no less than 36% of precision, which is not nothing. These values range between 0.50% and 2%.
Now it's up to you to find the equipment that suits you best. At first, without Requisitions, you won't have a choice of weapons anyway, but knowing what you want to get will help you spend your points wisely.
Initially, you will have a bit more maneuvering when it comes to your crew members. Three will be available immediately for each of the four positions to be filled on your ship. Each crew member offers two passive bonuses to your ship, they are important, study them carefully. You can then choose one of them to become your co-pilot, which will then give you additional active power.
Third step: I'm ready!
You are now ready to begin the fight ... in the tutorial. It is accessible by a button at the top right of your GS window. It is relatively simple but will allow you to fine tune your controls and learn how to manage your ship.
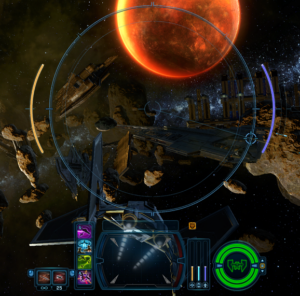
So as you can see in the picture, the interface is not the basic one. It is indeed possible to modify the layout of all the elements via the interface editor, as for the rest of the game.
In the center, therefore, your aiming circle, which represents your firing cone. It is dependent on your equipped weapon. Inside this circle, a second circle represents the firing cone of your secondary weapon. To the left of the large circle, a yellow bar which represents your available weapon power, and to the right, the purple bar shows engine power while the blue bar gives you an indication of your current speed.
Then let's take a look at the other elements. At the bottom left your primary and secondary weapons. If the secondary weapon has limited ammo, you will have a number telling you how much you have left. Next comes the active skills bar, 4 in number, 3 depending on your ship, the last being that provided by your co-pilot.
At the bottom in the center we find the window which will give you details on your target: health, shield, target, orientation, distance between you.
On the right, we first find the indicator of power distribution between weapons, shield and engine and then a simplified view of your ship which will indicate the state of your shields and your hull. Test your ship and its different systems, then finish the tutorial, it's time to get down to business.
Last step: Tips for getting started
Here are various tips to get you started:
- Always use your power converters. They greatly improve the regeneration rate of your systems, mainly weapons and engines. They also provide bonus damage when power is assigned to weapons and speed when power is assigned to engines. If you don't use them, you won't last long. Logically, you have to switch to engine power, use the boost (space key) to reach your target, and as soon as you are within shooting range, switch to weapon power before starting to shoot. If your target flees, switch back to engine power to pursue it. Here are the power allowance bonuses (Thanks Altheran):
- Blaster Power: + 10% damage -10% shield -10% speed
- Shield Power: -5% damage + 20% shield -10% speed
- Power to engines: -5% damage -10% shield + 20% speed
- "Boosted" domains have their energy regeneration increased by 50%, and "malussed" domains have their regeneration decreased by 25%.
- Use your active powers often. They are very useful for fleeing, helping you aim, or increasing your firepower.
- The boost is your friend. Try to keep some engine power under the elbow so that you can escape quickly. If you see that you are taking damage, change direction and give a boost to get yourself out of there.
- Try the R key . It automatically targets the last ship that inflicted damage on you. If a sniper has shot you from a distance, it will allow you to find it directly and fly in a zigzag way until you get within shooting range. An armed ship within range is a potential graveyard.
- Get to know the ships you hunt. They all have their strengths and weaknesses. It's up to you to find the right method for each.
I hope this guide will help you get started in this game mode. See you soon for more guides on the subject.


