


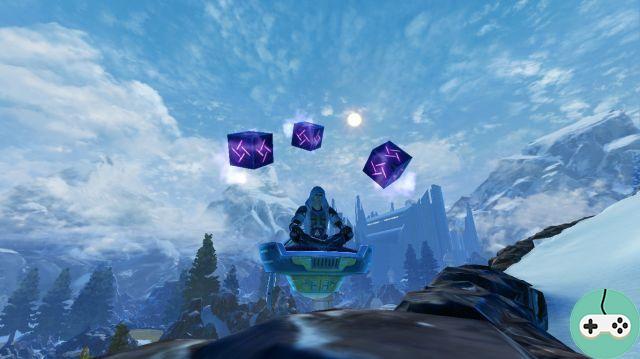
I am Elfeden (Elfy for close friends), from the ASTRIA guild on the Mantle of the Force server, and I bring you this guide on shadow balance 2.10 in PvE.
Long a pure PvP player, fan of the Infiltration specialization, I only got into PvE late and I discovered the sufferings of this class in the face of bosses. For a long time, even in Balance, Shadow was the last of the DPS classes.
Going from Infiltration to Balance, returning to the 3/18/25 hybrid, I struggled in vain, while the other classes exceeded 3800 DPS, we poor stealthy people remained in limbo. kikimeters. Recently, with 2.8, things have changed for the DoT (damage over time) spec, bringing its DPS down to a level equal to that of other advanced classes, if not even the best.
There are two months left before the 3.0 is released so it's now or never to learn to play the shadow Equilibre!
- Arbre the talent
- Equipment
- Cycle
- Terms & Conditions
- Advanced cycle above 30%
- Order of priority and Cycle under 30%
- Burst and when not to ask DoTs
- Conclusion and acknowledgments
Arbre the talent
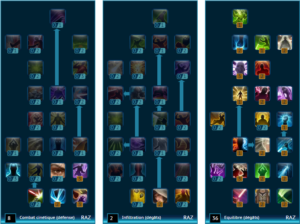
8 / 2 / 36
Several points can be modified:
- 2 points in Shadow Respite (used for Force regeneration and thus limit Saber Strikes in favor of Double Attack => increased DPS)
- 2 points in Jedi Resistance (increased survival of the Shade who needs it)
- 1 point in Vilipendage (increased DPS in area damage from 3-4 targets to be taken only if there are adds and your Strength in balance will not be enough)
These points can also be placed in:
- Haste (2 pts) (to be taken if the vanish cannot really be used like with Raptus' curse, teleporting into the Dashrood Desert, or if there is a lot of movement with Force Speed or control at remove with the Force of Will)
- Mind Guard (2 pts) (if DoTs hurt, like on Draxus, Tyrans, Nefra etc ... In general, we will remove Jedi Resistance points).
- Restraint, mostly PvP talent can possibly be mentioned, but few bosses will require an instant Force Lift. Note but hey ... ^^
The remainder is the commonly accepted tree of Balance.
Equipment
Critical
Being around 300 Critical Rating in full Dread Master (index 186) seems the most optimal. You can go higher, up to almost 450 and have little variation in DPS (hear "always make a dps largely honorable") which will have the advantage of having the same equipment as for Infiltration.
However, if you want to optimize yourself, being in the indicated range will allow you to be more regular in your fights, the critic tending to produce a DPS which can vary a lot. Let us remember that the critic suffers from a decreasing return (the more one puts in critical index, the less it gives percentage of chance) while the power is not concerned.
Engime
Once your critical number is reached, fully increase your Power.
Precision
The course to be reached is 440 index.
Depending on your level of stuff, you will want to hit different numbers. Below the 180 index, you'll want to get as close to 100% (110% strength / tech) as possible without going over them as that would require an additional item. In index 180, you will exceed it slightly (100,27% if memory serves).
However, in 186, it is possible to remove an object with precision to replace it with surge and put an improvement in accuracy / stamina in order to end up at 100,07%. We thus optimize our precision and increase our influx at the cost of a small loss of willpower.
If your gear level is between 180 and 186, don't try to do this as you would need 2 precision upgrades causing you to lose too much willpower. I tried, I didn't like it ^^
Influx
Once you have reached Accuracy, you can fully ramp up your Surge.
improvements
All in Will! Possibly, one in Precision as explained above. Willpower gives you less damage bonus than Potency, but it also gives you Criticality, which makes it more effective for Shadow.
Relics
Without any hesitation, the Unexpected Assault and the Concentrated Punishment. These relics are the best in terms of DPS. They also have another advantage that I will detail in my advanced cycle. You may, for certain situations, prefer the relics that can be activated in order to control a burst (Raptus Nightmare challenge for example) but outside of the strategy requiring them, there is no debate.
Seven bonuses
Ranger, with 4 pieces. This will allow you to be at 50% critical on your Double Attack (which hits 50% more crit thanks to your shaft) and will allow you to better manage your strength with your Saber Strike. Again, there is no debate.
Cycle
Terms & Conditions
How does the Balance work? It is a specialty mainly focused on DoTs (Damage over Time) or damage over time in spanish.
- your Force in Balance Debuff all targets it hits, making your DoTs more powerful (20% more damage for 15 times they trigger).
- your DoTs can trigger (30% chance) the possibility of using your Rotary Strike (performs it), no matter what your target's standard of living is.
- any melee attack that hits a target hit by your Force Breach cancels the cooldown of your Mental crush and allows you to use it for free.
- your DoTs heal you for 1% each time they criticize.
- le Force Cut and your Strength Technique inflict Wave Force which allows you to surrender 2 of Strength.
Once all this information has been assimilated, we end up with a basic cycle that looks like this:
- I put my Force in Balance.
- I put my Force Breach.
- I put my Force Cut.
- I use my Rotary Strike as soon as it activates or becomes available (under 30% of the target's health) ...
- ... Otherwise I use my Double Attack...
- ... Or when I have no more strength, I use Saber Strike.
- I put my Mental crush as soon as it is available.
- I do my Force in Balance as soon as it is available.
- I put back my DOTs as soon as they disappear.
- And I continue in a loop ...
Here is a cycle which is not very complicated, it is enough to press on the buttons as soon as they light up or as soon as the small icon of the DoTs disappears from the Boss, but which however already does a lot of damage. Yes, Shadow DoTs hurt and that makes them an easy to play specialty for an already powerful render. If you are just starting out and want to discover the DPS in operation, I can only recommend Equilibre.
BUT...
The purpose of this guide is to take you to the next level of Shadow Balance. All the little cumulative advice that I am about to present to you can earn you nearly 300 DPS and turn this simple specialty into an abyss of concentration.
This part is intended to be exhaustive in terms of information concerning the Shadow Balance. Some details are not of critical importance, but knowing them fully allows you to make the most of the shadow's potential at any time.
Advanced cycle above 30%
Force in Balance and DoTs
First of all, you need to know several things:
- Force in Balance is available every 15 seconds and should NEVER be delayed. Not only does it bring significant damage, but the debuff it poses makes DoTs even stronger.
- Force Cut et Force Breach each last 18 seconds. Delaying the installation of a DoT implies loss of damage. In the case of Force Breach, it may also involve the delay in triggeringMental crush. We should therefore NEVER delay the installation of one of these DoTs which has just ended (except under 30%, I will come back to this)
In a cycle where the three follow each other, we end up after a while with a superposition that forces us to delay the use of one of the three. Needless to say, we then lose in DPS. The solution is therefore to space the installation of Force Cut and Force Breach of 3 GCDs. This makes the management of DoTs more complicated, because we no longer put them back at the same time and we must therefore monitor the 2 on the boss (or count up to 3 ^^), but this makes it possible to never superimpose the Force in Balance with the installation of DOTs.
There are 3 DOTs in all and all consume a charge of Force Suppression (asked by your Force in Balance). Except that there are only 15 charges!
- Force Cut fires 7 times in 18 seconds and is the strongest DoT.
- Force Breach also fires 7 times and is a little quieter.
- Crushing theMental crush only fires 6 times and is the least powerful.
- La Force Strike, the proc ofMental crush, can only be triggered every 7,5 seconds, i.e. 2 times per Force in Balance.
So there is not enough charge for all DoTs. Prioritize the Force Cut and the Force Breach when there are always loads instead ofCrushing therefore results in a gain of DPS.
However, beware, theMental crush is an attack + a DoT, all for free. While the DoT should not be given priority in terms of Force Suppression, the entire movement remains powerful!
It should also be noted that what makes the Force Cut stronger is that it hits in internal damage and its damage is therefore not mitigated by the armor, unlike the other two which hit in kinetic damage. On bosses losing their armor, this can therefore change (Kephess on Asation for example). Note that with a loss of only 20% of armor (power of FT and Guardians), Force Cut stay ahead.
Finally, a small detail: we always leave Force Breach et Force Cut end and we put them back in the GCD right after. It is then important to have a high APM (action per minute) in order to be able to have our GCDs in synchronization with the DoTs. The less synchronized they are, the more difficult it will be to recognize when to refresh your DOTs.
Melee attacks
There are 4 melee attacks, of which the Whirlpool shot, optional attack valid only if there are more than three enemies. We will talk about this later. The three that interest us are the Rotary Strike Double Attack and Saber Strike. Necessary in the cycle to trigger the Force Strike, they are hierarchized according to two levels: damage and Strength.
- In terms of damage
- In terms of strength
La Rotary Strike is your biggest attack and therefore is your priority. It consumes as much Force as the Double Attack for more damage. It therefore completely replaces it. Above 30%, it is only available by triggering the Denigration, triggered by your DoTs. This trigger can only appear every 10 seconds, lasts 10 seconds, and is consumed as soon as your Rotary Strike is used. Where it gets interesting is that your Relics trigger every 20 seconds. This allows you, once in two, to match the Rotary Strike with them. Useless to specify the gain of DPS. Your Relics will not always trigger synchronously, however. They will sometimes even be shifted. You will then have to choose which relic trigger to use your Rotary Strike. Basically, focus onUnexpected Assault is more profitable, but you have to respect your cycle which will sometimes prevent you from doing so. In this case, do it on the Concentrated Punishment.
La Double Attack is your most used movement. However, it does quite a bit of damage with its 50% critical hit chance (set bonus, force synergy, and gear crit) and 50% additional critical damage.
Le Saber Strike is the weakest of your attacks. If you have Strength, you won't be using it.
If you have no more Force, logically, the only attack you can do is the Saber Strike. Nothing difficult. On the other hand, where you must be vigilant, it is to anticipate the 2 or 3 GCD which come and what will be your consumption of Force at that moment there. Too much Saber Strike, this is not enough Force consumed for more powerful attacks, not enough Saber Strike and it is the missing Force which obliges us to delay an attack, or even to do nothing. This will slow down your DPS, on the one hand, but will destabilize the whole "harmony" of your cycle, and will irrevocably cause your DPS to drop.
For safety, we recommend to make a Saber Strike instead of a melee attack when under Strength 30. Starting off on that basis is a good point, but you will learn to recognize when you can type a little harder (stealth with increased strength regen, use of free Mind Crush) and times when Force consumption will drop. '' increase (Force in balance mainly, Whirlwind stroke etc ...)
The Strength, Readiness to Fight and Doping Content:
La Strength Content gives you 2 charges which will be consumed as soon as one of your Critical Force attacks. While you have these charges, your Force Crit chance is increased by 60%. So it is not a self-written word, as some people think. These charges remain for 20 seconds after the Content activates, allowing you to cast it early, in preparation for your future attacks.
In Balance, only two attacks consume charges: the Force in Balance andMental crush. We will always try to use one of the charges by the Force in Balance in priority and the second by a Crushing (The Force Flow also uses some, but we'll get to that later).
Be careful, because if the Force in Balance hits multiple targets, it will use as many charges as it uses crit. This is a loss of DPS because the Force in Balance tends to crit on all its targets even with a single charge of Strength Content.
In the cycle, you will have to be careful about when you start the Content. Indeed, launching it as quickly as possible will allow you to retrieve it earlier in the course of the fight, and thus make more criticism again but between two Force in Balance, there are two Mental crush. If your Force Content is misplaced, you may run out of charges for Force in Balance.
THEReadiness to Fight has several effects. It restores you 15% health and heals you each time your ability is going to trigger. It is therefore perfect for lifting you up slightly if your healers are in a bit of a panic. In addition, it increases the damage of your abilities by 100% and increases their chance to proc for 15 seconds. On its own, it will only bring bonus DPS. On the other hand, coupled with a dopant, it will only be more efficient.
The Dopant lasts 15 seconds, which corresponds to an entire cycle of Force in Balance. To make it as profitable as possible, try to trigger it when you know that as many DoTs as possible will be running. You will be able to place a single Force in Balance, so don't bother activating your dopant based on it. On the other hand, you must maximize the number of Rotary Strikes which are available every 10 seconds. The best way to do this is to wait until your trigger Denigration either there, continue its cycle on 1 or 2 GCDs, launch the dopant, make the Rotary Strike. This will increase the chances of having the second Rotary Strike within 15 seconds of Dopant, and even, if we waited at least 3 GCD before launching the Dopant, will almost ensure it. Be careful not to disrupt your cycle though.
There are two particularly interesting moments to slam the dopant (apart from the particular boss strat): the engage and once under 30%.
The specific commitment of which I will speak later makes it possible to make the use of Dopant as profitable as possible. In addition, the faster you use it, the faster you will get it later. Hitting very hard at the opening is not a problem thanks to our vanish which will reset the aggro. You should also know that the Dopant has a 3-minute CD while theReadiness to Fight has one of 2 minutes. This makes it possible, on long fights, to use them in conjunction with the engagement and at 6 minutes of combat.
Below 30%, the dopant becomes particularly strong since the Rotary Strike is used almost every 6 seconds and your DoTs and Strength in Balance are increased by 15%.
Deflection, Resilience, Force Occultation, Phase Walk ...
The Shadow is not the toughest class. The Shadow Balances even less.
La Deflection only increases our defense, leaving all Force and Techno attacks to hit us without worry as the Résilience Only grants immunity to these attacks, but for 3 seconds only. This will vary depending on the boss, so you'll quickly learn what to use Deflection and Resilience on. However, you should know that most devastating attacks (mostly channeled) from bosses or add-ons are in Strength or Techno while their basic attacks will be countered by Deflection.
Resilience is not really to be seen as a defensive power, but rather as a tool which gives you the possibility to cheat the game. The curse on the Asation Dreadguards? Resilience. Brontès balls? Resilience. The attack that should have you one-shot or hurt you? Resilience. Etc ...
Le Mass Mind Control is both your desaggro and a 6 second cooldown that reduces damage taken by 30%. Perfect when you take the aggro from the boss because you protect yourself while reducing your threat, a little more limited when you are low in life and you have to hold out. Don't expect to tank for long with a Balance Shadow!
La Phase Walk is now inserted in 0,5 seconds, excluding GCD, which allows it to be placed while cycling. Use there to cover long distances after a pushback or a TP (raptus for example), to reposition yourself or conversely to put you in safety (Titan 6 and its rocks). Used properly, it can save your life or save you precious seconds.
Finally, theForce Occultation has several interests: resetting your threat, increasing your Force regeneration if you have taken the corresponding talent, saving your life after a bad test, or even trying a rez fufu (going to revive the dead buddy because he haven't seen the AoE).
Personally, I don't keep my Force Occultation to resuscitate that when I have not taken the Shadow Respite. Indeed, doing a vanish after 6 seconds of combat has the advantage of not only preventing aggro from taking over (combines perfectly with the taunt time of the tanks if they do so) but also of allowing to continue to hit hard thanks to regeneration, which is for a much more DPS benefit than the uninsured possibility of reviving a buddy (which could be revived by a DPS that can heal). On the other hand, if I do not have the Respite, I only do a vanish to hire to be sure not to resume aggro, but then I keep it safe (crappy aggro, rez fufu etc ...).
There are also 2 other uses for using Occultation: getting out of combat allows you to use your accelerator (very useful on some bosses requiring a lot of travel) and resets the limit of one medipack per fight. Very often, I vanish to be able to use the medipack again and thus reduce the work of the healers.
Area damage (AoE)
We could start this paragraph with an amused "lol". And yet, the Shadow Balance has a DPS ability in AoE. Of course there is the Force in Balance but be careful because it must put the Force Suppression debuff on your main target (and watch out for the Content stack as explained above), otherwise you will lose efficiency. Being only available every 15 seconds, you will need to find other attacks. And there aren't tons of them.
L'Whirlwind Attack is your only AoE hitting melee attack. Note that if it hits a target marked with the Force Breach, it will trigger the Force Strike. The Whirlwind Attack is expensive (40 Strength) and is only really profitable from 3 or 4 opponents.
If, however, you absolutely must do maximum damage in AoE, you can also use your Force flow which has the advantage of being free. Be careful if you have Force Content charges as the Force Stream will consume them. Be careful not to take enemies out of your companions' areas. Best to only use it on uncontrollable adds.
You can then do: Force in balance, Whirlpool attack, Whirlpool attack, Force flow, Saber strike, Whirlpool attack. But you will end up dry in Force.
There is another possibility to hit multiple targets at the same time: drop your DoTs on two enemies at the same time and hit them both with the Force in Balance. You keep a main target but you put your Force Breach on both. After 9 seconds, you can use your Force Cut on the second, which will give you the possibility to refresh this DoT on your primary target when it ends after 18 seconds. Mind Crush is only placed on the primary target.
This technique is only profitable if the fight lasts at least thirty seconds for the DoTs to be fully profitable and if you have to DPS on both at the same time.
Often it will be more profitable to focus on a single target than to want to hit the area at all costs.
Projection and Telekinetic Throwing
These two attacks do not normally enter your cycle. However, don't take them out of your bars. You will sometimes be led to use them: immobilized far from your target, you can use Strength Content to make a Telekinetic Throw at 30m, the Projection is an instant mid-range attack that can sometimes enter a movement phase outside of 4 yards from melee attacks while your DoTs are already active.
Sometimes you don't want to go melee (Draxus Subteroth, Raptus Force Execution etc ...) and / or need to keep your Force in Balance for just after on the next target. Using these attacks works around the problem. In short, it remains anecdotal.
Engage, Priority and Cycle
When you add up all this information, you come to this order of priority above 30% of the boss's health:
- Force in Balance as soon as available
- Force Breach (or Force Cut) to rest the DoT
- Force Cut (or Force Breach) to rest the DoT
- Mental crush
- Melee attack (Saber Strike if under 30 force> Rotary Strike > Double Attack)
We will tend to prioritize Force Breach over Cutter Force when we want a Mental Crush trigger, and vice versa when the trigger is not immediately available and we want to prioritize the higher damage of Cut -Strength (but this is rare especially because of the short time between two Mental Crushes). I also remind you that it is better to place the Rotating Strike on the relic triggers.
Shadow, like many DPS specialties, has an engage that's slightly different from its usual cycle. We will distinguish two possible openings according to the bosses. If you have Shadow Respite, always start stealth.
The first is the most optimal in terms of DPS and profitability of our different buffs (dopants, vanish, eagerness etc ...). It is used in particular for parses on an operating pole.
- Strength content ahead of the fight (approximately 5 to 10 seconds before the pull)
- Mental Crush Channel
- Force Breach
- Doping + Readiness to Fight
- Force in Balance
- Force Cut
- Force Occultation (désaggro + regen force)
- Melee attack (often your Rotating Strike) depending on priority
- Mental crush
- Melee attack x4
- Mental crush
- Melee attack (end of dopant)
- Force in Balance
- Force Breach (then we wait for 3 GCDs before placing Coupe-Force)
- Melee attack
- Mental crush
- Melee attack
- Force Cut
- We continue following the priority ...
In the first part of this opening, we do not separate Brèche de Force and Coupe-Force of 3 GCD in order to make the Dopant as profitable as possible. We only do this during the second part. Mental Crush is channeled for the same reason. The fact that it isn't free is offset by the increased regeneration of Shadow's Respite. If you haven't taken it and are not comfortable with managing the Force, I recommend the other opening.
Sometimes you won't be able to cast your Mind Crush (boss jump on the tank out of range, detect your stealth etc ...), or you just want to avoid hitting too hard even with your Force Occult (young tank for example). Here are the differences:
- Strength content in advance
- Force Breach
- Doping + Readiness to Fight
- Force in Balance
- Melee attack
- Mental crush
- Force Cut
- We continue following the priority ...
As you can see, we make less profitable the dopant without the first Mental Crush and we start directly on the cycle with the 3 GCDs between the DoTs.
There is another order of precedence that places Mind Crush above Force Breach and Force Cut. The cycle appears more complex since sometimes we will still prioritize Force Breach to have the Force Strike, which will tend to shift the 3 GCD spacing and destabilize the cycle. Personally, I have always had less good results with it, but I would point it out anyway. The advantage is that it coordinates better with the cycle under 30% boss health and tends to be easier to burst.
Priority order and Cycle under 30% (execute phase)
When we go under 30% of the target's life, our DoTs and our Force in Balance hurt more and above all we can use Rotary Strike without Denigration. Delaying a Rotary Strike is absolutely out of the question at this time because it is our biggest attack and we risk in addition to having the Denigration when the Rotary Strike is already available when we could chain two of them. sharpened. The only attack that passes in front is the Force in Balance (and sometimes Force Breach when you want to have Force Strike and you feel that delaying Rotary Strike by a single GCD will not be a problem) thanks to its consequent damage and his Force Suppression debuff.
As the Rotary Strike passes in front of the two DoTs, the Force consumption increases (because it costs 5 and 3 more respectively), which also makes Saber Strikes more frequent so as not to delay anything. Suddenly, the Mental Crush that hits hard and is free (therefore allows you to regenerate your strength for a GCD without loss of DPS) becomes all the more important. It therefore goes above the other two DoTs in the priority list. We end up with the following order of priority:
- Force in equilibrium
- Rotary Strike
- Mental crush
- Force Breach (or Force Cut)
- Force Cut (or Force Breach)
Burst and when not to ask DoTs
Difficult to burst when you have a DOT specialty that draws its effectiveness over time. The order of priority for burst is the same as under 30% insofar as we will prioritize the attacks that do the most damage. It will also be necessary to take into account an important thing: how quickly will the target die?
If it's longer than 20 seconds, you can cycle through your usual cycle and increase it by one Combat Readiness, Strength Content and / or Dopant. If it won't survive for more than ten seconds, you can land your Mind Crush if you already have your Force Strike. If it is slightly more resistant, you can additionally place your Force Breach to have a second Mind Crush.
Finally, if the target will only last 3 or 4 GCD, no need to place a DoT. Simply hit her with your melee attacks. Indeed, to pose its DOTs, it is to use 1,5 seconds for a skill which draws its power only in the long term. A DoT tick is about 800 damage points while being full gear. At the same time, you could have inflicted 2000 with a Double Attack.

Conclusion and acknowledgments
I think I have done the tour of things to know about Shadow Balance in PvE. If I forgot any, I will be happy to add them to it (well, details like I switch to combat technique to put my protection on a low dps alive which will benefit from the 5% damage reduction, that remains really too anecdotal ^^).
For fun, I tested a basic cycle and then the advanced cycle. By having made more mistakes on the advanced cycle, I made almost 200 more DPS (4132 against 3950), or 10 seconds saved over 4 minutes. This is the kind of gain that can make the difference between a wipe and a boss down.
Torparse being currently down, for those who would like to see how the damage is distributed, here is one of my best parses on 1.000.000 hp pole and armor reduction (the standard established on the official forum):
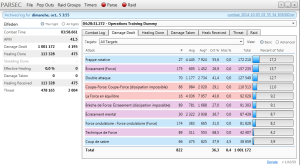 (I am currently in full 180 with two armor (including the secondary hand), two mods, a sophistication and an implant in 186. So there is still a good margin of progress.)
I wanted to thank MknightRider who wrote his English guide for shadow balance in which he explains important things like the spacing of 3 GCDs. It was his guide that made me progress and I tried to draw inspiration from it, took information from it and tried to deepen it with my experience. More generally, the official English forum of SWTOR is full of good players and valuable advice, do not hesitate to take a look?
Hello to my Astria guild who support me as best they can, and to those who know me? (Juliaan's note: ooooh yes, somehow :))


