


"Go more than 4 mobs ... 3 ... 2 ... 1 ... DING"
We all waited for this moment! And for most of us (especially Akira the casual gamer overstuff) for one or two weeks on average, little habits appear. "Go hop journa PvP, daily quests, and a group to do a heroic rush to complete the third type of journa!"
It might be time to shake up all this NAMEHO! For two weeks now, I used to clean the Normal mode and I finally arrive on the try in Heroic / Nightmare mode as well as on the new patch! So it was time for me to tackle "Guide" (if you can call it that) on the fights that await you in Eternity Vault. But from the perspective of a Jedi Scholar Heal!

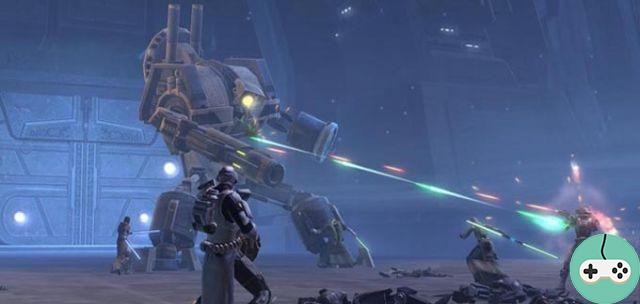
Droïde d’annihilation XRR-3
Here is a big step beautiful and not ugly. In fact I like it, that makes KABOUM, PIOU PIOU. But beyond the sound effects, the fog on the area, and all the light effects. This boss is not complicated. There are a few things that interest us in particular:
- A well placed shield, so you can hit! This is the main tip on this fight. On his single target missile, placing a shield on the target considerably limits the damage received by the latter. You will be a big winner in terms of the heal to provide.
- An area you will land behind the turrets: During the missile barrage phase, the raid hardly takes any more damage (thank you line of sight) but will have taken a lot of time to move behind. So asking a Salvation / Revivification during this phase is truly magical! (Akira's note: it's a low-income strategy, the real men won't hide behind the pillar and take the salvo of packed missiles in front of the boss to continue to dismantle the ugly droid, it just takes a little stuff so that it goes smoothly. Anyway in Hard mode, this strategy is almost essential not to fall into the timer rage.)
- The Sprint you will use: It is not because we are a healer, that all our other spells are useless, far from it. The sprint is one of those little extras that limit the damage we take. Need to get behind the post? A little sprint and that's less damage to the head!
- A second zone you will pose! When the boss is almost out of health, he begins to Loop his barrage of missiles. Usually this is the moment when everything is slammed! We get together! And the first reflex is to ask your Hi / Revivification again. No need to explain why I think!

Garhj
"Hey guys, is it tonight that we fall Ragnaros?", And yes that's what the old wow must have thought when we walked into the room. There's plenty of lava, rocks. A big thing that jumps on a platform in front. But what to do on Garjh?
- Behind you you will look. Little tip on a mishap that happened to me! Having positioned myself a bit too much on the outside, the villain's bump sent me into a lava fountain which is sore, remember to take a good look behind you. As well to avoid a "one-shoot", as to facilitate your fight. There are plenty of rocky peaks behind you that can be used to limit how far you are thrown.
- Hi ! I revive you! The Zone Heal, over and over again. As well when we all take damage with the bump, as when changing platform where Garjh takes a little while to come on the new platform. Pack the raid quickly, "Hi" and off we go!
- Of the assistance dps you will do. Not necessarily on the boss directly, but during the add pop and the platform change, throwing a wave of force on the arriving adds greatly accelerates their death and avoids some surprises. Of course, what not to do at the expense of the heal!
- Sprinting is life. Do you get bumped in the lava? Need to change platform? No worries the sprint saves you. Limiting your damage and making you immediately available to resume your healing.

The Ancestral Pillars.
Did you know the expression "No, but this boss is a post"? Bioware made it real by creating a boss with poles. I would not dwell on the healing to be done so much and classic and not very intense (unless there are times). You can even have fun healing your group from the most unlikely places! Be careful, however, if you are in a group without a real tank when you have to manage the big acklay, it still hurts a lot, be reactive.

The Infernal Council
An advice ! They are not so hellish as they can show! Typically you will be assigned to the PnJ at 20k HP as a healer.
Beyond its weakness, the main reason for this attribution lies in the functioning of your opponent. Which does small damage and which at times sends a big spike of damage to your head.
So beyond the dps to provide (Projection / Disturbance / Weakening and Telekinetic Throw), it will be necessary to think about heal. But have no worries about that. Given our role damage spells consume E-NOR-ME-MENT. Fortunately, put the shield on your head as soon as possible and heal yourself either with New Youth + Healing Trance is enough to hold, while allowing us to keep up the fight in terms of strength consumed.
Remember that you cannot interfere with other players' battles during this encounter, so resist the temptation to heal your raid!

Sounds
Oh a squid! But no fool, he's a Rakata! We come up against a real boss. Although it falls quite easily in Normal mode, this boss will require movement, that you do dps (yes if yes) and reactivity. The boss is divided into 3 phases with an interphase between each.
During the first phase, there is not much to say about healing, damage here and there. If your dps have eyes you might even be a little bored! At 75% it is the interphase
The Saving Gesture: This is a small gesture that requires responsiveness. It may happen that one of your operating partners does not realize the phase change and continues to stupidly tap on Soa when this one will collapse the room. Fortunately, you have the Rescue spell. Do not hesitate to "Grip" this unconscious to save it from certain death. Adrenaline guaranteed!
During the interphase, the collapsed ground will form a large staircase to descend to a second platform. It is therefore necessary to descend rather quickly, however fall damage is received by the members of the raid. So taking a healing break with Hail / Revivification from time to time is essential. Normally, two breaks in the course of decent and a final arrival on the ground are enough. You can surely do less if you are reactive on the HoT break during this phase, but objectively, there is plenty of time, so you might as well not take any risks.
After this comes Phase 2, serious things start to happen. Like most of the time on SW: TOR, 80% of the damage received by players is avoidable. So, we will rather speak in terms of "Do what at what time"!
- Much less in hard mode, but in normal mode there are heals. That is, periods when your party takes almost no damage. Rather than just running around stupidly, Helping Destroy a MindTrap is very effective.
- If your grip is up, don't hesitate to use it either to prevent a person from getting an energy orb.
- When a person falls from the air, he takes a lot of damage, on the other hand small surprises like "falling back on an orb" are quite possible, so as soon as a person who was controlled comes back to the ground, I put my Force armor immediately so that she survives this kind of glitch.
- The control in the air that Soa inflicts is quite violent in terms of damage. So a person with half his life will not survive it. Keeping everyone at 80% of their life is very important.
At 30%, return to the interphase. No complaints. It is the same as the first.
After this second interphase, the boss attacks his phase 3. Without doubt the most intense. During your descent, even with the zone heals that you have provided, you will logically arrive with 100% of your strength for this phase 3. Always the balls to be avoided, the mind traps. But there are 2 additional subtleties concerning us.
- The assist dps when possible on mind trap still holds. These will appear faster and faster, so doing so can really help the operation.
- When the pylon falls on Soa, it is not uncommon to see the tank take a significant spike of damage (if this incompetent does not know how to place). Try to anticipate the tick by pre-casting a large healing spell.
- Once the pylon has fallen, you need dps Soa. Absolutely everyone, we'll get the group back together later. We do not hesitate to burst heal, we have resources, there will be no worries! The dps window on Soa is really very short. That, added to the Mindtrap appearing faster and faster, your 20.000 total damage is very important to make the difference (I still remember a screen print on the forum of a wipe with soa at 215 hp).


