


Foreword
The time of heroes is over, team spirit is now mandatory to overcome the new difficult ZL that appeared with update 3.0.
Also, before tagging on the RDG, be certain: to have the necessary equipment and a minimum optimized, to know your class and its new uses, to have defensive powers and threat reduction at your fingertips at all times.
Manaan Depths is often considered the biggest ZL challenge in 3.0 (wait until you see 3.1 ^^). The adds hurt a lot and the boss mechanics are very original, which unfortunately often goes hand in hand with the difficulty.
Once is not customary, it is the DPS that have a primary role to play here, both on the final boss and its timer as on the others.
Packs d’adds notables

There is one thing to know that applies to all adds in ZL: They have a buff that makes them almost unresponsive to stealth. Also, if you want to open the way for your comrades, don't forget to activate your camouflage in addition to your stealth (if you are Shadow tank, you will conceal your fail in a failed sweater, if you are the Thief take care of the gang. … It will sting!).
- Snipers
- Repair droids
You will find them on (almost) all groups until the second boss. These are of the strong type and channel a shot that takes your life with a great blow of 20K. It is therefore necessary that the tank collects them all and especially that the DPS take care of them as a priority.
They are elite type and you will encounter them on all packs starting with the second boss. These heal all your enemies very effectively, so you should drop them first.
More generally, all the groups do very heavy damage on the raid which could considerably complicate the task of the healer.
BUT, with each group you always have one or more kolto barrels. These heal in zone (the radius is small attention) and go up all those who are there to 100%. So it's more up to the tank, once his aggro is well stabilized to come and explode them to help the healer to keep everyone. When the latter begins to move, join him as soon as possible to benefit from this care. If you are in critical condition, operate these barrels yourself, no one will blame you ...
Sairisi
I'm sure if this one doesn't pose a lot of difficulty, some players still believe it takes 20 minutes to drop it. If I tell you that beyond 2 switches (4 minutes), it is too long, you believe me?
It takes a good understanding of how it works to save valuable time in combat.
The boss is surrounded by 2 droids who place a shield on him that makes him invulnerable to any type of damage. As soon as a droid reaches 50% health, he, panicked, recovers the shield he placed on the boss to put it on. In addition to making himself invulnerable, the shield heals him until he regains 100% health.
When the droid is at 100% thanks to his shield again, then he relies it on the boss. Knowing that it is enough for the boss to have only one shield on him to be invulnerable, it is necessary to operate the "switch" at exactly the same time.
For that you need :
- distribute a droid by DPS with symbols (they are exactly the same so it might as well be easier)
- DPS must have the other droid in focus to monitor their comrade's advance
- Here no excuse for the tank, he must take everyone while avoiding the rectangular areas of the droids (I have too often seen tanks only interested in the boss in these moments, the DPS having to manage them- even their area). I remind you that your salvation goes through them so you might as well make it easier for them.
Some tanks stand against a wall and guard everyone. The idea is not stupid since it immobilizes everyone, but it has the fault of making the areas of the droids inevitable for them. The consequences in care are significant too… once again… ask the doctor for permission.
- When the 50% is about to be reached on both sides (do not hesitate to slow down, even to help your DPS), you make the switch simultaneously. The two messages appear at the same time and the boss is accessible.
- There you can drop the boss at once if you send wood otherwise he ends up with 20-30% of life before recovering the shields. No problem, you will have it at the next switch.
I can already hear some people say that they prefer to drop their droid first and then go and help the other DPS. It's up to you to see, it's as much time wasted on the boss ...
Also to watch:
- The droids target their biggest threat with a red rectangular area. This does not strike everyone who is there but only the one who is closest, including the boss.
- When the boss passes the 30%, he sends several bursts of grape rifle which will immobilize the biggest threat, leaving it at the mercy of the robot zones.
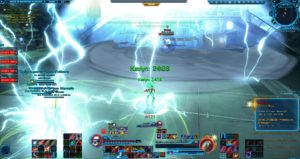
Ortuno
The first thing to know with it is that the mechanics change from its normal version. Indeed, walking in the puddles that it poses no longer puts the debuff which makes you more sensitive to its damage except at the time of the "flood".
You will understand that you will have your feet in the water most of the time.
Phase DPS
- The boss does moderate damage and on a regular basis (every 10 seconds) sends a puddle of water at the bigger threat. The latter remains in play until the next "flow".
- After 6 or 7 puddles, he places an eighth but it lands on each member of the group.
- Immediately afterwards, it channels its "flow", which has the effect of enlarging all the puddles in play by 300%.
- After the first "flow" 2 strong type adds arrive, they are melee, so let them come to you.
Dry feet phase
- During the "flood" phase, you cannot do anything, the boss is immune and if you are unfortunate enough to find yourself in one of the enlarged puddles, you are dead.
Also everything is played in the placement, to facilitate the task of everyone, it is advisable to superimpose all the puddles that the boss poses, even (especially) those just before the "flood" that he places on everyone.
Why ? The electrified area will be smaller, but not only! Those who never tank may never have realized it, but there is an essential subtlety here. In fact, immediately after the end of the "flood" the boss sends a new puddle on the biggest threat, or if it is not within jumping distance of the boss it will not have time to come and drop it off. feet and you'll end up with a puddle right in the middle of the room and good luck on the next wave.
So here's how I position the group:
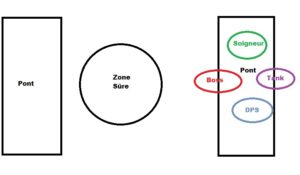
The tank is therefore at the time of the "flow" in the safe zone, but so as to be as close as possible to the boss.
You can also go from bridge to bridge and wait for the boss after each wave.
When adding adds, do not move, you risk putting it everywhere too, wait for them in contact with the boss.
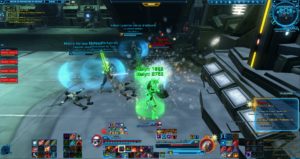
Stivastin

Screen taken from Normal mode
This boss represents a real challenge because of its rather original mechanics but especially because of its timer!
From the end of the cutscene, (also do not spam space if you want us to explain), a 5 minute timer is triggered. After this time, the boss will reset and you're good to start over.
The first thing to know is that the aggro of this boss is very complicated to understand and to hold. Indeed, he will regularly project the player with the biggest threat to come and focus on the second and go after him. During the period when the boss is going after a player, you can taunt him, but he won't move until he's finished (the mass aggro that places Shield and Reflection can be very useful here).
The problem is that the boss's damage peak always occurs at the time of this relentlessness, and so if you tank it in the traditional way, it will always be on a DPS that it will fall.
Also 2 solutions are available to you;
- You can, with the agreement of the healer, completely ignore this aspect of the mechanics. The tank will then have almost no use on this boss (the relentless phase being the longest phase of the boss, the tank will therefore have the boss on it less often than the DPS). This solution can be very interesting if you are light in DPS, the tank can then specialize in DPS before the fight to be sure to keep within the timer.
- Another, more complicated solution is to reverse the roles. It is therefore a DPS which will initiate the fight with the boss and on the projection, it is the tank which recovers. The interest, as you will have understood, is that each time, it is the tank that will take the boss's relentlessness. This solution makes it possible to keep a tank, which can prove to be saving when the adds appear, but requires, to be correctly carried out, a DPS equipped with a provocation, which is not always the case.
Aside from this complicated aggro technique, the boss also requires precise placement. Regularly, orange areas will appear at the 4 corners of the map. It will then be necessary to place the boss there to burn it. After a certain number of fire stacks, the boss freezes and loses his shield, which allows you to inflict much more damage to him.

You will understand, with the boss's complicated aggro, it won't necessarily be up to the tank to place him. Also, when the orange zone appears, the whole group moves together and runs to stand there. When there is only one minute left, 4 orange areas appear to make your task easier.
While it is already very complicated, adds are added to the party. They are a strong type and do not tolerate provocation very well. The latter will pose on those they touch accumulations that accumulate up to 10 and which considerably increase the damage they do.

Small useful thing, like the minions of Grob'thok in the Dread Fortress, when the adds go through the fire, then it only takes one hit to drop them.
So when the adds appear if you are in the "orange zone" phase, let them come to you and drop them. If there is no orange zone when they arrive, whoever has aggro must kite them (make them run) gently until this one appears.
M2-AUX

You will see that this one is really funny and that changes a bit!
The first thing to know is about mines.
- Regularly, mines surrounded by a detection zone will appear in the corridor, they appear one by one and move "normally" in a straight line. Why normally? Quite simply because, if they receive a mass provocation or damage, they will target the one who attacks them… And there, it is the tragedy. So we avoid bothering them and we kindly let them pass near us.
- If you have the misfortune to cross their detection zone, they explode and take away 50% of your life but not only… They pose a debuff which doubles the damage of the mines. So for dummies at math, 50% x 2 is 100% and when you lose 100% of your life… you're dead. It is therefore necessary at all costs to avoid this debuff especially that at a certain moment of the fight you will be obliged to take it.
The second thing concerns the placement of the group.
The boss is of the Melee type exclusively, which will allow you to place it as you see fit. I advise you to always tank it along the wall so you will systematically and effortlessly avoid 2 out of 4 mine paths.
There are indeed 4 different trajectories:
- The central trajectory : no matter which wall you have chosen to tank the boss, if the whole group is well glued to it, you will systematically avoid this mine without moving.
- The trajectory stuck against the right wall: well, it's not complicated, if you tank on the left it's without worry, if you tank on the right it's time to move
- The trajectory stuck against the left wall: no need to repeat myself though?
Also I advise you to choose the right wall because the first mine is always glued to the left wall and the second is central, which allows you to start quietly or to get in the bath.
Bah Proust… what's happening to you? You no longer know how to count? You said 4 trajectories, that's only 3 ...
- The last trajectory, the terrible "infernal triplet" : 2 times in the fight (3 if you are light in DPS (I make an aside in the apart: undergoing 3 triplets is a good way to know that your DPS will be a little short for the last boss)), 3 mines will appear at the same time on the 3 possible trajectories and there, impossible to hide.
Also, before starting the fight, you must choose 2 (or 3) expiatory victims who will sacrifice themselves for the group. It is generally the DPS who take care of it, the tank and the healer being already busy, you will see it. The first victim takes care of the first triplet, the second of the second. If there is a third triplet, normally the debuff of the first victim is gone and he can take care of it again.
The designated person must therefore run in front of the triplet and detonate one! You have to run because it is important not that you detonate the mine on the group otherwise everyone takes the debuff. As said above you now have a debuff so you can no longer hit a mine without dying.
Obviously, this all sounds very easy to set up, but sometimes people do detonate mines that should be avoided (that's not good!). There you have to be vigilant, never go in front of a triplet if you have the debuff otherwise you will die.
So I suggest this order of priority:
- The DPS without debuff titled to the treble
- The DPS without debuff which is assigned to another tiplette
- The healer without debuff
- The DPS with debuff assigned to the triplet (you will die)
- The Tank without debuff (simply because the boss hurts a lot and the tank may often be too low to withstand the damage of the mine)
As much to say to you that if you are not in one of these cases of figure, you can / stuck!
The last thing to know is about care.
The boss regularly casts ice cubes at party members. They start by slowing down their target and then immobilizing them completely. These ice cubes must be purged! You have understood the difficulty of this boss is the placement, if you are immobilized it is a hassle. Also, priority to the purge of the doctor, keep your immunity only in case of hard blow.


