


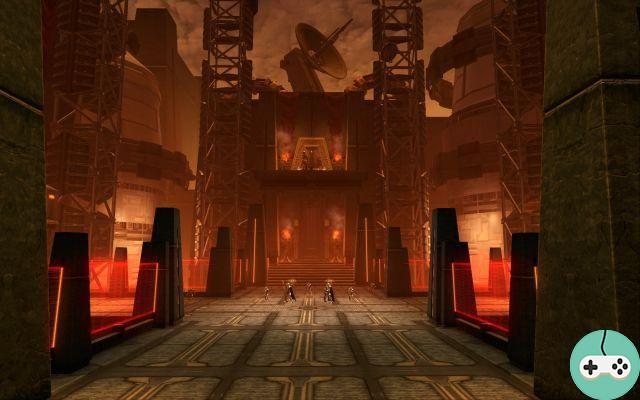
Here is the guide to Corruptor Zero, with the usual team Tigraou, Keros, Kyumz and Niidya.
Nothing too complicated this week while waiting for Brontes next week.
Hard Mode Reminder:
When you arrive in the room, an army of droids stand between you and the Corruptor.
The fight doesn't really begin until after these droids are dead.
Corruptor Zero can take two forms of combat, either melee or ranged. His attacks are not the same depending on his form, and it will be more difficult to move him when he is in distant form.
Regularly Corruptor Zero casts a spell called "mine".
A debuff will then appear on a random person in the group who is not in contact with the boss. This mine can therefore be avoided if everyone is grouped on him.
This mine generates an area of about 10m in diameter which moves with the person. To dispel it, you have to position yourself so that it touches the boss.
It is a debuff which is placed on the tank which has the aggro of the boss, it rises regularly in accumulation. The higher it is, the more damage the tank will take. The tanks must therefore exchange the boss to avoid climbing too high.
A debuff also placed by the boss on the tank which has aggro. This debuff can (and should) be resolved.
A large red area appears under the corruptor's feet. It will inflict very heavy damage on you if you hang around in it for too long.
Six droids regularly come to lend a hand to the boss.
There are three types of droids that you need to distinguish:
- Respondents" (Droid Repair D-03) : there are two that appear in each wave. They are placed at the bottom of the pack. They do not attack, but heal.
- The "little ones" (Corruptor D-02 / Corruptor D-09) : they appear in threes. They usually target your healers when they spawn. They don't do anything in particular, but can hurt quite a bit.
- The fats" (Corruptor D-13 / Corruptor D-15) : only one droid of this type per phase. It places an area of damage under the feet of a raid member. You have to cut her spells to prevent her from touching him.
All of these droids themselves fall into two types: melee or distant.
At around 30%, the boss jumps to reappear at one end of the room, then launches a laser straight in front of him. You must therefore watch its landing place in order to position yourself well. This attack will remind you of a certain Toborro.
He repeats this attack 4 times in a row, forcing you to move between each of the lasers.
New mechanics:
It is no longer one, but two players (at most) who are targeted by the mine. The whole group dies if the areas of effect of the two mines touch each other.
The mine hurts a little less than in the hard mode.
There are two techniques to manage this mechanics:
- Classic
- Group
The distant ones and the healers must therefore be kept away from each other in order to prevent this from happening. It is also advisable to decide on an order to remove the mine in order to avoid two players going there at the same time. The difficulty of this technique is the management of the dissipation of the mine and the positioning of each.
The whole group except one person goes into melee with the boss. Thus, during the incantation: "Percussion mine", only one mine appears and it will necessarily be on the person at a distance. One person has to be at a distance to get the mine or the group gets killed. The difficulty with this strategy is to stay ALL in a group at ALL times.
Little novelty on this side, except that they can no longer be controlled. D-13 and D-15 Droids' spells can (and should) always be interrupted, on the other hand for probes you cannot break their healing spells, and they heal more effectively.
There are two methods here suited to the management of the impactful mine:
- Classic
- Group
We jump in the heap, the management of the mines becomes a little more complex, you have to be careful that the person who is going to dissipate does not pass near the other player who has the mine. With this method I recommend the order of dissipation: Distant> CAC> Healer.
We break their line of sight by moving to the opposite corner. They are thus forced to move and regroup, so it will be easier to get them down. With this method, a single player does not stay in contact with the boss in order to manage the hard-hitting mines. This method requires more reactivity from the whole group to get out of the antigravitational field.
Corruptor Zero casts the spell, then places an area of damage under each player's feet. This attack forces players to move away from each other.
Great novelty of Nightmare mode, the laser phases are present at different times of the fight. For these new phases not present in HM, there is only one laser each time.
These new rays are happening on time. The first two lasers are located:
- As soon as the boss goes down
- After the second pack (you should be around 70% Boss health)
- After the fourth pack (Variable from 50 to 30% depending on the group)
The phase of the four lasers is always present around 30% (Variable from 15 to 35% of the boss's life as in HM).
If you want to avoid unnecessary deaths, be sure to announce when the boss takes off. The RL can also announce "side" or "stairs" for example to help, but everyone must watch their minimap to know where to stand.
As in hard mode you will only have to finish the boss, remember to dodge the areas of his missile barrage.
videos:
As usual, you can find different videos with different points of view:
Classic Strategy:
- Tank
- Heal
- DPS Distant
Groupir strategy:
- DPS Cac
- DPS Distant
See you soon to finish this guide series on the Nightmare Dread Fortress, with Brontes.


