


Hello everyone, let me introduce myself, Oberoth, Sniper of the Raiders Guild on the Darth Nihilus server. Our guild focused on PVE HL offers you a little helping hand to defeat Asation in Story Mode. This strategy is from Tilchet (Assassin Tank) as well as Ner'zhul (Sorcerer healer) for illustrations. Your servant, Oberoth, is in the editorial staff.
Absolute Horror
Absolute Horror" src="/images/posts/6852f8a7313d96afae17865d02d64191-1.jpg">
This first instance boss is not very complicated in story mode, although there are some basic mechanics to consider. The boss is placed with his back to the operation group, with a non-compulsory switch (exchange) of the tank every 3 incubation accumulations. You always need a tank in contact to prevent the boss from hitting everyone with his spit (tank specialist or tank pest seems to be best).
It spawns small adds accompanied by a larger add, "the jealous evil". And yes, the boss is a female then. During this pop, an area of red “pheromone” will appear on the ground. You have to attract these adds in order to place them in this area, then kill them as quickly as possible. This area considerably reduces the damage inflicted by mother's offspring. The higher the number of incubations (the debuff on the tank), the more additions there will be.
The dread guards
The dread guards" src="/images/posts/6852f8a7313d96afae17865d02d64191-2.jpg">
Made in 16 (the 8 being almost identical)
For this boss, it is important to observe each specificity of the three guards. Indeed, like the 3 droids of Directive 7 or the 3 boarding team soldiers, these are complementary. You will have to kill the wizard first, then the marauder and finally the assassin.
During the sorcerer's DPS phase, his marauder buddy comes to help him with a shield. It is then necessary to kick (interrupt) and burst (hit quickly and hard) the marauder so that his shield disappears from the sorcerer who is immediately returned to type. Some loose information:
- only two guards are tankable (the marauder and the assassin)
- killing one gives all their life back to others.
- The Sorcerer launches lightning bolts at a random target when protected by his marauder.
- the Marauder places a curse on a player. This one must recover green ground areas on the ground in order to remove it, the other members of the raid must move away.
- the assassin places a debuff on his tank. It must therefore be exchanged. At a certain moment, he wants the death of a raid player, this phase is recognized by a large green ray between him and the targeted player. He must therefore move away as far and as quickly as possible from the assassin.
Operator IX
Operator IX" src="/images/posts/6852f8a7313d96afae17865d02d64191-3.jpg">
4 colors are to be taken (2 players of each color in raid 8 and 4 of each color in raid 16): blue / orange / purple / yellow. The principle is to give each healer a different color. For tanks and dps, there is no problem (in 16 of course).
Phase 1
We will have to make the operator appear in order to be able to kill him. To do this, you have to destroy 8 data cores using color recognition: under the boss there is a colored area, this indicates who should be there. I would say you need either an RDPS or a tank in it.
In addition to that there is a tablet to activate (well stay the time of the incantation on it). Once done, two nuclei become vulnerable. We must therefore hurry to type them while one of the members of the raid remains on the console that he continues to activate. If the cores haven't fallen fast enough, a champion will arrive. During this phase, add arrives, trying to prevent the click on the console, it is therefore necessary to retaunt, grap etc ... so that they do not affect the player of the console.
Phase 2: Once the cores are destroyed
The boss appears, so you have to type it quickly. Every 10% it spawns a shield and colored marks around it. Each member with a color must go to the one that corresponds to it. During this period, he casts a spell and if the colors aren't done quickly enough, it is the death of the weaker living members of the raid, who will have deserved it anyway.
Kephess: Still him but he took steroids.

A very nice boss to do, a little pole on the edges, you have to send him full face from the start.
At one point, it spawns blue ground areas as lightning bolts and a player ends up with a lightning bolt on him, so he has to go into the ground area to turn it off.
Kephess targets a player and sends him a kind of flamethrower, the ideal is for the targeted player to rush to the level of the boss exit so as not to hit the other players in the raid.
Kephess then jumps in the air to land on a random player (persistent red circle), he leaves behind an area that grows and turns blue (to be avoided).
During the battle, players with an orange icon (a kind of flame thrower) will have to destroy pillars that appear at the 4 corners of the room. These grant extra power to the boss, so it should be done quickly.
Finally the last phase is a real butchery. Kephess bends his knees slightly and sends orange tracer missiles around you. It's raining Napalm everywhere, the missiles do areas on the ground as well as area damage so send big, big damage (burst). Among the Raiders, we fell the first time in raid 16 but lost a dozen members in this phase, enjoyable!
For normal Kephess, although the nag method in phase 2 works, there are some subtleties to this fight. Indeed, the destruction of the turrets triggers some interesting mechanics:
- the one who channels on the turret is healed regularly for a non-negligible amount of life points
- if the pipe is interrupted before the end of the pipe, the tower is destroyed (so no need to wait for the pipe to end)
- if Kephess is nearby when the tower is destroyed, he finds himself knocked out and the group benefits from a damage bonus of ten seconds
Finally, in phase 3, no need to run everywhere all the time, a large part of the damage is not avoidable anyway. Only the areas on the ground are (a priori, seen that in normal they are only 5k) to be avoided. This phase suddenly becomes much less chaotic. The only priority is to stay far enough apart from each other so as not to be obstructed by your neighbor's area.
Nightmare from elsewhere
Nightmare from elsewhere" src="/images/posts/6852f8a7313d96afae17865d02d64191-5.jpg">
Here is the main course of this new operation concocted by Bioware. Here, you don't have to be the server's biggest DPS, only coordination and placement count.
Phase 1
Phase 1" src="/images/posts/6852f8a7313d96afae17865d02d64191-6.jpg">
2 tentacles arrive, about 20m apart from each other. Each must be tanked. They must be directed outwards due to a cleave / crush (damage in a forward cone). They must be DPS:
in red.
- adds arrive from the water and move towards the MT1 of each tentacle, they must be killed (this is periodic): in green
.
- the tentacles retract, a wave of addons arrives from the boss, you have to move away and not be in their field of vision: in yellow
.
- the tentacles reappear, this time separated by 50m, same as for the 20m: in blue
.
- adds arrive from the water and go to the MT1 of each tentacle, you have to kill them because they go to the tanks to explode on them: in green
.
- the tentacles retract, a wave of additions arrive from the boss, you have to move away and not be in their field of vision: in yellow
.
- during all these cycles zones will be placed randomly on members of the operation, they must be placed judiciously (3.4K / tic).
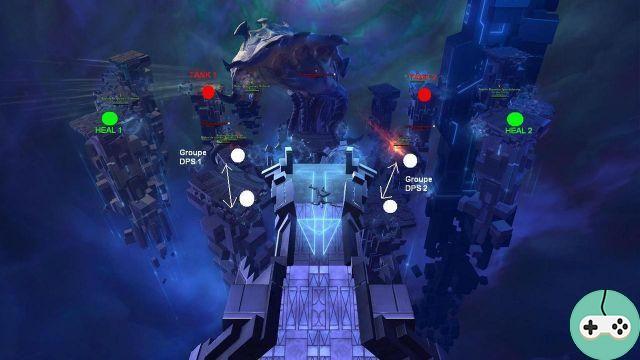
Phase 2

The boss sucks us in and we appear on platforms with vortices. You have to take vortices in order to get to one of the platforms where there are tentacles. Half of the operation must be grouped on each. It is assumed that one must take different source vortices in order not to die. The tanks, them, take the central vortices in order to arrive on each side of the boss:
in red. The healers (
and transl) stay high to heal since this phase allows all members of the raid to have a range of 60 meters. DPS (
in white) take the lateral vortices at the start in order to arrive below as close as possible to the tentacles.
On the platform of a tentacle, you must do the maximum damage in order to kill it (2 dps per tentacle). When it rises, you ABSOLUTELY have to take one of the vortices to change the platform and then come back when it is lowered.
The boss must be tanked by the 2 tanks and they will exchange the aggro on the big casting spell called "CRIS". Note that tanks must be at least 60% of their life to not be swept away by the "CRIS".
When the tentacles die, the DPS must kill all energy balls (orb) on the map, then go to the tentacles again. The tanks land in 11 and 12, the tentacles are in 6 and 8 then in 14 and 15. Finally the hypergate distortions appear in 0-3-4-5-7-9-11-12:

Third phase (15%)
You have to do a huge BURST DPS on the boss who admits defeat to 3% of his life.
There you go, hoping that this strategy can help some of you, it is obvious that it deserves to be refined and modified since the operation is still very recent. In normal mode, the last boss turns out to be the toughest, but we noticed a real effort from Bioware in terms of the very clean environment of this instance.
Thanks to everyone for reading and thanks to Onidra for his kindness.


