
I introduce myself, Hanaar, level 50 sentry on the Hssiss server. I am part of the Ascension guild specializing in PVE HL content (therefore difficult and nightmare operations). I come to talk to you about my feedback on the combat spec that I mounted on my main character and which my faith offers a good package of DPS.
I would like to particularly thank Alex and his post which offers a lot of detailed information on the Sentinel combat spec and which convinced me to adopt this specialty. This detail of the combat special is an update (and flat) following the changes brought by patch 1.2.

The talent tree
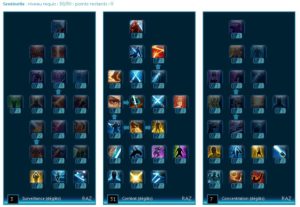
The combat specialism represents for many a "mix" between the surveillance special (oriented PVE) and the concentration special (oriented PVP); by developing this branch, you have the ease to raise your levels by doing PVE and you can then continue on the PVP without too much difficulty. In pre-1.2 I was using a 3/31/7 build. In 1.2 I now use a build in 5/31/5
Le build pré-1.2 on 3/31/7:
My current build in 5/31/5:
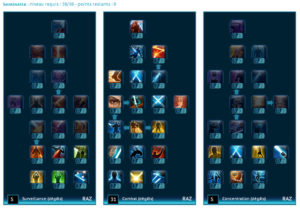
link to specialization
Fight tree:
Level 1:
- Dual Wield Mastery: + 36% damage on second saber, speaks for itself. Compulsory competence regardless of the tree chosen
- Defensive forms: generates 1 centering in case of attack every 1.5s, and 15% more speed, not negligible to avoid the enemy AOE
- Jedi Crusade: Generates 1 auto focus when the reprimand returns damage, every 3s
Level 2:
- Firmness: + 3% more damage to the hull
- Defensive asset: -30% on AOE damage received, not insignificant
Level 3:
- Ataru Form: Accuracy + 3%, and a 20% chance to inflict 234-279 Energy damage every 1,5 seconds.
- Ataru Mastery: Ataru Form Attack Damage + 30%
- Timely Attack: The next attack using focus is 10% more effective. Since most of our attacks use focus, this is essential. On the other hand the term “effective” is somewhat ambiguous, we do not know if it is on the damage, the precision, both,… or something else!
Level 4:
- Combat trance: generates 1 point of concentration at the end of the trance
- Immaculate Strength: Blade Storm almost grants an automatic critical hit when Combat Trance is active
- Righteous Relentlessness: -3 seconds to cooldown on Relentless Strike
Level 5:
- Accuracy Lunge: for 6 seconds increases the armor perfo by 100%, this cap is to be used as a priority in the DPS cycle because it will allow us to then place our kifrapentfort attacks (but we will see all this later)
- Sharp Blades: Blades Storm CD -3 seconds and -2 focus on use, points earned will be used for other attacks
Level 6:
- Waste: Expert strike immobilizes target for 3s
- Saber Storm: + 30% to the critical strike damage bonus of Blade Storm, Blade Flurry, and Ataru Form. With the Immaculate Strength buff that grants Blade Storm auto-crit under combat trance, we understand the usefulness of the combo.
Level 7:
- Blade Flurry: In addition to damage, triggers an Ataru Form attack and can proc another Ataru Form for the 6 second cd.

Monitoring tree:
Level 1:
- Concentrated Lunge: Lunge, Blade Flurry, and Merciless Lunge restore 1 point of Concentration
- Bravery: Generates 2 centers when using powers that tap into focus and reduces the Valorous Call CD by 30s. as we draw on concentration almost all the time, it is now a must-have.
Concentration tree:
Level 1:
- Expert Focus: Expert Strike CD -3 seconds and Force Stasis CD -10 seconds
- Insight: + 6% Force Attack Crit
Leveling up and tree climbing
Having the details of the points to invest is good, knowing in which order to invest them is better! This leveling is based on my personal experience, so you are free to adapt it to your needs. So your first 3 points should go to "dual handling master". We have two weapons, so we must maximize the effectiveness of the second sword right away. The following 7 points are invested in “defensive forms” (max) to unlock level 2, “defensive asset” (max) and “firmness” (max). Here two options: either you go up "jedi crusade", or you attack stage 3 and you will end the crusade later. I go on the optics of attacking level 3. I therefore invest the following 10 points in the headings of levels 3 and 4 to open level 5. The next point is immediately invested in "accuracy slot" because this attack is an essential component of our strike. I then use the following 4 points for "sharp blades" and "jedi crusade". The rest of the points are invested to complete the tree, and the remaining 10 points to increase the capacities of the other trees.
Beaming as a rule or how to approach the DPS cycle
We are a DPS, we are there to do a lot of damage to the opponents, yes, but not just anyhow either! Our attacks consume concentration, so we will first have to use the attacks that generate this concentration and then follow up on those that consume it while maximizing the various ability bonuses. We then come back to the beginning, generation of concentration, etc etc… This is our DPS cycle seen from above. At the same time, we will generate centering, which should be used to increase our damage (with Inspiration) or reduce our consumption of concentration (with Zen). With 1.2 and the reorganization of the trees there was a little nerve on the jump in strength (3 points instead of 4), but this is compensated by the investment in the bravery ability which explodes the generation of our points of centering. We are therefore going to do a small review of the number of attacks, buffs and utils, then we will move on to the DPS cycle itself.

The abilities of the sentry jedi
Offensive abilities:
Strike (level 1): basic attack, generates 2 points of concentration
Lunge (level 1): medium damage, uses 3 focus points
Force leap (level 2): jumps on an enemy and interrupts its current action, generates 3 points of concentration (range: 10-30m, CD: 15 seconds)
Force Sweep (Level 3): Kinetic damage to up to 5 targets within 5m, stun weak and standard enemies for 1,5 seconds, uses 3 focus points
Riposte (level 5): riposte to a parried or deflected attack, uncontrollable by the opponent, uses 3 points of concentration
Blade Storm (level 6): Very powerful Force hit, stuns weak and standard enemies for 4 seconds, uses 4 focus points (range: 10m, CD: 12 seconds)
Expert Strike (level 8): powerful hits, lasts 3 seconds (CD: 30 seconds)
Relentless Strike (level 10): hits the target multiple times, generates 6 focus points (CD: 12 seconds)
Cauterization (level 12): immediate damage then DoT over 6 seconds, uses 2 points of concentration (CD: 6 seconds)
Lunge Legs (level 16): damage, and target speed reduced by 50% for 12 seconds, uses 2 focus points
Incapacitating throw (level 18): damage, plus healing received by the target -20% over 15 seconds, uses 3 points of concentration (CD: 12 seconds)
Force Stasis (level 24): overpower the target, stuns and inflicts kinetic damage, generates 1 point of focus per second, lasts 3 seconds (CD: 1 minute)
Pommel Strike (Level 28): Deals heavy damage, only works on incapacitated targets (CD: 45 seconds)
Cyclone Slash (level 32): attacks up to 5 targets, uses 3 focus points
Timely Strike (level 34): Punch the target and deal damage according to its level (weak, standard, strong), only works on incapacitated opponents (CD: 15 seconds)
Elimination (level 46): sword throwing that inflicts heavy damage, only works on targets with less than 30% total health (range: 10m, CD: 6 seconds)
Lunge of Accuracy: Deals damage, increases armor piercing by 100%, uses 3 focus points (CD: 15 seconds)
Blade Flurry: Deals damage, automatically generates an attack of Ataru Form, and for 6 seconds Ataru Form has a 30% proc chance; uses 3 focus points
Defensive Abilities / Buffs / Stun ...
Shii-Sho form (level 1): damage dealt + 3% and damage taken -3%
Call for Force (level 1): buff, increases damage and healing by 5% (lasts 60 minutes)
Saber Return (Level 4): Defense + 50% and reduce Tech and Force damage by 25%, lasts 12 seconds (CD: 3 minutes)
Resolution (level 9): debuff any incapacitating effect (CD: 2 minutes)
Reprimand (level 10): Reduces damage by 20% and deals damage to attackers. The effect is only available every 1,5 seconds and lasts 6 seconds. The duration is restored in the event of an attack but cannot exceed 30 seconds (CD: 1 minute)
Zen (level 10): converts 30 centering points to enter Zen state:
- Shii-sho form: the lunge does not tap into focus and hits an additional enemy
- Ataru Form: Reduces the focus cost of Slash and Blade Flurry and reduces GCD by 0,5 seconds
Call to the Force (level 15): ends the cooldown of the return of saber and heal 40% of the health over 1 minute (CD: 20 minutes)
Force Kick (Level 18): Stops the target's current casting and prevents use of the ability for 4 seconds, uses 1 point of focus (CD: 8 seconds)
Transcendence (level 22): converts 30 focus points for party buff, movement speed + 50%, melee and ranged defense + 10%, lasts 10 seconds
Pacification (level 26): Debuff target accuracy (melee and distance) by 90% for 6 seconds, uses 1 point of focus (CD: 6 seconds)
Droid Deactivation (level 26): stun a droid for 1 minute but heal it, damage interrupts effect, works on 1 droid at a time (Range: 30m)
Force Camouflage (level 30): invisibility and movement speed + 30% for 4 seconds, attacking negates the effect (CD: 45 seconds)
The Force Keeps Us (Level 38): Uses 50% of remaining health to give 99% damage reduction for 5 seconds
Dread (level 42): Confused all nearby enemies, preventing them from acting for 6 seconds; does not work on droids, and damage interrupts the effect (CD: 1 minute)
Inspiration (level 44): uses 30 focus points to buff the party, increases all damage by 15% (CD: 5 minutes)
Valorous call (level 50): automatically generates 30 centering (CD: 3 minutes)

The DPS cycle
Now that we have done our detailed review, let's take a closer look at the attacks that will generate concentration. We therefore find:
- Strike (2 points)
- Power jump (3 points)
- Relentless Strike (6 points)
- Force stasis (3 points)
- Flurry of Blades (+1 point with Concentrated Lunge Cap)
- Combat trance (+1 point at the end of the trance)
We can therefore theoretically generate 17 concentration points. Now let's take a closer look at the attacks that use this focus:
- Lunge (3 points)
- Force scan (3 points)
- Response (3 points)
- Windstorm (4 points) -2 points with the sharp blade capes
- Expert strike (3 points)
- Catering (2 points)
- Leg lunge (2 points)
- Disabling throw (3 points)
- Cyclone slot (3 points)
- Accuracy slot (3 points)
- Flurry of Blades (3 points)
Force Kick and Pacify also use focus, but since they're not attacks, I don't count them in the list. The crippling throw, lunge, and cautery don't deal enough damage to targets to be interesting enough. In addition there is not a lot of heal on PVE targets (it does exist but it is not common either, do not make me say what I did not say ^^) and reduce their movement speed n It is not too useful since we will be staying nearby most of the time. Cauterization inflicts DoT which can certainly be interesting but since we do not develop DoT skills we will leave this attack aside.
Force Sweep and Cyclone Slash are more for groups of enemies, we'll cover that later.
Buffs
It helps to remember, you have buffs, use them! This is what can make the difference between a mob killed or a rez at the nearest medical center… I systematically use Reprimand before my attacks, coupled with Saber Return when it is necessary to hit either heavy or a group of mobs (or both…), this buff allows us to cash in quite a bit at the start of the fight.
Zen / Inspiration: to also proceed at the start of the fight if available (and if you have an elite opposite), you might as well hit hard right away. With Update 1.2, focus point generation is improved, so you can trigger Zen / Inspire much more often and quickly. Do not deprive yourself of it !!
Without forgetting of course your relics which should provide you more than correct buffs. I personally use a potency buff and a critical / surge buff (rakata and campaign relics).

Opening
As explained above, we need a good dose of concentration to be able to pass our powerful attacks. The cycle will therefore open with the Force leap immediately chained by the relentless strike, which will constitute a reserve of 9 points of concentration.
We will then place our armor debuff on the target, so the Accuracy Slash, which will allow us to chain on our most powerful shots, the expert strike first that deals in the 1500-2100 points of damage (low estimate). ) and will generate the combat trance, followed by the Flurry of Blades which procs both the Ataru form and an almost automatic Crit of Blades Storm, and so to finish our start we launch the Storm of Blades. We therefore consume here 10 points of concentration, but thanks to the combat trance which procured we regained 2, and with the reprimand 3 more! we thus obtain this:
Force Leap> Relentless Strike> Slash of Accuracy> Expert Strike> Blades of Blades> Blades Storm
While leveling, you won't have all of the abilities, so you can replace Lunge of Accuracy and Blades Flurry with Lunge.
During the fight
There's no real order, other than the Accuracy Slit, which you need to spam as soon as it's available to chain with Expert Strike, and the Blade Flurry / Blade Storm combo.
Finish (PV < 30%)
For the finish we will use the Elimination ability which sends wood to the target. We can therefore define the following order of priority (if the concentration reserve allows it):
Priority 1: Accuracy Slot> Elimination> Expert Strike
Priority 2: Relentless strike (rain concentration)
Priority 3: Storm of Blades> Storm of Blades
Priority 4: Hit (rain concentration)
And there you have it, with all that you should send firewood into combat, and thus have the pleasure of seeing the HP of your opponents melt like snow in the sun under 30 °

Some other interesting combos
For groups of low level mobs that are all well crammed together, you can consider the following sequence:
Force Leap> Relentless Strike> Cyclone Slash> Force Sweep> Knob Strike
You start on the base that generates concentration, the cyclone slit will send damage to the group of mobs, and the Sweep also with a stun bonus of 1,5s. You can then consider the use of the Pommel Strike which allows you to easily eliminate an opponent without too much hassle and without damaging your HP too much. In addition the other mobs will already have their health started, which facilitates the task.
For droids, we can also think of a combined DPS pre-cycle as follows:
Droid Deactivation> Pommel Strike> Strike> Strike
And from there you go through the opening DPS cycle with the Relentless Strike and following.
On some elite mobs, I sometimes include at the end of my opening the Force Stasis, which stuns the target for 3 seconds, makes a regen of 3 points of concentration (even 4 if my conbat trance also ends), in general if I play solo with Doc as a partner this is the moment when I resume a good bunch of health, and it allows me to repeat with the relentless strike to regen my concentration and start again on classic DPS.
And my attributes in all of this?
Primary attributes:
Our effectiveness will depend mainly on the attribute available now, which will be our firepower indicator. Attribute endurance will be the one who will increase our VPs. These two attributes will have to be mounted as a priority.
Secondary attributes:
La power will allow us to add a bonus to the damage provided. The precision will allow us to increase our chances of hitting the target. Above 100%, accuracy decreases the target's defense chance. The critical will increase the chance of a critical hit, and the influx indicates the increased power of critical hits.
Prioritization:
Stamina will be the ability to increase imperatively because it is our primary stat and it directly affects the damage bonus and critical strike chance.
The second statistic to prioritize will be precision, to cross the 100% mark, this will allow you to hit with each attack and lower the resistance of the target when you exceed 100%.
The third stat concerns for me the critic, which will have to be raised in a range of 35-50% to be (almost) sure to trigger an auto crit with our storm of waves.
We will therefore end up with the following order of priority:
Stamina> precision> critical> potency> surge

What outfit for my outings: smocking or jeans / sneakers?
Your equipment will greatly depend on your success or your ground level at the medical center… use the purple stuff as much as possible if you find any, otherwise the modifiable orange stuff will be almost vital. Focus on increasing stamina and endurance as much as possible, second option precision and critical, and third possibility power and surge. Do not forget your implants, atria and relics in your character, if you hunt the datacron you can craft a relic that will help you a lot for a while, afterwards you can switch to artefact relics which will only favor one stat but which will help you. will give a big temporary boost to another of your stats (example with the brand new campaign relic of immeasurable ages: +84 stamina but +405 power for 20s, or the rakata relic of forbidden secrets: +77 endu and +235 critical / influx for 20s).
At level 50 and as soon as you have finished your story mode, you will be able to attack ZL HM and operations. To do this, you can already attack the Daily Missions on Belsavis, Ilum, Corellia and Space which will earn you 36 Daily Awards, plus 6 Weekly Black Hole Awards, and Level 23 Purple Armor and Mods. can equip yourself with implants and rakata atria (count 360 distinctions for 2 implants and the atrium), then campaign relics (count 400 distinctions for 2 relics). The Black Hole awards will allow you to purchase the Black Hole set. At the same time, your ZL HM will allow you to recover the columi / tionist stuff which again will boost you well. And all you have to do is go on an operation to recover the rakata / black hole / campaign equipment.
Since there are many guides and materials out there regarding Daily Quests, ZLs, and Operations, I won't go into this any further.
Here, it was a small presentation of the combat spec in 1.2, if you have questions or comments do not hesitate !!


