


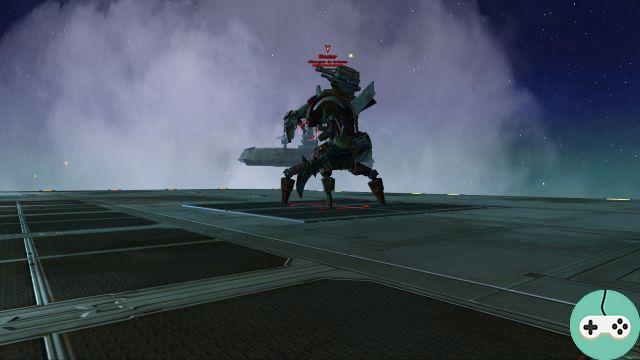
After a bitter fight against Torque, here you are on a large area, where you can find Blaster. Do not seek Master, he will come later!
Description of the fight
You will first face Blaster on your own. Master will then come to help him and you will therefore have to deal with both at the same time.
- Blaster health points : 3 779 329
- Master Hit Points : 165 975
The fight is broken down into 3 distinct phases:
- P1 : Blaster (100% - 53%)
- P2 : Blaster and Master (Master 100% - 50%)
- P3 : Blaster and Master (the 2 to 9%)
Combat abilities
- Blaster
- Maître
Super Ravager Scrap Cannon : attack materializing as a red cone at an angle of about 150 degrees. Anyone caught in the cone is thrown away. The power of the projection is 3 times the story mode and will bring you close to the void every time.
Thermal Mortar : series of mortar depositing 6 yellow circles and greatly reducing the available space. Can reasonably kill a person in 3-4 ticks.
Resonant explosive probe : drops an explosive probe on 6 people in the group. Explodes after a while. In the event of contact between 2 players with a probe, instantly explodes and pushes the 2 players back about twenty meters: potentially fatal.
Devastating Electro-Pulse : Blaster's final power, channeled over 6 seconds. Throws all players who do not have the Master debuff beyond the platform.
The fire wheel of death : Whirlwind of the Master, can be devastating if misplaced.
Powerful ion cutter : laser beam depositing charges on the target and whose damage increases with the number of charges.
Rain of pain : red band causing heavy damage to anyone remaining in it.
Ionic pulse wave : Damage in a straight line in front of him, causing low damage but dropping a double debuff. The former increases damage received per unit and the latter reduces movement speed by 15% but prevents being thrown by Blaster's devastating Electro-Pulse.
Phase 1
This first part will be broken down into 2 sub-parts, detailing first the real strategy and then the "easy" strategy, with a team made up of 2 Vanguards / Tank Specialists.
- Normal strategy
- Easy strategy
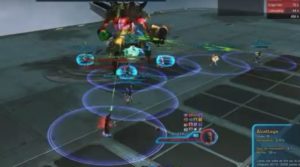
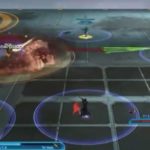
Let's start right in the thick of it, to succeed in this fight you don't really have a choice, you have to learn this image (credits: Dulfy):
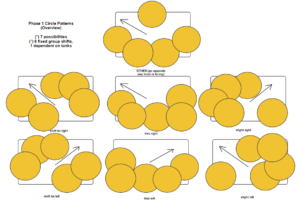
So there are 7 different circle positions and depending on these 7 positions, the tank will orient the boss in one direction. In order not to be thrown into the void / electric fence, you will have to systematically place yourself in the free space behind or next to Blaster but never in front of him.
The only position where the tank will have a choice is the first… and the most obvious choice will be not to move.
This part is therefore the most difficult because you have to pay attention to two essential things:
- Be responsive enough not to get stuck and / or in front of the boss
- Above all, do not bump into, pass over, etc., otherwise the explosive probes will explode as soon as they appear, causing a fatal projection.
This phase and this boss in general is based on self-management and communication. The boss does not have anger, it is priority to place correctly rather than DPS at all costs.
So it is not impossible that a DPS is out of range of the boss but it is not inevitable in itself as long as your investments are made correctly.
It is also important that your Healers stay close to Blaster overall, otherwise your Tanks will die due to lack of healing range.
When you are the "first", remember to go as far as possible, there are 6 people behind you who need a place.
Explosive probes only explode if a circle hits a player who himself has a circle. The circles are therefore largely superimposable ... be careful however when moving, the circles are fidgety and can disturb a little the vision of the space they really occupy.
Do not hesitate to communicate in voice: "Martyne, shift to the right / back / advance" if you are stuck by this player.
On the Tank side, an exchange (switch) must take place at each projection, because if you have the aggro of Blaster and you are too far from it, it will send you a surprise missile which will have the effect of throwing you again (less far but potentially fatal for the success of the strategy).
The off-tank must make sure to interfere as little as possible with the raid, even if it means finding yourself 40 meters from the Blaster during a change of position, you will have plenty of time afterwards to return to the boss to make the next exchange.
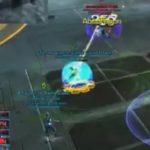
The other strategy relies on fixed placement and the Vanguard / Specialists' Immutability / Hydraulic Manipulation unique ability to prevent being knocked off by the Super Scrap Cannon.
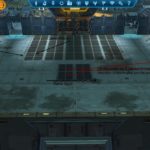
The placement is as follows:
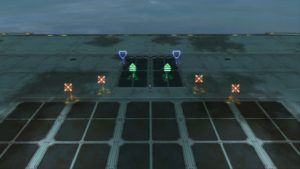
And in real life it looks like this:
If you have Melee, you just need to reverse yourself with a Healer. Beyond 2 CtoC, the strategy is unusable (and between us, falling this boss with 3+ CtoC seems to me more or less improbable without intense suffering).
By respecting this placement to the nearest pixel, all the explosive probes are superimposed without touching each other. If they touch each other, there is a placement error.
On the Tank side, hydraulic handling must be used at specific times under pain of death by fall:
uses
Timing
- The first Tank must trigger its Immutability / Hydraulic Manipulation when the red cone appears. This will allow, if it is done well, to collect this cone and the next.
- The Mortar is still not launched, it is possible, by aiming the corner of the platform, not to be thrown into the void. So, if you miss the first throw, immediately trigger your Immutability / Manip and come back. If you miss the second, it will keep you alive.
- Once the first two screenings are over, the first switch occurs. You can trigger your Immutability / Manip immediately after the switch or wait 1 to 2 seconds but not more under penalty of not having it available at the end of the phase.
- We switch again and we must then wait for the end of the Mortar channel to trigger its Immutability / Manip again.
- Always stay as close as possible to Blaster without ever being within 0 meters or you will receive regular damage.
We therefore have 1 Tank (the first) which collects 2 cones, then only 1 which must coordinate its Immutability / Manip according to the Mortar and the other Tank which recovers the boss and triggers its Immutability / Manip directly.
Apart from the two at the start, the switches intervene at each cone.
Phase 2
Phase 2 begins with the arrival of the Master. The strategy is simplified but remains no less difficult:
- Healer side: finished sleeping, the raid and especially your tanks will be expensive, I will come back to it.
- DPS side: same punishment as in the first part, you must pay attention to your environment and not hit other players at all costs with the explosive probes.
- Tank side (Blaster): you must not be thrown into a void or into a yellow circle on pain of rapid death.
- Tank side (Master): You have to properly kitter the master and place it correctly to prevent the fire wheel from causing damage to the raid and not finding yourself alone at the other end of the map with the laser beam.
- We will define 2 DPS which will collect part of the charges of the radius, 1 DPS being linked to 1 tank.
To succeed in this phase, you have to understand its mechanics. The Master always performs 2 laser phases before the phase with the red bands.
From experience, it is easier not to switch to the red bands and to wait until then to perform the first switch:
- Either you have a Sorcerer and he can then take all 20 charges from the first laser via immunity.
- Either you use the 2 DPS which do not effect the laser beams to take the first 20 charges.
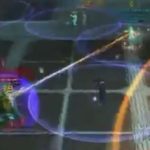
We have a habit of orienting the Blaster cone on the exit side and walking Master to the other side for the first laser beam, then up / down for the next ones:
- The second laser will be performed on the grid side (since the circle appears on the empty side). To do this, you have to kitter Master as close as possible to the grid then go back along the circle on the entry side in order to leave room for a DPS to insert itself to take the charges of the laser.
- The third laser will be carried out on the empty side. In this position, the 2 Tanks end up almost side by side, ready to switch as soon as the twentieth stack is deposited.
- The red bands intervene between the second and third ray, the time that Master reaches his position, it is very likely that the wheel of fire crosses the raid a little, do not panic.
The whole of the "rays" being made in 2, we will share 10 stacks on each person in 2 times.
It goes something like this:
Healer side, special attention is requested here, the damage on this boss is largely predictable and it will be necessary to constantly juggle between the Blaster Tank, that of the Master and the DPS taking the charges depending on the class played.
- When Master goes down, he launches his attack 6 times while Blaster is in "white strike" mode, it is important to quickly raise the master tank just before the start of the fire wheel.
- When Master makes his wheel of fire, Blaster cleaves, so Blaster's tank will take the majority of the damage. The heal must be refocused on the latter.
- At the end of the fire wheel, Master makes his laser beam and except for an immune sorcerer, you must refocus your healing on the person taking the stacks, keeping the bulk of the healing for the last 3-4. As soon as the person receiving the stacks changes, care must follow.
- The end of the laser means that we will have to return to the blaster tank which will start taking the majority of the damage again - be careful not to lose the thread between the switches.
Obviously, you should not completely stop healing the rest of the raid as well as the other tank, but it is the "focus heal" which are pointed here and which will prevent you from seeing a tank get vaporized.
If your dps is good enough, it is possible to phase master before the appearance of the second triplet of red bands, otherwise do not weaken and respect the positions.
The red bands, precisely, are often the scene of an organized brothel, it is important to remain lucid when the red bands appear so as not to find yourself in a complex situation:
- Either way, KEEP YOUR SAFETY DISTANCES is most important.
- If you are in a hurry and it will be too late to go out anyway, don't panic, stop running in all directions, activate a defensive power, prepare the medipac and take the chouquette.
- During the third band, Blaster activates his electro blaster which has the effect of triggering all the remaining explosive probes and making you jump in place. Usually this one is messed up, try to save your movement powers for the third set!
- In general, try to always stay as close to the center as possible. If the safety zone is on the gate side, do not make love to her, stay as close as possible to the red strip, without disturbing your friends of course!
In terms of the distribution of our DPS, the 2 players sharing the shelves with the Tanks take care of the Master since logically most often within range. The other 2 DPS deal with Blaster.
Blaster phase has 23% and does not trigger Phase 3.
Master Phase has 50% and triggers Phase 3 regardless of Blaster's health. The ideal is therefore to bring the closest Blaster to 23% when Master phase.
If you have an imbalance in your DPS, you are free to modify the attributions. It is possible to start at 2/2 then switch to 3/1 after the first red bands.
Phase 3
If you've made it this far but Blaster and Master still resist, persevere, you're really not very far from falling.
This phase is by far the easiest, but still requires not doing just anything.
We usually place 3 DPS on Blaster and only one on Master, a matter of preferences but the choice is free as long as you respect two things:
- Blaster should NEVER reach 9% before Master
- Blaster must not have too much health remaining when Master passes 9%
This results in a rather simplistic strategy which consists of lowering Blaster down to 12/13%, the Tank will continue to lower it, taking care not to phase it.
The set of DPS then switches to Master until he dies and then it suffices to finish Blaster.
In order to avoid being miserably ejected into space, it is necessary to obtain Master's debuff. But unlike the Story mode, this debuff comes with another debuff, cumulative this one, which increases the overall damage per unit.
Therefore, and to prevent the entire raid from ending up being OS by the Shock, it is important to return master to the raid ONLY to restore the debuff and to be quick in the execution. The fewer superfluous charges the raid will have, the longer you can hold out.
At the start of the phase, all players, including the Blaster Tank, must group together in the same place in order to facilitate watering. Any player who still has an explosive probe must get as close as possible but no one must set foot in his circle on pain of ejection during the explosion.
One essential point remains ... sooner or later, you have to make a boss exchange between your 2 Tanks. We exchange when the Master Tank has 30 charges, it is possible to climb higher but the risk remains high.
Another strategy can be used: if you still have the Ground in combat, you can let the other Tank go as high as possible and die as a hero. Once resuscitated, he will be able to resume Master as if nothing had happened, these charges having returned to 0. It is a little cheap solution, but which allows, in case of a little low DPS to extend the life of your Tank (but if you are light in dps here, you will never fall into Ruugar so hey… it does not stay great).
Tips and tricks
In bulk:
- Energy Shield is an excellent defensive power against Bombing if you fail to get out of it, it will greatly reduce your damage
- Entrenchment and / or Evasion while in cover also greatly reduces damage from Bombardment.
- Evasion absorbs 6 and 5 charges from the beam respectively without taking any damage - to be used on the last charges
- Explosive Fuel, Saber Return can dodge one or more charges for the duration.
- A Marauder, by accumulating Force Camouflage and Eternal Rage (and possibly Saber Return?) Is able to withstand the 20 charges of the ray. Some guilds with 2 marauders never did a switch tank and let the 2 marauders take turns taking turns.
- With the Shroud, the Assassin can take 10 charges. The Shroud should logically negate the damage from the Bombardment, but I have never been able to verify it.
- Many powers with the right use can greatly reduce the damage of Bombing: Stim boost, Sorcerer desaggro, 30% area damage reduction etc etc ... read your uses!
- It is possible to use your Hydraulic Manipulations / Entrenchments to deliberately trigger the explosive probes and get rid of them. Causes double damage to 2 players.
- In Phase 3: prohibition to use your Hydraulic Manipulations / Entrenchments as well as the Release under penalty of dispelling the debuff which keeps you on the ground. Death assured!


