


Good morning all ! This is Pure Heart Migori Rorviori'Ardivi -how does an Imperial always have to be mean? In this guide, I will introduce you to the Secret Agent class specializing in Concealment. First, I will explain resource management. I will start in the second part of the DPS. I will continue on the talent tree. I will finally continue with some advice on statistics.
Guide updated on 14/02
Summary (click on the link to go directly to the part):

I. Presentation of the concealment special
II. Resources
III. DPS part
III.1. Cycle DPS monocible
III.2. Cycle DPS multicible
III.3. Situational powers
IV. Talent tree
V. Statistics
VI. Consumables in combat
Presentation of the Concealment specialization
The Secret Agent is a stealth class. He makes himself invisible to enemy eyes, ready to strike his target in the back with poisoned stab wounds to kill them quickly. Stealth is calculated based on clues. One of our Undercover Agent talent improves the base index by 3 points, making us more difficult to detect. Techniques like the Camouflage Screen and In Hiding can significantly increase this clue to make us almost undetectable - the only time we can be detectable is to dance right in front of the target's eyes. Finally, one of our Lighting talents increases our stealth detection by 2 points.
His weapons of choice are the blaster rifle and the vibration knife. Thanks to these weapons, the secret agent who is a specialist in melee (or cac in the vocabulary) can very well shoot from a distance when his target moves away.
Finally, a special feature unique to the Imperial Agent is the cover. Once your enemy is targeted, as soon as you see a green icon behind an element of the scenery you can, by pressing the F key by default (or Shift + F to stay in place), hide behind this element. This pose has 2 advantages:
- The first is that it gives you a chance to dodge enemy blaster shots. You're in cover, and their shots will ricochet behind your makeshift protection.
- The second is that you unlock a new action bar which will overlap with the old one, and which allows you to use powers that necessarily require this pose. Such as the call to the explosive probe or to prepare a sniper fire by aiming the laser beam at the enemy.
Resources
Our main resource is energy. At the start of the fight, we have 100 energy points. Almost all techniques require energy. It regenerates at a rate of 5 units per second. There are however 2 steps:
- If you expend your energy and it drops below 60 units, you only regenerate 3 per second.
- If you drop below 20 units, you only regenerate 2 per second.
The goal is therefore as much as possible to avoid falling below 60 energy so that it always regenerates at the maximum rate and that you do not run out of resources. Some powers make it possible to increase the energy gain over time, this is the case with amplified Stim.

The secondary resource is the tactical advantage (which I abbreviate AT). Slash, Hidden Strike, and kill an enemy powers grant a charge. It increases damage dealt by 2% and stacks twice, but only lasts 2 seconds.
Additionally, it allows the use of offensive and defensive powers that require and consume TA. The goal, to always inflict the most damage, is to manage this resource. And to manage the tactical advantage well, you have to know how to try to always keep 2 charges to inflict 4% more damage, or at least 1 charge. It is far from obvious.
DPS part
1- DpS cycle in single target
1-1 Order of priority and rotation
Always open with hidden strike (to be associated with Acid blade.
- Rifle shooting if you are under 70 energy
- Taillade (For TA which will allow amplified Stim)
- Amplified stimulation (to refresh)
- Dagger in the back (to associate with Acid blade)
- Corrosive dart (to refresh)
- Taillade (For the AT which will allow Laceration)
- Laceration
- Explosive probe
1-2 In detail
 The rotation of secret agent concealment techniques is demanding. We always start with a hidden strike that we associate with Acid Blade. This allows you to inflict damage, get an AT charge and have the enhancement of armor penetration + 30%. Keep the Tactical Advantage on you at all times (this is why you must launch a Slash as soon as the technique is available to refresh the AT). Use as much as the cooldown of Back Dagger with Acid Blade allows to deal damage and refresh your armor piercing upgrade. You must have previously cast Corrosive Dart before performing Laceration on your target for your Collateral Strike to restore 1 charge of AT if it triggers. Finally, Explosive Probe is a more anecdotal power, to be used when energy permits. Finally, a secondary technique but present in the dps cycle is Explosive Shot. This technique is part with Rifle shooting of the school "at distance" therefore subject to the heading touch (100% index touch) and can be dodged / deflected (110%). You can use it to replace Rifle Shot when you are over 80 Energy.
The techniques are still expensive in energy. Using them as soon as their cooldown has expired is not easy. I also recall that the tactical advantage provides + 2% damage on each charge, which is why, ideally, we should keep 1 charge at all times. And that way, Lacerate is only usable occasionally (unless you can't get behind the target). If you want to use a technique that requires AT, Slash right before to get 2 charges, so you'll keep one after. It's quite tricky to manage.
2- Cycle DpS multicibles
- Orbital Strike: Available at level 48 and dealing massive area damage.
- Frag Grenade
- Slash: to have 1 AT charge that will allow the burst
- Rifle burst
3 - Situational powers
These powers are not part of the DpS cycle. We use them to react according to the situation. They include crowd control powers, defensive powers, and offensive powers.
3-1 Crowd control powers
Soporific dart. Can only be used on a non-combat target. Kills him for 60 sec or 6 sec for a PvP target. Any damage wakes her up. Range: 10m. Cost: 20 energy.
Droid hacking. This power allows you to control a droid whether it is in combat or not for 60 sec. However, the droid is healed every second. Range: 30m.
Tendon cutter. The target is slowed for 12 sec and thanks to the Freeze talent it is immobilized for 2 sec. Range: 10m. CD: 12 sec. Cost: 10 energy. Techno power.
Weakening. Stuns the target for 3 sec. Range: 4m. CD: 45 sec. Cost: 10 energy. Techno power.
3-2 Defensive powers
Shield probe. Shield absorbing an intermediate amount of damage. CD: 45 sec.
 Countermeasures. Reduces your aggro against the enemy target (excluding PvP). CD: 45 sec.
Evasion. Allows you to dodge all enemy actions for 3 sec. Don't break stealth, so you can pair it with the camouflage screen. Avoidance training also removes any effect affecting movement when using evasion. CD: 1min.
Camouflage screen. Allows you to quit combat and enter enhanced stealth mode. In PvE combat, negate any level of animosity a monster has towards you. Thanks to the Advanced Camouflage and Energy Screen talents, the cd is reduced by 1min, the movement speed of the improved stealth buff is increased by 50%, and you no longer suffer the 100% reduction penalty for healing received. CD: 2 min with talent.
Exhaust. Free from all cc. Assign a shortcut on this power, it is useful in countless situations. CD: 2 min.
Blinding Grenade. Blind all enemies within 5m of impact for 8sec. Any damage negates the effect. Range: 10m. CD: 1 min. Cost: 10 energy.
3-3 Offensive powers
Infiltration. Sneaks the party within 10m of us for 15 sec. CD: 3 min.
In hiding. This power, which can be used in stealth mode, increases his stealth rating by 15 points, making it almost undetectable
Distraction. I strongly recommend assigning a hot key on this power. It cuts off a skill while casting and prevents that unique skill from being re-cast for 4 sec. It allows you to counter a wizard who would like to chain cast Lightning Force to you, to cut a healer swinging his big heal or to counter a sniper who would have fun sniping ... It can especially be essential on a boss to prevent a boss from using a power that could be fatal! Range: 10m. CD: 12 sec.
Adrenaline probe. Restores 50 energy over 3 sec. CD: 2 min. The advice I could give about its use would be to use the Adrenaline Probe rather after the burst phase (ie the phase where we must do the maximum damage in a min of time). This phase is the only time when we do not care much about energy, we have to send heavy. We often end up with very little energy. An adrenaline probe and we can leave alone at dps.
Camouflage screen. The technique can be used to restart the fight by regaining an advantage over his opponent. In PvE, use this technique during a burst phase, where you must send the maximum damage in a short time. Coupled with the Acid Blade + Hidden Strike combo, you will reset the armor piercing buff, stick a DOT with Acid Blade and gain a Tactical Advantage charge with the Hidden Strike. Enough to start your phase.
Talent trees
1- HL PvE Templates
Here is a talent tree intended to do more damage in high level PvE. It is built like this: Template PvE HL
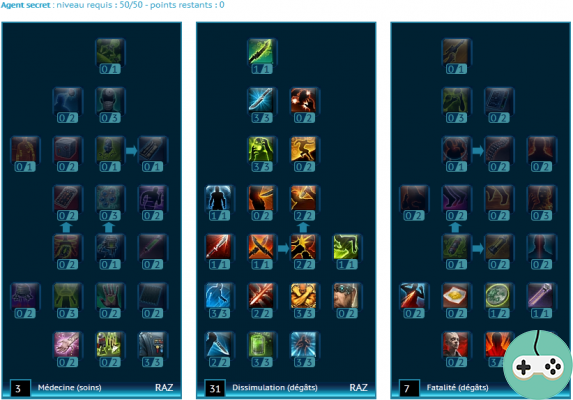
Survival training: 3 points are to be distributed at the 4th level after taking the tactical opportunity. From a high level perspective, it is always very appreciable to benefit from a bonus to the care received. This concerns the care of the amplified stim but especially the care received from the healers, who will have less to do to get you back in shape. Among the choices of optional talents, this is the most suitable.
Rigorous conditioning: is another apt talent. In high level raids it is essential to have a lot of health in order to survive better. This talent adds to it.
Undercover agent: This talent is mandatory because, beyond the stealth aspect, it mainly allows you to increase your movement speed by 15%. For cac it is essential. We have to catch up with a target, get back to the boss's cac quickly, and so on.
Energy screen: Useful for its energy supply.
Other talents add directly to DPS. At level 2 of the Fatality branch I put 1 point in Corrosive microbe and 1 point in Fatal injection. The theorists of the game recommend this choice because it adds to your gain of dps a comfort of play with your DoT Corrosive dart which passes to 21sec instead of 18, that is to say 1 more tick. The 2 point variant in Corrosive Microbes is very good though, it would even add more DPS. The choice is therefore according to your style of play.
2- Solo and PvP template
Here is a template designed to do everything, for leveling up, to do battlefields or some Flashpoints: Template Solo / PvP

A lot of points change compared to the template above. This is particularly the case for the 4th level, where we will continue the line with Freeze which will allow the target to be immobilized for 2 seconds with Tendon Cutter and no longer take Rigorous Conditioning and Survival Training.
Instead, we will favor Advanced Camouflage which is a must-have in all situations, and Detonating Strike which allows you to engage your target well.
And for the 2nd level branch of fatality with The Eel, where we will reduce the CD of Embrittlement to bring it back to 30 sec and increase its movement speed by 15% when used.
Statistics
The Secret Agent's primary stat is Hack. The hint increases all damage dealt and increases the chance to get a critical hit.
 With no in-game dummies and the ability to install Recount-like add-ons to actually test math calculations, it's very difficult to figure out which stat is best for you. SWTOR is very complex on statistics. I tell you what I know about the stats, by looking at various English sites, specialists in this field.
Hit Index: Increases your chance to hit. Basic, with the techniques of the 'techno' school we have 100% of hitting our target. The interest of this stat is for our techniques of the 'ranged' school including Rifle shooting among others. we have 90% of hitting our target and have a 15-20% chance of being dodged or deflected. Since Rifle Shooting is central in our dps cycle, it is recommended to reach the cap (the threshold ) which we will hit our target in. Don't overlook this stat, 1 point would add much more damage than any other secondary stat.
Critical Rating: Increases your chance to land a critical hit with your attacks. Basically, you have a 14.26% chance to deal a critical strike. Add our imperial agent improvement which adds 5%. That's a good base amount that we have.
Surge Index: Increases the damage of critical hits you deal. Basically, we increase this damage by 50%.
Potency Index: Increases all of your "ranged" and "tech" damage.
Alacrity index: the value that is really useless. This reduces the casting time of powers like Kolto Injection or Sniping. Anecdotal.
Priority order
According to game theorists (abbreviated as TC),
Hit 100%> Hint> Crit = Surge> Power.
This would mean that it is recommended to increase your touch up to 100%, to particularly like the tip, the critical index and the surge index and to let go of the potency. TCs estimate that the criticism rate is around 30% and the influx rate is around 80%.
However, their data seems outdated by what we find in the game. In addition, the influx index will be modified in patch 1.1.3, raising the question of the order of priority.
What I am going to quote is only my opinion, after reflection. It consists in advancing the schmilblik. Do not hesitate to comment.
I note the total of each stat present on the Columi "executor" type equipment by counting the weapons "No regrets" and "Project Claw", we bring to +1156 tip, +475 power, +366 hit, +144 influx and 96 crit. On the "Executor" PvP gear, we also find a lot of touch and power.
It's pretty self-explanatory. The equipment in play clearly tells us to particularly like the power that will allow us to inflict explosive damage coupled with our critical rate of around 25% (with Coordination) and the touch whose around 366 expresses a touch cap. at 105-110% likely. This corresponds to the amount needed to no longer be dodged / deflected from a Rifle Shot. This technique is used a lot in the dps cycle, so if you don't hit your target when you shoot, you lose the GCD used and potential damage. This is why touch is essential, more than increasing power. The influx is more present than the critical, which we can clearly do without, because once again we have a high rate of chance to inflict a base critical hit, with the hint and the buff. Improving the influx is to increase the damage of rather regular critical hits and more significantly increase the DPS.
Suddenly the order of priority of the stats would give this: Tip> Hit 100% at least and up to 110% to reach the threshold> Power> Surge> Crit
Consumables in combat
1- Stimpack
From biochemists. If you are not, you will have to go through the galactic market. Skill and Affiliate Stim Rakata should be taken which increases the trick.
2- Dopant
We will focus on power with Dopant Rakata attack and affiliate.
Thanks for reading this guide, hope you find it helpful. Do not hesitate to comment, if you have any questions or remarks.


