


First of all I introduce myself: Tilchet member of the Guilds Raiders on the Darth Nihilus Server. Our current PvE progress (as of October 18, 2012) can be summed up simply, we are on the 3rd Terror boss from elsewhere on a raid 16. This therefore implies that the rest of the HM has already been clean.

The little guide that will follow revolves around the assassin tank in order to do PvE on the largest instances (HM Explosive Conflict - Terror from elsewhere HM - Coming soon Explosive Conflict Nightmare).
The assassin tank is the only tank with light armor. This therefore imposes a different style of play compared to a Specialist or a Ravager. Indeed, due to this lack, the assassin plays on his personal healing (low but to be taken into account all the same) but also on his chances of triggering a shield that can easily be boosted. We can also note that the assassin has a capacity to tank over 10 meters. Finally do not forget to engage the Dark Charge if you want to turn to tanking.
- template
- Fighting techniques
- Tanking
- Statistics and equipment
template
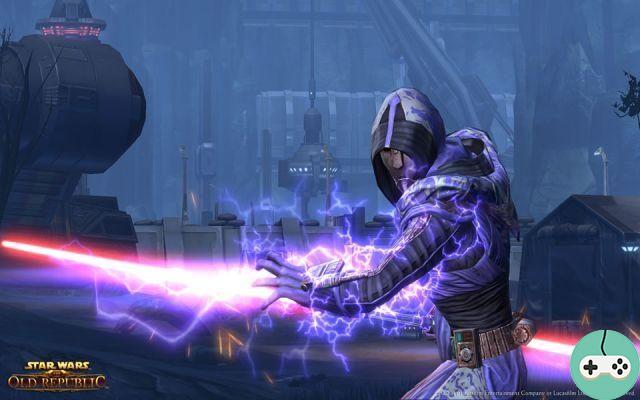
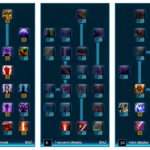
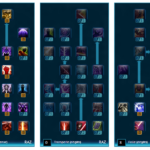
The primary talent tree, used by the assassin tank, is the Darkness tree. To this we will add points in the Madness route. Two talent trees are viable. We find the classic 31/0/10 but we can also turn to 33/0/8 or 31/2/8 for strength regeneration:
- 31/0/10
- 31/2/8
- 33/0/8

Other possibilities are possible and should be. There is no such thing as a typical talent tree, everyone builds it the way they want.
Fighting Techniques
We will start by detailing a little the important spells for tanking.
at. The taunts
The assassin tank has two taunts at its disposal:
- Single Target: Mind Control (Cooldown 15sec)
- Multi-target: Mass Mind Control (Cooldown 45sec)
b. Controls
- Spike: Stuns your target for 2sec (can be followed by Tumult).
- Force Pull: pulls mobs towards you.
- Overload: KB the target.
- Mind trap: puts the target to sleep (sap). Can only be used in stealth and on a non-combat target.
- Shock: Interrupts the target.
vs. Defense spells
- Force Speed: Activating it allows you to remove all effects affecting your movement speed
- Shroud of Force: Dispels all negatable hostile effects and grants 100% resistance to Force and Tech attacks for 5sec
- Unwavering Will: Unleashes all crippling effects.
- Dark Zone: Increases the chance to trigger the shield by 20% for 8sec or 15 stacks. (A refresh when there is a charge left or before the 20sec ends.)
- Deflection: Increases melee and ranged defense by 50% for 12sec.
- Advanced Saber Charge: with the points put in you get: Instant recovery of 10% of your life.
Tanking
Now it's time for the most important part in order to keep your target: which cycle to perform, how to pull mob packs / a boss?
First of all, before even pulling a pack, I advise you to activate the Dark Zone. This allows you to have your shield proc chance increased by 15% from the start. Which is far from negligible when we know that the assassin tank is in light armor.

So the basic rotation is:
Tanking multicible :
Dark Zone -> Withering -> Laceration -> Discharge -> Withering -> Overload (Watch out for his KB) -> Saber strike if force <30%
In multi-target, I recommend playing on withering for several reasons:
- maintains agro on all targets (in case some dps have the idea of hitting other mobs than the tank)
- multiple mobs hitting us, withering decreases damage dealt by targets in the withering zone by 5%.
Tanking monocible :
Dark Zone -> Shock -> Wither -> Discharge -> Kill if target's health <30% -> Shock -> Recklessness -> Force Bolt -> Fixed -> Saber Strike if force <30%
Statistics and equipment
The essential statistics
The basic class stats are Stamina and Willpower:
- Endurance: increase your life
- Willpower: Increases force attacks, this is the dominant stat of the Sith Inquisitor.
Other stats of interest are Shield Absorption, Armor, Defense Chance, Shield Trigger Chance, Accuracy. Our priority of choice will be:
- Endurance> Willpower. Firstly.
- Shield> Absorption> Defense. On the other hand.
I advocate this model for several reasons: the first CDD when you receive a hit is defense. The second will decide whether or not your shield goes off. And then the last one will determine how much damage this one will absorb.
The basic statistics are:
- Damage reduction: 2%
- Defense: 15,65% (10% base + 1.65% Defense Index + 4% Lightning Reflexes)
- Shield: 35% (15% Dark Charges + 15% Dark Zone)
- Absorption: 24% (20% base + 4% sinkhole)
Thus we will seek to achieve the following statistics:
- Damage reduction ~ 40%
- Defense> = 25% (28% max)
- Shield> 50% (By counting the Dark Zone proc for an opti 61 otherwise without the Dark Zone proc for a 63). We must therefore aim for the 70% chance of triggering via Dark Zone
- Absorption> 50% (You can easily go higher.)
Curve:

Detailed curve:

Equipment
First of all, you must try to "cap" yourself with the basic equipment and this by moving the various modifications and sophistication if necessary. By that I mean, do not absolutely seek to cap you with the improvements. These are just a bonus and depending on the choices you have made for your gear, you will be going on more upgrades than necessary.
The optimization between 61 and 63 changes slightly. So we can either start on [tor = bf2zjri] full endu / power [/ tor] or on a mix [tor = 7BAeUwp] Abso / power [/ tor] + [tor = 8DERZtR] Shield / power [/ tor].
Indeed the ratio between each stat of the campaign to the Dread Guard changes. It's up to you to take a good look at the mods and sophi 63:
Modification:
- Advanced Robust Mod 27
- Advanced Robust Mod 27B
- Advanced Reinforced Mod 27
- Advanced Reinforced Mod 27B
Sophistication:
- Advanced Vigilant Enhancement 27
- Advanced Bulwark Enhancement 27
- Advanced Steadfast Enhancement 27
Here is what we can get:

This is based on my personal optimization and what I'm looking for with the assassin tank (note that for defense you have to add 4%).

A little more detail on the equipment:
With the possibility of making between 60 and 80 Black Hole distinctions depending on your PvE progress, it is no longer necessary to want to prioritize implants and the Rakata headset. Skipping straight to the Black Hole Duelist Type 1 Implant will bring you many more interesting stats.
For the higher level, it depends on your optimization, you can mix the statistics, but I advise you to go through the Implant Type 2 of Duelist Hazmat.
Relic: The War Hero +113 Defense Relic is highly recommended. For the second relic, remember to carry out your daily newspapers in order to quickly recover the Dread Guard relics (300 marks against 200 marks for the Campaigns)
Stim: Endu / Defense
Doping: An Armor dope is always good to have in your bag to have an extra defensive CD. A power dopant can also be considered in order to have a burst moment.
Thank you for taking the time to read me and invite you to participate in order to further complete our knowledge of the assassin. I also invite you to drop by our forum if you feel like it.
See you soon in game!


