


We take the same composition of editors and deliver the Draxus guide to you.
As a reminder, the editors are: Keros (guild Kraken), Nidia & Kyumz (Goodfellas guild) and Tigroou (guide the Guardians of Anachore).
As with Nefra, we will remind you of the HM mode and the modifications of the Nightmare mode.
Rappel du HM
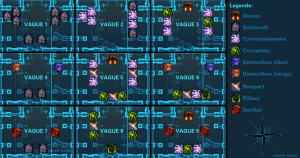
The waves of ads are exactly the same in HM and Nightmare, namely:
New mechanics
Each new wave appears either in relation to the death of the last add of the previous phase, or on a timer (whichever comes first).
- Draxus, when present, randomly draws a person to him.
- Each person can only interrupt the corrupters once per phase (debuff on the person who causes you to die instantly on the second interrupt).
- Subteroths put in a debuff that increases damage taken when exploding.
- The raider heals in a not insignificant way: he casts a chain spell which, if not interrupted, completely revives the life of all the other enemies in the room.
- The ramparts prevent people under their shields from receiving care.
- At the end of the shield channel, the ramparts go into mini-enrage and inflict fairly significant damage (around 13k).
- The Guardian Cone kills anyone in it (except tanks and DPS under heavy defensive spell).
- On the last phase, the boss can only be tapped if all of the adds are dead.
Pullover
Burst phase on the boss to make him go up quickly.
Be careful for the distant ones not to be too close to each other for the corrosive grenade, the melee can be put at 4 meters each, it seems the minimum not to take the grenade of an ally.
Phase 1
When the boss goes up, the first wave is made up of eight Subteroths : Three on each side and two at the back of the room.
Different methods come together to manage them:
- Each player takes an add and moves away from the others to make it explode. Then, remote DPS helps tanks and healers finish theirs while melee DPS waits.
- When you have one or more Vanguards, you can use their ranged mass taunts when the adds are at half life. During travel time, you can kill them and so no one will take the debuff.
tips
- The Assassin's Shadow Resilience / Shroud of Strength allows them to take no damage or debuff. We can thus imagine a strategy where the Shadow / Assassin tank takes the eight subteroths which explode at the same time during the Resilience. I do not recommend it because it is a little too random on the DPS of adds.
- The Guardian / Ravager's Saber Reflection is slightly different. The damage is not taken by the Guardian but he does take the debuff anyway.
Phase 2
The left group is made up of three Commissionaires, a group of four people (a tank, two DPS and a healer) are assigned to implode this group.
The group on the right is made up of two Commissionaires and two Subteroths, the remaining four people must destroy them.
There is no difference with the HM on this wave.
Phase 3
The boss returns, he is taken over by the tanks.
The DPS keep their right / left distribution as in the previous phase.
There are two Commissionaires et a Corruptor on each side. The Corruptor is the priority target. Please note that each person can only make one interruption on the Corrupters.
We leave a Commissioner alive on one side to have time to bring up the boss before the appearance of the next wave.
Phase 4
A dismantler on each side.
The one on the right hits harder than the one on the left.
The management remains the same as in HM. To avoid the deaths, a tank resumes after the bump.
For people who took the dismantlers, remember to use an anti-animosity spell so as not to take it back!
Phase 5
This wave is quite critical. She is composed :
- d'a rampart et two Commissionaires on each side.
- d'a rampart et two Corruptors South.
- from the Boss to the north
The attribution of each person is important and must be respected:
- The main tank is assigned to Draxus
- The second tank performs the first interruption on the Corrupteur 1
- A DPS from the left group stays on its side to kill the left group. He concentrated on the Rempart first and then on the two Commissionaires. Be careful, as long as the Rampart is alive, it cannot be healed. He must announce the death of the Rempart.
- A DPS from the right group remains on its side to kill the right group. He focuses on the Rempart first and then on UN commission agent. He therefore leaves a Commissionaire alive. Be careful, as long as the Rampart is alive, it cannot be healed. He must announce the death of the rampart.
- The remaining two DPS must be to the south. Their primary target is the Corruptor 2. A DPS performs the first interrupt. At the death of this one, he concentrates on the Corruptor 1 and the second DPS performs the second interrupt. The last target is the Rampart.
- Healers do not have special assignments. As soon as the Ramparts have fallen (and announced dead), they must heal the DPS.
By following this attribution, you will therefore have one Commissionaire on the right (it can be left eh).
When each DPS has finished its allocation, it switches to Draxus.
Ideally, it should be brought up to this point before wave 6 begins. Inspiration and offensive spells must be used on this phase.
Phase 6
Wave 6 is certainly the toughest of this fight. She is composed :
- D'a dismantler to the left
- D'a dismantler to the right
- D'a Corruptor, D 'a Pillager, D 'a Commissionaire and D'a rampart South
- D'a Commissionaire on one side.
- From the Boss if he has not gone back to P5
There are different strategies for managing this phase. The Kraken and the Freed make a generalist strategy that works with all groups. The Guardians of Anachore strategy is based on Resilience / Shadow Force Shroud / Assassin.
Here are the three strategies:
- Strat Kraken
- Freedoms Strat
- Shadow Tank Strat
First, here is the Kraken Guild's strategy:
- The first tank is on the boss if it is still present. As soon as he is released, he will resume Dismantler 1 (left) after his incantation.
- The second tank takes the Dgrinder 1 (left) and take it back Dismantler 2 (right) after his first incantation
- A healer is free from any attribution
- The second healer must take the Dismantler 2 (right) and do his anti-animosity spell after the incantation.
- A DPS (rather a CaC) stays on the boss until he goes up then goes to the dome in the back (charges on the shield or on the messenger) and helps interrupt the corrupter.
- A (rather distant) DPS passes on the pillager and interrupts the healing spell. It then passes over the Dismantler 2 starting with the one on the right which will be marked. When his interrupt spell returns, he will have to do so on the Corruptor.
- A DPS (CaC or remote) focuses on the Corruptor then on the Bulwark. It performs the second interrupt on the Corruptor if necessary.
- A (rather distant) DPS performs the first interrupt on the Corruptor and then focuses on the Pillager. Once dead, he hits it Dismantler 2
Secondly, the strategy of the Affranchis guild
- The first tank on the boss if present. He will then resume the Démanteleuses on the first incantation.
- The second tank with an 8 second interrupt spell focuses on the Pillager.
- Each DPS (rather CaC) takes a Dismantler. Don't forget the Pacification / Evasions on this one if you are Sentinels / Marauders.
- The distant DPS are to the south. They focus on the Rempart. They must organize themselves to make the interrupts on the Corruptor. Once the Bulwark is dead, they kill the Corruptor before the end of his third cast.
- The healers have no special attribution.
Here is the strategy of the Guardians of Anachore. It is based on the ability of the Shadow / Assassin tank to take under Resilience / Force Shroud the first incantation of the TWO Dismantlers and to do its Force Occultation (exit from combat) after having taken the second incantation of the Dismantlers:
- The first tank is on the boss if present.
- The second tank (Shadow / Assassin) takes aggro from the two Dismantlers. On their first cast, he must use his Resilience / Force Occult so as not to take the spell's debuff or damage. On their second cast, the Shadow / Assassin tank takes damage and the double debuff and performs its Force Occult to exit combat. The Dismantlers will turn on members of the raid (probably the healers if no DPS is on them).
- Two DPS focus on the Corruptor and perform the interrupts. They then pass on the Démanteleuses.
- Two DPS are on the Pillager and perform the interrupts. They subsequently kill the Rampart and then the Démanteleuses.
Phase 7
Wave 7 is made up of two Guardians and two Subteroths.
The management of these is as follows:
- The first tank takes the Guardian on the left and leaves far from the raid (about 30 meters). This prevents him from jumping on a raid member to do his spells.
- The second tank takes the Guardian on the right who will be the priority target for DPS.
- The DPS is concentrated on the Guardian on the right then on the left and finally on the Subteroths. Do not forget the Pacifications / Evasions for the Sentinels / Marauders as well as the diversion for the Maverick / Marksman / Precision Marauder / Ranged shooting.
- The healers come together and adjust the care as needed.
When only the Subteroths are left, the party must position themselves for wave 8.
Phase 8
This wave is made up of:
- D'a Pillager South
- De two Corruptors and D'a rampart by side
The attribution of each person is as follows:
- The tanks are on the Pillager at the back and organize themselves to perform the interruptions.
- A healer is on the left to interrupt the Corruptor on the wall side.
- A healer is on the right to interrupt the Corruptor on the wall side.
- Two DPS are present on each side. They focus on the Corruptor on the pylon side. One of the DPS performs the first interrupt. The second DPS will perform its interrupt on the Corruptor on the wall side when it does its second cast (if it does).
This wave is really not difficult. It is enough just to respect its attribution.
Phase 9
This is the final wave:
- The boss in the center of the room.
- Two Guardians in the center of the room.
- A Corruptor et two Commissionaires South.
The attribution of each is as follows:
- The main tank on the boss
- The second tank takes the two Guardians and takes them far (30 meters)
- A healer is concerned about the tank on Draxus
- The other healer handles the rest of the raid.
- The DPS are in the south to implode the pack (beware of the Corruptor anyway) then focus on a Guardian, then on the second and finally the boss.
Phase 10
All you have to do is take the loot. If you are lucky you will have a superb Subteroth that will follow you throughout your blah blah adventure. What a reward ...
Videos
Here are different videos like for Nefra. Tank, CaC and Distant Povs are provided by the Freedmen guild. The Healer Pov by Keros of the Krakens. Finally the last video was filmed by myself: a down where everything is going too well?
- Tank
- Body to Body
- Distant
- Healer
- Distant GDA
Thank you for reading this guide. Please make your comments after reading the entire guide.
See you next week for Grob.


