


We meet again this week with the guide of Calphayus. This is the third boss of the Dread Palace. He is certainly the simplest boss of the instance.
This boss does not require a crazy DPS but a fairly precise organization.
HM reminders:
This fight is very simple. It is a sequence of phases described below. To access these Past / Future phases, all you have to do is place yourself in the appropriate areas (orange and blue respectively) within the allotted time.
The placement of the group is relatively free in HM. The only need is that only the tank is in front of the boss. During his incantation, he will put a debuff on it. He'll kill him if he touches it up. The tank switch is therefore necessary. Taking damage from the red zone will also kill anyone with the boss's debuff, so be careful with your placement.
The fight takes place in 6 phases:
- Present: Unique boss, tank switch with each cast
- Past / Future:
- Past: The party must defend a seed from the Pillagers and Reavers that appear. They must plant the seed in the place indicated by the future.
- Future: The group must demolish the boss and enemy spawns (not to be specified)
- Return to the present: same as 1.
- Past / Future:
- Past: The party must destroy the announced crystal in the future.
- Future: The boss jumps on a crystal and makes it disappear. The group must announce this crystal.
- Present: Same as 1 and 3.
- Past / Future:
- Past: A crystal is to be collected at the back of the room and to be placed next to the throne in the present. The carrier is strongly slowed down. A class with a movement bonus is recommended.
- Future: The group waits for the crystal to be placed in order to demolish the boss.
Notable difference with the Nightmare:
This fight differs very little from the HM. However, some changes will significantly alter the practices of some guilds.
The red zone is really ripping off now. A healer will need to focus on it for the duration of the debuff. If a second player is hit by the red zone, they are stuck in place for one minute. You must therefore be very careful with your placement to avoid having to manage this kind of situation at all costs!
If the red zone lands on a Scholar, it is advisable to put the Force barrier (whether you are a healer or a DPS).
To work on your investments, you can use the Ballistic shield, it is exactly the same diameter as the red zone.
Main changes:
- Present: At the end of the present phase, the time to access the colored circles is only 5 seconds. A placement of the throne / entrance boss seems the most appropriate to me.
- Past / Future: Purple areas appear. They do little damage and we haven't seen any particular effects associated with them.
- Past: The boss must be shielded in the Past AND Future to be able to plant the seed.
- Future: The timing is tighter to kill enemies.
- Present: Same as 1.
- Past / Future:
- Past: No change except that crystals reflect damage when tapped.
- Future: When the boss jumps on a crystal, a ball of energy appears. You have to kill her before she gets to the boss.
- Present: Same as 1.
- Past / Future / Present: This is the main modified mechanic!
- Past: When taking the crystal, an add (Dread Chain) appears just behind the throne, jumps on the crystal carrier and immobilizes it. He must be killed. The wearer of the crystal has a buff linked to it, if it is not placed before the end of this buff, it is the wipe.
- Present: A Keeper of Knowledge appears. It prevents the laying of the crystal. Once dead, you will have 3 seconds to put the crystal down. Thus it is necessary to coordinate the death of the Guardian and the installation of the crystal.
- Future: The boss must be tanked identically to the HM.
How to distribute when you are in the present phase:
Following the diagram below:
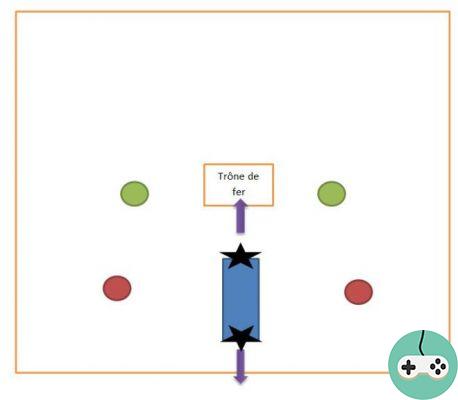
We place the distant ones on the exteriors (in green). The healers rather inward (in red). The tanks place the boss in the center of the room, facing the throne and the entrance alternately.
For the Past / Future distribution, we recommend (but not compulsory):
- Future Group: 1 Tank, 1 healer, 2 DPS rather in Burst special
- Past Group: 1 Tank, 1 healer, 2 DPS rather in AoE special
The distribution in the final phase:
- A group consisting of 3 DPS and a healer go to the past. One person takes the crystal. The others are ready to demolish the enemy that appears behind the throne.
- A DPS remains in the present and lowers the mob to 5%. Just before placing the crystal, he kills the monster.
- In the future is the two tanks and a healer. They take Calphayus and rotate defensive powers.
Depending on the DPS your party is able to provide, you may need to repeat this phase a second time.
Conclusion:
A really simple boss when we managed to do the first two. It's just one more step before Raptus and his challenges.


