


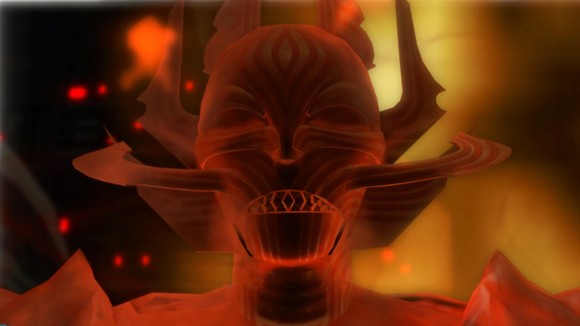
Today we bring you the Guide to Tyrants in Nightmare Mode. This is the second boss of the Dread Palace instance. He is not necessarily difficult and does not require a monstrous DPS compared to Bestia.
We will start by recalling the different mechanics in Hard mode. We will continue with the major changes with the Nightmare and then we will explain the path or rather the logic in this path.
Rappel du HM
- Lightning explosion :
- Spell he throws on his target, when it is hit, the explosion changes direction angle (between 45 ° and 90 °)
- Simplification :
- Apply a debuff on the target tank, then two other people at random
- Furnace :
- Applies a debuff to one / more players which, when completed, applies a bright red circle to their slot. This circle turns into a flame a few seconds later!
- Affliction (Damage over time):
- DoT (green icon) cannot be removed and deals damage every 3 seconds.
- Plate management in the room : it is quite variable and permissive:
- Either the tanks turn around the room and the distant group takes the plates in the center.
- Either the tanks take the plates in the center and the distant ones / Healers take the exteriors
Evolution of these mechanics with the Nightmare:
- Lightning explosion :
- This really hurts and often won't be able to be taken by anyone other than the tank. Be careful with your placements to avoid cleave in the raid!
- Simplification (one on the top aggro list target then two other random ones):
- When you destroy a plaque, you gain a yellow debuff with a skull (same icon as the Nightmare buff). The role of this debuff is simple: you will die if you don't click on the holocron at the bottom of the room. NO TECHNIQUE CAN CHANGE THIS!
- Reminder: when you jump (don't jump but drop otherwise the fall damage is more important) you will lose 33% of your life, be careful of this.
- Attention, the simplifications arise much faster than in HM. It is therefore advisable to anticipate your placement and place them on the slabs where you are. The time taken for the slab to fall is quite long. The people present above therefore have time to go to the next one.
- Furnace :
- It applies to all the members of the raid, it is placed at the top of the room as well as at the bottom (if you put it down the flames will also be at the top of course!)
- For good management, be grouped when it is applied to the ground, you will save space and avoid deaths!
- The furnaces do not begin to take effect until the last of the group has been laid. So you can group them without worries, you can stay in your colleague's red zone until you have lost your own debuff.
- Affliction (Damage over time):
- Tyrants now place two DoTs at the same time and they really hurt!
- Plate management in the room :
- We will devote a whole paragraph to it in order to make you understand the logic.
How do you deal with plates and furnaces on Nightmare Tyrant?
Global description of the checkerboard:
In Nightmare Mode the plates are organized in a sort of bizarre checkerboard pattern.
Below you will find the position of the plates in gray color and the void in white. In this diagram you will find an example of a path.
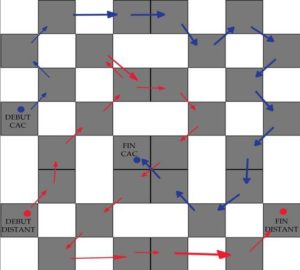
This path is not the only valid one. Many variables are possible and all guilds will have their preferences.
Why this path?
In this fight, the main difficulty is the management of the plates so as not to go out of range of the heals in relation to the tank. The second difficulty is the management of lightning explosions. They should not be oriented on the raid.
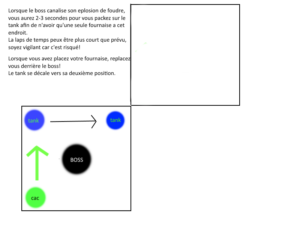
So we split the group into two:
- The first is made up of two tanks and two Cac Dps. They take the outside of the room (blue arrow for example).
- The second is composed of the two heals and the two DPS Distant. He will follow a race with the plates towards the interior of the room (red arrow on the diagram above).
How to manage the simplifications with this path?
Positioning, anticipation and communication are paramount in this fight.
I will take the example of the first simplification.
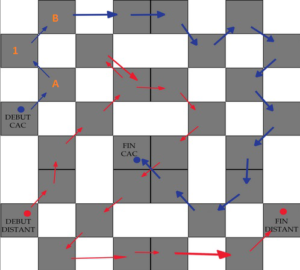
During the first simplification, the tank places the simplification on the "Start Cac" platform.
The second tank will take over the boss on the platform 1 : The advantage of this platform is that it has two other plates in direct communication:
- The platform A is the one to remove if one of the CaC DPS has a simplification.
- The platform B is useful for the tank if the second DPS CaC has the third simplification (it will therefore remove the 1).
This was therefore the management of the simplification for the Cac group. Management for the second group is simpler. It follows the predefined path at first. Of course, the second group has to remove the remaining plates (for example the platform A if still present) if the opportunity arises.
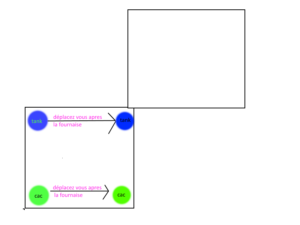
Furnace management:
The first solution is to group the CaC furnaces on one side and that of the tank on the other according to the following diagram. This is the most classic management.
The second is to group the three furnaces (Tank and CaC) on the same point. This requires more precise timing of the lightning explosion. In terms of timing, the cast of the furnace is launched, then a few seconds later, there is the explosion of lightning. Right after that, you can regroup (you have 2 - 3 seconds) to regroup the furnaces. Then it will be necessary to return behind the boss.
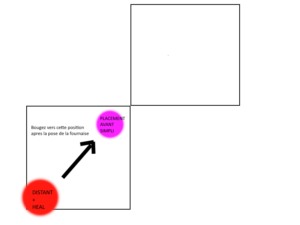
For the remote group, the management of the furnace is as follows:
How to keep the group alive?
The great difficulty of this fight will be to keep your group high enough in health at all times. For this, more than on the previous bosses, it is important to have a complementarity between your two healers. One of the two healers will have to take care of the tanks as a priority, while the other will take care of the whole raid.
The objective is to anticipate the damage taking as much as possible.
For this you must locate:
- The tank with aggro. The tank swichs are plentiful, try not to lose the thread of the fight! Likewise, always watch the replacement of the second tank to make sure you have the range to heal it when it resumes. If not, ask your group to close the gap between the CaC group and the Distant group.
- Players who pose simplification. You know they are going to have to fall and therefore lose a third of their life bar. It is up to you to reassemble them in time if necessary so that they do not perish in the fall and ideally put HoTs on them in order to anticipate the taking of damage.
- Players who have Affliction. This DoT hurts a lot and can overwhelm you quickly. It's up to you to counter it as soon as it appears. Since it cannot be dispelled, you will have to settle for limiting the health drop with your HoTs and Bubbles.
In this fight, healing is everyone's business, so for classes that can, do not hesitate to choose the specialization that will heal you.
You can also take advantage of your Sentinels / Marauders in Juyo to put them in the same group as the tanks as part of an operation. So the care they provide is less likely to end up overheating.
Damage optimization:
Regarding Inspiration, the fight lasts a little over 5 minutes, so you have several choices:
- One in the sweater, the second as soon as available
- Keep it for when the boss is under 30% (burst phase for most classes)
- Use it to help your healers when party life starts to get a little too low.
General conclusions:
- In terms of tanking, the placements must be precise and announced to the healers. In Shadow / Assassin, it looks like the hybrid specialization is better. This is because lightning explosions are area damage.
- An average DPS of 3k200 per player will allow you to kill this boss comfortably. Defensive CDs should be put on for ailments so as not to penalize healers.
- The remote DPS should announce the locations of the furnace / simplification poses to their healers for more convenience.
The fight in videos:
As with each guide, we will offer you different POVs of this fight from different guilds. Each guild has its specificities and preferences.
- Tank
- Cac
- Distant
- Heal
For the moment no Pov Tank but it will not be long.
A first video with a GdA Sentinel Pov:
Here is an FT Pov with a CaC attribution. Our lineup was 1 CaC and 3 distant.
And a second FT Amnesia Pov with remote attribution:
Here is a first video of the Amnesia guild in Pov Malfrat:
And a second of GdA with a Pov Commando:


